Menu Close

Author: changsooeun

How to share your awesome MCGs – MCG Installation and network deployment

MCG had a big changed in 3dsMax 2018. This post is based on 3dsMax 2018+.

One of the biggest changes was Improved MCG Package Installation Experience. Let me just norrow the words from dev.

“In previous versions of MCG, the package installation process of an .mcg file involved the automatic extraction of its contained .maxtool and .maxcompound files into the user’s 3ds Max /Max Creation Graph/Tools/Downloads directory. A consequence of this installation method was that common compounds would often conflict with each other, resulting in duplication messages.

In MCG 2018, we’ve simplified the package installation process to make it much more robust. You can now install a .mcg file by dragging it into the viewport. All installed packages now reside in the user’s 3ds Max 2018/Max Creation Graph/Packages directory, and are evaluated as standalone .mcg files. No more file extraction, no more conflicts, no more problems.”

Basically, 3dsMax will consume .mcg package file directly and use the compound in that package first to avoid compound version conflict. Now .mcg file act much like a plugin dll file.

Packaging MCG

MCG Editor > File > Package Tool Graph… will allow you to package the current tool graph and all compound in a .mcg file.

Installing MCG

It means just copying .mcg file into MCG package folder, and drag and dropping .mcg file into 3dsMax viewport will do that f or you. The MCG packages folder is in your user folder/Autodesk. 2018/2019 shares the same structure. But, 2020 MCG package folder is a slightly different.
C:\Users\[username]\Autodesk\3ds Max 2018\Max Creation Graph\Packages
C:\Users\[username]\Autodesk\3ds Max 2019\Max Creation Graph\Packages
C:\Users\[username]\Autodesk\3ds Max 2020\User Tools\Max Creation Graph\Packages

ProceduralContent.ms

Before I tal about network deployment. I need to mention about this file first. The mCG is implemented with dotnet and Maxscript. The engine is dotnet and UI and communicaion with 3dsMax portion id Maxscript. This means we can actually see the source of many MCG functions which are in C:\Program Files\Autodesk\3ds Max 2020\scripts\Startup\ProceduralContent.ms file. If you dissect this file, you can learn a lot about how MCG is working.

Custom MCG Path

By default, 3dsMax uses the above MCG folders. But, you can also have own custom path for MCGs. RegisterCustomGraphPaths function in ProceduralContentOps struct in  ProceduralContent.ms manages how to set the path.

By default, it is set to use 3dsMax.ini file, C:\Users\[username]\AppData\Local\Autodesk\3dsMax\2020 – 64bit\ENU\3dsMax.ini. You can type getMaxiniFIle() in Maxscript Listener to get your 3dsMax.ini file path

You can add MCG Compound Directories, MCG Tools Directories, MCG Package Directories sections and add path like this.

[MCG Tools Directories]
tools_dir=C:\path\to\my\tools
other_tools=C:\path\to\other\tools
[MCG Compound Directories]
common_compounds=C:\path\to\my\compounds
experimental_compounds=C:\path\to\experimental\compounds
[MCG Package Directories]
networkPackages=\\path\to\network\packages

Custom MCG path without using 3dsMax.ini #1

But, what if you do not want to use 3dsMax.ini. The one way of using own .ini file for MCG path would be modifying ProceduralContent.ms. Open the file,C:\Program Files\Autodesk\3ds Max 2020\scripts\Startup\ProceduralContent.ms, search “getMAXIniFile()”. Then, replace with whatever path you want.

fn RegisterCustomGraphPaths =
(
local iniFile = getMAXIniFile()
local settings = dotNetClass "Viper3dsMaxBridge.Settings"

Custom MCG path without using 3dsMax.ini #2

But, then you have to modify on all workstations and render node. That might be too much. The next methods is taking the function from ProceduralContent.ms and make own script.

If you check the code, you can see all the functionality is coming from Viper3dsMaxBridge.Main dotnet class. So, I check what kinds of methods it has with showMethods command. CompileGraphsByFolder is what we need. There are a lot more methods. But, I revmoed not to scare you.

bridge = dotNetClass "Viper3dsMaxBridge.Main" 
dotNetClass:Viper3dsMaxBridge.Main
showMethods bridge
.[static]CompileGraphsByFolder <System.String>folder
....

Now, this is the final maxscript you can use

local viperbridge = dotNetClass "Viper3dsMaxBridge.Main"
-- Just in case if Viper3dsMaxBridge.dll has not been loaded yet
if viperbridge == undefined then (
    local bridgePath = (symbolicPaths.getPathValue "$max") + @"\Viper3dsMaxBridge.dll"
    dotNet.loadAssembly bridgePath returnPassFail:true
    viperbridge = dotNetClass "Viper3dsMaxBridge.Main"
)
viperbridge.ReloadOperators()
viperbridge.CompileGraphsByFolder @"D:\myfolder1\"
viperbridge.CompileGraphsByFolder @"E:\myfolder2\

Put this in a .ms file like myMCGload.ms. Then, throw in one of your network shared plugin folder. I’m sure you probably already have a plugin folder for a free plugins. Any .ms fil in plugin folder will be automatically runs when 3dsMax start.


A few more things to know

  • mcg files are registered in 3dsMax file as an asset. It will show up in Asset Tracker and asset metadata stream.
  • If you use BackBurner and use Include Maps, .mcg filw will be submiited with the job like maps.
  • When 3dsMax starts in slave mode, it will automatically evaulate all .mcg file in the folder where the max files are. Therefore, if you use 3rd party render farm, all you need to do is put .mcgs in the same folder as max file. You don’t need to set any path.

I hope this post is helpful for MCGers.

3dsMax 2020 – OSL update

3dsMax developer has changed their delivery model to continuous delivery. Instead of delivering a feature at one release, now a feature will be delivered continuously until all the planned feature is finished. The automatic OSL > HLSL conversion for viewport was the one of them. It has been improved in every PU since tisinception. Now almost all OSL shader will be automatically converted to HLSL including 3rd party OSL shaders.

Also, the viewport playback performance of animated OSL map has been greatly improved.

This is the viewport playback of the sample file for my OSL shader pack1 in 3dsMax 2019/2020.

3dsMax 2019.3 – Alembic update

Since I posted the Alembic improvement of 3dsMax 2019 release, each PU has been added more and more improvements continuously. Let’s check what has been added.

Per object metadata with .userProperties and .arbGeomParams

3dsMax 2019 introduced the export of per object propery. But, it was only compatible between 3dsMax. With the PU3 update, you can export/import per object properties via .userProperties and .arbGeomParams. This allows a greater compatibility between 3dsMax and Maya/Houdini.

Here is an example of Alembic file exported to Maya.

Here is some details.

Import
  • It will read from both .arbGeomParams(Maya default) and .userProperties
  • It supports integer, float, boolean, string.
  • It supports animated value.
  • If Extra Attribute is on shape node, it will be in Alembic Geom Parameters rollout(alembic_geom_attributes). If Extra Attribute is on transform node, it will be in Alembic XformParameters rollout(alembic_xform_attributes)
Export
  • The custom attributes on the top modifier and base object will be exported.
  • 3dsMax will use .userProperties for export and store data on transform node by default.
  • If you use the same custom attribute name alembic_geom_attributes and alembic_xform_attributes which 3dsMax alembic importer uses. You can even have control over where your custom attribute export goes. To store data on shape node, you need to make the alembic_geom_attributes on the baseObject.
  • If you have duplicated name custom attributes on an object, none of custom attributes  will be exported. You will see the warning in Maxscript elistener.
  • Layer name will be on transform node.
  • Material name and Object ID will be shape node.
  • 3dsMax will import Layer name/Material name/Object ID as custom attribut on the respective rollout, too

Alembic Inspector

This is added in PU1. This allows to browse the content of the alembic object even without opening the alembic file. Now PU3 allow you to open the Alembic Inspector for the already imported alembic files. Use the Alembic Inspector button in the Alembic container object(the root Alembic object with Alembic logo icon),

Alembic Inspector is also accessible via Maxscript. Link.

Maya compatble Multi UV and Vertex Color

Maya is very picky about reading the multi UV and vertex color in Alembic file. To send multi UV(UV channel 2+) to Maya,  you need to choose UV for Extra Channels type. Also vertex color data from Maya will be imported as a proper vertex color channel. Before PU3, the vertex color channel was imported as an UV 2+ channel.

Instancing Support

Support for instances allows files to be much smaller while maintaining complexity and can dramatically improve export speed. PU2.

Alembic library 1.7.5

Alembic library has been updated to 1.7,5 in PU2.

Alembic Transform Controller Performance improvemant

Alembic Transform controller playback is more than 2x faster in PU3. Also Source and Object browse buttons are added for Alembic Transform controller.

Material ID will be exported when all Material IDs for an object were the same

Before PU3, None if mMaterial ID was exported.

Alembic Peformance mode will only cache the current animation range

Before PU3, it was caching from frame 0 all the time.

UV Channel will be preserved

Unicode Support

Fixed Alembic not able to use relative paths

Fixed High-speed rotations no longer deform objects


Thanks  for 3dsMax team for continuous effort to improve Alembic support!

3dsMax 2019.3 – OSL Viewport Support : OSL > HLSL

Since it is introduced in 3dsMax 2019, OSL Map has been comtinuously improved in every release.
There has been many updated on performance, OSL editor useability and viewport display.
The most important improvement among all is the viewport display.

Now 3dsMax viewpot can display almost all shippinig OSL and many 3rd party OSL shaders properly even as 3D procedural map.
How canit even support random 3rd party OSL shader?
The 3dsMax rendering team has developed automatic OSL > HLSL converter instead of making HLSL shader for each OSL shader.

The OSL shaders in the following images are all 3rd party OSL as 3D procedural map.
It is oddly satisfying to see all the 3D shaderes in the viewport exactly as renders.

And,,, a little bird told me even more stuff might come in the future. 🙂

3dsMax 2019.1 – Attaching large amounts of meshes is up to 7 times faster

3dsMax 2019.1 has been release with many improved features.

Many new features has been added to Alembic/OSL/Fluid/Arnold. Python and Project got some improvement. Plus 94 fixes.

One of the item among “Bringing your ideas to life in 3ds Max 2019.1 Update” was “Attaching large amounts of meshes is up to 7 times faster”.

So, I decided to test if it is true. The enhancement was done for Collapse utility. I think 3dsMax dev choose to enhance this because this is the only attach which keeps explicit normals.

I test total 4 files. I open the file and attach all geometries.
The result is… drum roll…

05_TM_manyLowRes

Obj:5616 Verts:99,686 Faces: 165,505
2019 : 3.335s
2018 : 32.724
9.81 times faster

08_Static_Many
Obj:19913 Verts:2,264,540 Faces: 3,265,430
2019 : 11.2s
2018 : 2236s
199.35 times faster

bistro
Obj:2429 Verts:2,766,360 Faces: 3,850.480
2019 : 9.5s
2018 : 546s
57.23 times faster

EmeraldSquare
Obj:29596 Verts:9,065,430 Faces: 7,722,170
2019 : 274s
2018 : 19980s
72.95 times faster

It is actually far better than 7 times!

csMergeBy – powered by 3dsMax 2019 Custom Scene File Data Stream

One of the hidden gem of the new 3dsMax 2019 feature is the Custom Scene File Data Streams. This allows uses attach custom strings to your max and access from outside of 3dsmax. It is not only eliminate the need of companion external file for such data but also opens up accesing of .max file related data to any program or language.

For more details, check the help.

To show the power of this feature, I made a sample implementation of this feature. csMergeBy script. It allows users to merge object from other .max file by Layer, SelectionSet, ObjectID and Material name.

Download CsMergeBy 1.0

There are 2 files in the zip file. The first one is csMergeBySave.ms which registers post save callback to save the scene data as xml and write to Custom Scene File Data Stream. You need to drop this into your startup script folder or one of plugins folder to run this script automatically everytime when you launch 3dsMax.
For exmaple, C:\Users\[username]\AppData\Local\Autodesk\3dsMax\2018 – 64bit\ENU\scripts\startup

This script would increase file saving a littlt bit. When I tested it, it took 0.1 sec for for 1,000 objects. BUT, I also have an extreme case of 29,769 objects which add 4.5 sec for saving. Considering the file saving itself would take some time, It was not noticable. But, I still want to give you heads up for the possible saving time increase.

The second file is csMergeBy.ms. This is actually a macro script. Just drag and drop this file into iewport. It will make csTools > csMergeBy action. This is the merge dialog.

How to use is simple.

  1. Select a max file which you want to merge from using the top button

2. Choose “Merge By” method from dropdownlist. You can use…
Layer – with hierarchy
Layer – no hierarchy
SelectionSet
ObjectID
Material name

3. Choose items in the left list. You can CTRL+click to select multiple items. CTRL+click also deselect item.

As you choose item in the left list. Preview object list will be updated.
By default, all objects in the preview will be selected. But, you can only select the objects you want.

If you have a lot of objects(1000+), it might take a while to update the object list. Then you cah turn off Preview object names chekbox to not to show the object list. Then all objects in the selected items will be merged.

4. Then press Merge.

5. All megered object will be in “JustMerged” selection set for your convinience.

3dsMax 2019 – OSL shader pack 1

You don’t need to download this shaders anymore. 3dsMax 2020 has a better version of all these shaders built-in.

While I was beta testing 3dsMax 2019, I made a few OSL maps. Nothing spectacular. Most of them are just “artist-friendly” pre-made setups to save some nodes.

Download OSL shader pack 1 or at http://UncleBobsShaders.com. Make sure to visit Uncle Bobs Shader Emporium for cool OSL shaders!

UVW > MatCapUV

This is a renderable version of my superClayMode script. Plug into the UVW slot of Bitmap Lookup.

Value > Color by Colorspace

You can conver to a vector value of other color space to RGB.

Math\Color > RGB to Other(Color)

You can convert a color from RGB to other color space. Output value is vector. after you process it, you can convert back to RGB with Color By Colorspace

Switchers > Random Index by Number/Color

It generates random integer index by number or color input. When you need to randomize something by Object ID, Materaal ID, Node Name and Node Handle, this map will be very handy. Of course you can also do the same thing by assembing a few other maps. I just made as one map for your convinience.

Math\Float > Sine wave function of frames

You can generate sine wave of time. It supports amplitude, period, phase value and square wave option. Check my sample animation. This map is very handy when you need to make some cyclic map animation.

!!! You DON”T need to connect Frame Number input. It already has float expression controller assigned. !!!

Scene > Normal

You can get normal value of pixel in various spaces.

Falloff

Falloff map OSL version. It supports Perpendicular/Parallel and Towards/Away.

BlendModel

Legacy Composite map OSL version. It supports all bklending mode in legacy Composite map. I was trying to support all Photoshop mode. But, I gave up on Vivid Light and Linear Light.

Here is a QC image that shows this map and legacy Composite map are producing the same result.

How to Install

1. Make “OSL” subfolder in any plugin folder
2. Unzip and copy *.osl files into the folder

A sample max file

Here is the shader tree for the animation. I used the distance from local center and random sin wave as the light intensity. No keyframes al all. The max file is included in the shader pack .zip file.

3dsMax 2019 – Alembic Improvement

Alembic is a geometry cache format developed by Sony Imageworks and ILM. It is a very powerful format. It can handle animated transform and deformation(include topology changing animation). It can also have custom meta data as much as you want.

Alembic has been added to 3dsMax 2016 and developed continuously  since then. I’ll go over Alembic improvement of 3dsMax 2018 first and show what has been added for each previous versions.

But, before we jump on the improvement list.Allow me go over how 3dsMax implementation works first. 3dsMax Alembic works more like referencing system. Each object in Alembic file is imported as separate object which has two component, AlembicObject for geometry data and AlembicXform Controller for transform animation data. This allows users to edit anything after it is imported. You can apply any modifiers, edit geometry, change controller setup and delete any objects. Imported Alembic object is just like any other object. In a way, it almost like ObjectXref.

Other way of using alembic is treating the entire alembic object as one object like VRayProxy or Arnold Procedural object.This makes overall workflow simpler and easy to manage. But, you lose granular control. I think It is good to have both workflow inside of 3dsMax.The more choice is always better.

3dsMax 2019

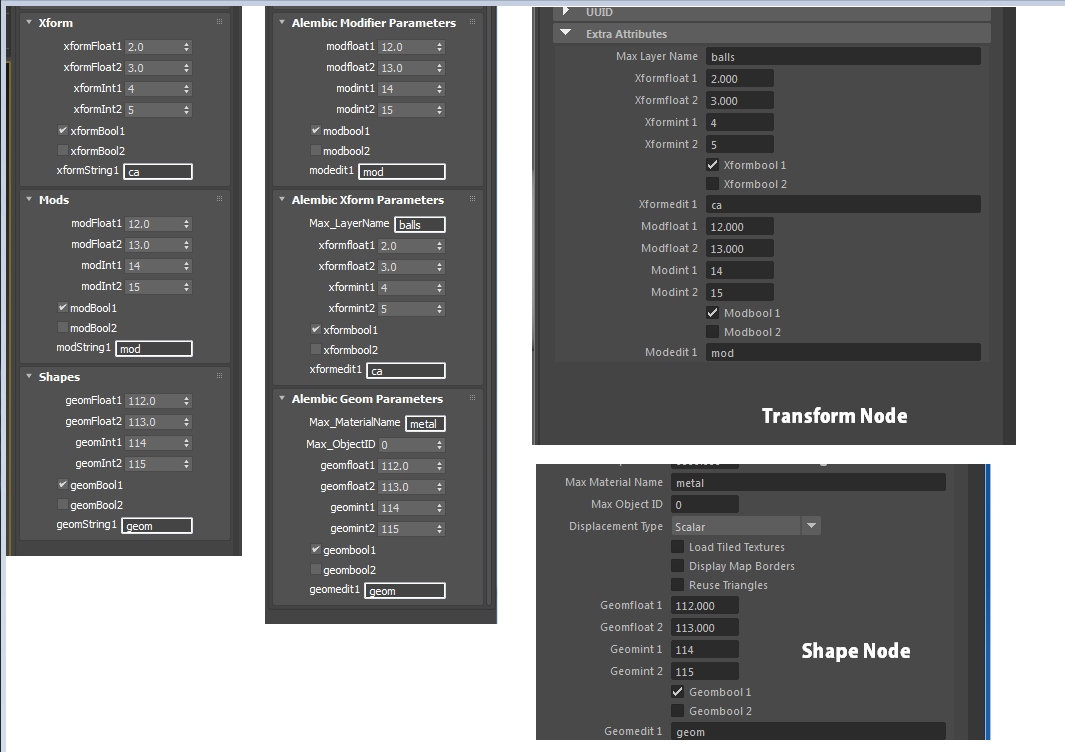
Per object metadata export

3dsMax Alembic supported faceset(material ID) and per vertex arbirary channel from the beginning. But, it never had support for per object metadata. Now you can export per object meta data using Custom Attribute and some export options in Export dialog.

You can choose to export the following data from Alembic Export Option dialog.

  • Layer Name
  • Material Name
  • Object ID

Custom Attribute export supprts most data types like float, integer, string and boolean. It even support animated values.

BUT, Please keep in mid, Alembic format specification doesn’t have amy standard on this matter. Because 3dsMax write these data into Alembic file, it doesn’t mean that other DCC will magically read this data. User must figure out how to load this data in other DCC.

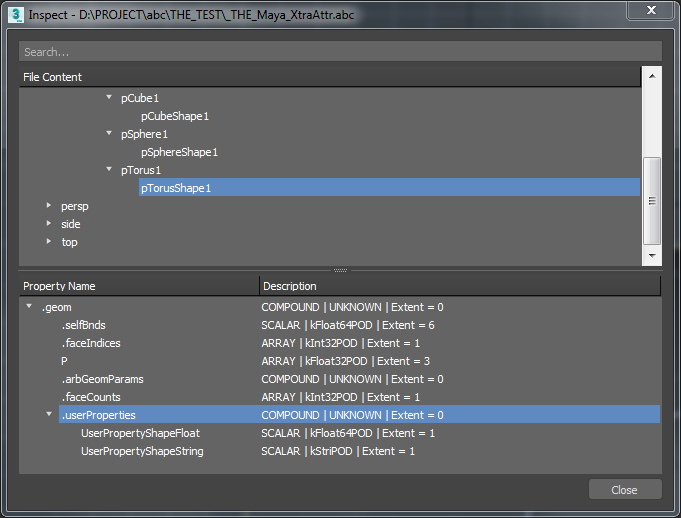
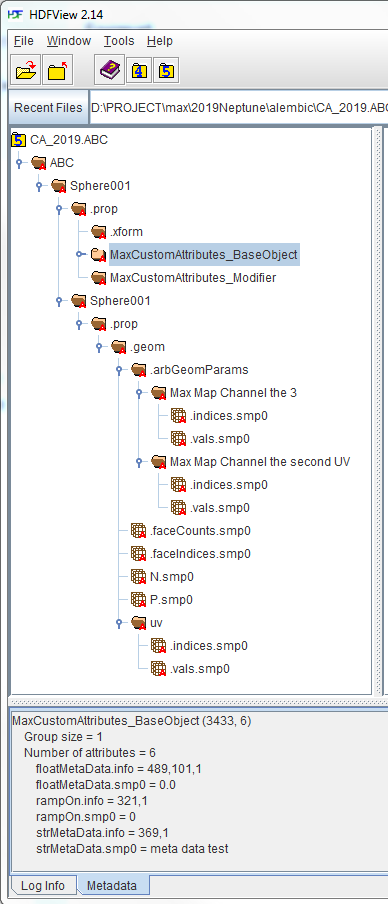
To know, how 3dsMax exporter stores these information, You can export a test Alembic file with HDF5 format and use the great tool called HDFView. This tool will show the entire structure of the Alembic file. Here is a sample screen grab.

As of now, the 3dsMax importer doesn’t support these data yet. I hope we would see the support for these meta data import soon.


UV/Extra Channel and FaceSet(MaterialID) name parsing

Since 3dsMax is rely on ID number for UV and Material ID. It was very challenging to get consistent UV channel or material ID number when you import and update alembic file. At least, 3dsMax 2017 added a way to keeping uv channel and material ID number consistent between 3dsMax. Therefore, if you export from 3dsMax and import into 3dsMax, all uv channel IDs and material IDs are preserved. But, when you import an alembic from other DCC. You didn’t have any controls. It just came in the order of channel order in the Alembic file.

Now alembic importer will check the face set and extra channel name, and if the name is end with number, the number will be used as Material ID or uv channel number. For example, if you name face group name as “group_7” in Houdini, the faces will get material id 7 when it is imported. THIS IS A SMPLE YET VERY IMPORTANT UPDATE!

Also when you export/import between 3dsMax, the data about the original uv channel and material ID is explicitly stored in the Alembic file instead of relying on naming convention. This makes the ID preservation between 3dsMax even more solid and allow the export the UV channel you set in 3dsMax. For eample, if you name your uv channel 2 as “the second UV“. the exported Alembic channel will have the name, “Max Map Channel the second UV


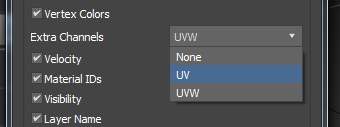
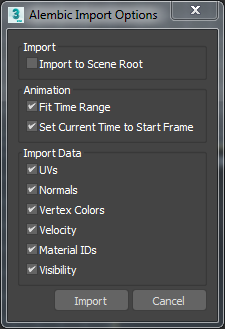
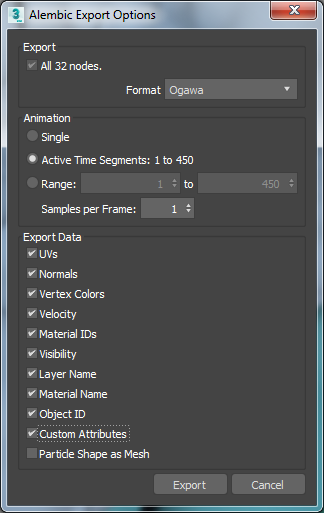
Option to choose what to export/Import

Now you can choose which channels to export and import. In the previous version, 3dsMax import/export everything it supported. The following image is the new import and export dialog.

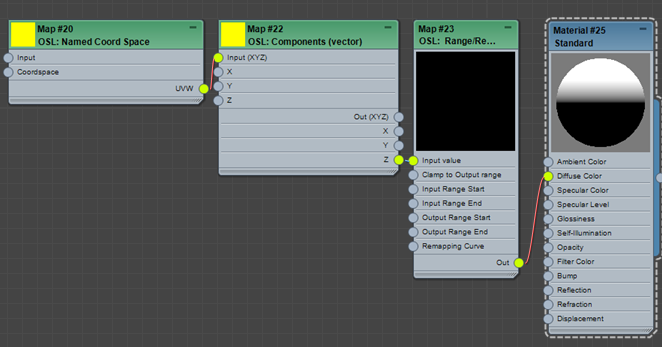
Ont thing you need to know is that, there is a hidden ExtraChannels  Maxscript option for both import and export. What is ExtraChennels? For export, ExtraChannel means UV channel other than 1. For import, it is arbirary per vertex data other than UV. By default, it is on for both export and import.

This new options are also very important for troubleshooting. Alembic from a different DCC can easily have problematic data. At work, I found out that most of the crash while importing Alembic file turned out to be a bad data in the Alembic file(Especially normal and extra channel). Without this options, it was very hard to troubleshoot because you have to try to a data and export again iover and over again. Usually the normal and uv data caused the problem. Now with this option, I can just exclude some data to see whats causing problem. I can also decide not to import the problematic data instead od waiting for re-export.

Of course, this also allow to get better performance by removing unnecessary data.

Velocity Channel

Velocity channel in 3dsMax is a long story. It requires its own long post. In a nutshell, 3dsMax itself never has had the concept of velocity vertex channel at all. When you don’t even have the concept, it is abvious that the imported Alembic can not handle vertex velocity.

Finally 3dsMax dev added the vertex velocity channel support in the SDK. If the Alembic file has standard velocity(or v) channel, 3dsMax import the channel as vertex velocity channel. If you have been re-routing the v channel to extra channel. You don’t need to do that anymore.

But, this doesn’t mean that all renderers will magically start to see vertgex velocity channel. Each rednerer need to support the new velocity channel to utilize this data.


Vertex Color

Now you can export and import vertex color channel(uv chennel 0)


Subsampling

You can export Alembic file with subsampleing in the previous version of 3dsmax 2019. Butm the worklow was confusing. To export subsamples. You need to set 2 things.

  • Set Every Nth Frame less than 1.0. IF you set 0.5, you will get 2 subsamples per frame.
  • Then, you must be in tick mode. You need to set Time Display in Time Configuration dialog either FRAMETICKS ir MM:SS:TICKS

Now you dont need to turn on tick mode anymore. Also the Every Nth Frame option has been changed to Samples per Frame.


Option for Exporting Hidden Geo

In the previous version, 3dsMax Alembic Exporter export geometry data only for unhidden object. If your object is hidden, only transfom animator was exported. THis might make sense for some. But, it also make some users scratch their head for sure.

Now there is a Maxscript property to control this. In AlembicExport interface, .Hidden property controls this hehavior.

Here is a tip. You can utilize this behavior as a way to export only transform animation. If you want to export transform animation only without any geometry data. Turn off this option and hide all object and export.


Graceful warning/exit for import/export malfunction

Sometimes bad geometry causes crash when you export/import Alembic file.  3dsMax 2019 will pop-up an explanatory Alembic Export Malfunction message box and abort when the Alembic Export plug-in encounters an unexpected issue while exporting instead of crashing.

Generally 3dsMax 2019 handles geometry import a lot more stable than the previous versions. In many cases, 3dsmax importer will try to fix the problem and give you a best possible result. If Alembic library itself errors, 3dsMax will relay the error message.

Export Selected will grab only needed hierarchy.

Since alembic is designed to keep hierarchy, 3dsMax exporter is grabbing other necessary object when you Export Selected object. The problem in the previous version was that it is grabbing too much(the entire hierarchy tree). This is changed now. 3dsMax will grab only the immediate ancestors of selected object.


Better duplicated object name handling

If you have duplicated name object while exporingAlembic file, it can cause problems. In ideal world, user should check if they have the duplicated name objects before export. But, since that’s not ganna happen most time, 3dsMax will check the duplicated name and suffix nodel handle to make all object name unique.


Respect Maxscript #noPrompt option for duplicated name object handling for import

When an Alembic file is imported, you get a duplicated warning pop-up if there is already the same name object. When you use importFIle with #noPrompt option, this dialog will not pop up as it should be.


Alembic Container Object Icon

Alembic log shape icon insteaf of dummy for AlembicContainer object.


Remember dialog setting

The export and import will remmeber the last used settings.


Extra Channel UV Data Animation Fix

In the previous version, the Extra channel(UV 2+) animation was not imported if the channel has UV data(vertex data + face indice). It is fixed. Please do not confuse this with per vertex channel data which never has been a problem.


More Maxscript Exposure for AlembicImport

.FitTimeRange : bool : Read|Write
.SetStartTime : bool : Read|Write


Performance Mode Stabilixation

The Performance Mode in AlembicContainer has been stablized a lot. This feature is probably the most underrated feature of 3dsMax considering how poerful it is. I’ll mpost about this feature someday.


3dsMax 2018


Visibility Support

Visibility track support is  added including visibility animation.


.ShapeSuffixMaxscript Option for Maya

Our little precious Maya could not handle the geometry name from Alembic file properly. Therefore, 3dsMax dev had to add a solution for them. If you tuen on this option, yout geometry name will get “Shape” suffix.


3dsMax 2017


Preserving UV Channel and Material ID number

When you export and import an Alembic file between 3dsMax, the UV channel ID and Material ID number will be preserved.


Extra Channel Import Support integer, float, vector, color

3dsMax 2016 only supported color and vector.


Proper Deformation Export for Object with Spacewrap

In the previous version, 3dsMax exported the object with SpaceWarp in World coordinate. If the object is not at the root level, the object will get double transform since the deformation animation already include the animation.


Alembic Performance Mode for Any Object

Alembic Performance Mode cab be used for any 3dsMax geometry. In the previous version, only AlembicObject without any modifier was supported.


More Stable UV Loading

In the previous release, UV data loading was unstable. Sometimes UV data corrupt after user scrub time slider. User need to use Channel Info dialog to copy UV channel data and paste back to the same channel to lock the UV data right after they import thr Alembic file. This is fixed.


Full Maxscript Exposure for Alembic Export

All Alembic Export funcions are exposed to Maxscript.


Preserving Object Name

3dsMax 2016 suffix “_mesh” for geometry. Now object will be exported with unchanged name,


AlembicContainer Object as Dummy


——————————————————————————————-

OK,  that’s it. I hope it is helpful for you.

3dsMax 2019 – OSL map

3dsMax 2019 has been released.

The most noticable feature is the OSL(Open Shading Language) map. You should watch Mads video to see what it can do. Obviously this is a god send for technical minded users. It is like MCG for maps. You can make anything. Your imagination is the limit.

But, what does it brings to the artist who doesn’t/can’t/doesn’t want to code?

3dsMzx 2019 is shipped with 101 OSL maps from bitmap loading to procedural noise, color correction and utilities. Thisbrings some interesting features and workflows. Let’s see what we can do with them.

Random By Index

You can randomize any vaule type that OSL supports by index number. For example, You can randomize gain value(float) or UVW offset(vector) or diffuse color. Anything!

Object property access

Even better, OSL map allows to access various object data such as Material ID, Object ID, Wire(frame) Color, Node Handle(a unique id per object), Node(Object) name and User properties(!). If you combine these maps with Rendom By Index map, you can randomize almost every map/material paramateres per object. Here is an exmaple. All object have the same material with single bitmap texture.

Switcher

Finally the switcher map has been arrived. This map allow you choose a map among the multiple children map. You have 1-of-10 and 1-of-5. But, you can cascade them to support more than 10.

Independent UVW control

It is like Coordinate rollout is a seperate map, and you can plugin the UVW into multiple maps. Yes, now you can instance UVW across multiple maps. Also you can also randomize UV by using the above maps. Do you want to distort UV? then apply a noise map to UVW map.

Randomized Bitmap

“Randomly place (and alpha blend) a set of bitmaps on top of something else”.
Just try it. So much fun!

Shuffling channel

You can easily shuffle channels around. Find Compoments(Color) map and connect from where you want get to where you want to put.

 .tx /.dpx format loading

OSL uses OIIO for image IO. Therefore, the image formats which supported by OIIO will be supported in OSL map. But, you can read .tx and .dpx directly.

Filename as a map

When you have a single file which is needed be used in multiple map. You can use Filename map and feed to the path to multiple Bitmap Lookup maps(OSL version of bitmap map).

Gamma checkbox in the map

You don’t need to use file dialog anymore for gamma settings. Gamma setting is in the paramaters rollout! It also has AutoGanna option which will set gamma value depends on the file format.

Samplerinfo

OSL gives you access to various scene data such as position/normal/uv. You can get this data in various space. You can use local object position or world normal vector as map. Do you want to render out UV as texture? Just plug UVW to diffuse color.

Math, Math, Math

You can do all kinds of math you want to do. Many math functions are exposed as maps. You don’t have to “code” for simple math operations. Do you want to have a black and white mask for your mountain? Let world position value and remap to 0-1. Simple.

Granular color correction

Of course, you can use any math maps to do whatever you want. But, 3dsMax 2019 also has 2 OSL maps you can use for color correction, Lift/Gamma/Gain and Tweak. This should cover all features of legacy Color Correction map.

Procedural map that renders exactly same across renderer

Many renderers support 3dsMax noise map. But, the result of the noise map could be different for the renderer which doesn’t use 3dsMax map api because they have own implementation of noise map. In this case, your rendered noise mapptern would not match with other portion of 3dsMax such as Displace modifier. If you use OSL procedurals, the render result would be exactly same regardless of renderers. This is HUGE. OSL allow to have a foundation of unified map workflow across renderers. Check out these renders. The left one is rendered with VRay. The right one is rendered with Arnold.

3dsMax 2019 come with new noise map with the follwing 6 types of new noise. perlin/uperlin/simplex/cell/hash/gabor

New pattern maps

It also has a few interesting new pattern maps.
Checker(3D), Candy, Mandelbrot, Revets, Digits

Unified and portable map tree

The biggest chanllenge of moving shader around between renderer is the complicated map tree. One incompatible map in the middle of shader tree will break the shader tree from that point. Even thiough there are enough matching maps. It is almost impossible to reuse shader tree and produce exactly the same result. With OSL, you can. As long as you stay in OSL, the result map tree will always be same just like procedurals.

Possibility of rendering on Linux

You already can convert mesh data to a renderer scene file format like vrscene or ass, rib file for rendering. But, the nature of 3dsMax renderer integretion always requires 3dsMax to evaulate map tree unless you only uses the renderer native maps. This is the main obstacle to render max scene on linux.  Now with OSL, the renderer scene file format could include all map tree in the file and render. It opens a posibility of rendering 3dsMax scene on Linux.

This is a new era for rendering in 3dsMax. Enjoy!

MCG : Camera Map Multi

This MCG modifier allows you generate multiple camera projected UV with independant resolition per camera. It is essentially  a MCG version of CameraMapGemini.
3dsMax 2018+


Download MCG : Camera Map Multi


Compare to the built-in Camera Map modifier, Camera Map Mult provide the following additional features.

  • Multiple camera support up to 8 cameras
  • Resolution per camera
  • Animated camera support

How to use is very simple. Select a camera with Select Camera button. Then, set the resolution and the frame to project. If you just want to project from the current camera animation, turn on Animated. Then the Frame value will be lock to the current frame. The Frame value is animatable so you can have more control than just matching to the current frame. The last option to set is which UV channel you want to use. For your convinience, there are also Get resolution and Set resolution button to get/set reslution from Render Setup dialog.

I know it CemeraMapSemini had also a companion map. But, making a map plugin is beyond my capacbility.  But, who knows someday I might. Let’s cross fingers. 🙂

It is free as always.

A special thanks to Kelvin Zelt at Autodesk for helping me to solve the last piece of puzzle.