Menu Close

Category: MCG

MCG : map2vc

It has been a while I made an MCG. This simple MCG allow to set vertex color(or any uv) using any 3dsMax 2d map.

Download

How to use.

  1. Pick a 3dsMax map. You can use a map tree. But, it has to be all 2d maps with Explicit Map Channel.
  2. Set Source ID same as the uv index which the map is using.
  3. Set Target ID to bake map into.
    As label says that channel 0 is vettex color channel in max.

If you wander what the graph looks like, this is the graph. The core portion is smaller. But, error checking made graph a little bit bigger.

How to share your awesome MCGs – MCG Installation and network deployment

MCG had a big changed in 3dsMax 2018. This post is based on 3dsMax 2018+.

One of the biggest changes was Improved MCG Package Installation Experience. Let me just norrow the words from dev.

“In previous versions of MCG, the package installation process of an .mcg file involved the automatic extraction of its contained .maxtool and .maxcompound files into the user’s 3ds Max /Max Creation Graph/Tools/Downloads directory. A consequence of this installation method was that common compounds would often conflict with each other, resulting in duplication messages.

In MCG 2018, we’ve simplified the package installation process to make it much more robust. You can now install a .mcg file by dragging it into the viewport. All installed packages now reside in the user’s 3ds Max 2018/Max Creation Graph/Packages directory, and are evaluated as standalone .mcg files. No more file extraction, no more conflicts, no more problems.”

Basically, 3dsMax will consume .mcg package file directly and use the compound in that package first to avoid compound version conflict. Now .mcg file act much like a plugin dll file.
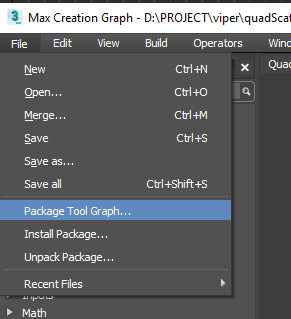
Packaging MCG

MCG Editor > File > Package Tool Graph… will allow you to package the current tool graph and all compound in a .mcg file.

Installing MCG

It means just copying .mcg file into MCG package folder, and drag and dropping .mcg file into 3dsMax viewport will do that f or you. The MCG packages folder is in your user folder/Autodesk. 2018/2019 shares the same structure. But, 2020 MCG package folder is a slightly different.
C:\Users\[username]\Autodesk\3ds Max 2018\Max Creation Graph\Packages
C:\Users\[username]\Autodesk\3ds Max 2019\Max Creation Graph\Packages
C:\Users\[username]\Autodesk\3ds Max 2020\User Tools\Max Creation Graph\Packages

ProceduralContent.ms

Before I tal about network deployment. I need to mention about this file first. The mCG is implemented with dotnet and Maxscript. The engine is dotnet and UI and communicaion with 3dsMax portion id Maxscript. This means we can actually see the source of many MCG functions which are in C:\Program Files\Autodesk\3ds Max 2020\scripts\Startup\ProceduralContent.ms file. If you dissect this file, you can learn a lot about how MCG is working.

Custom MCG Path

By default, 3dsMax uses the above MCG folders. But, you can also have own custom path for MCGs. RegisterCustomGraphPaths function in ProceduralContentOps struct in  ProceduralContent.ms manages how to set the path.

By default, it is set to use 3dsMax.ini file, C:\Users\[username]\AppData\Local\Autodesk\3dsMax\2020 – 64bit\ENU\3dsMax.ini. You can type getMaxiniFIle() in Maxscript Listener to get your 3dsMax.ini file path

You can add MCG Compound Directories, MCG Tools Directories, MCG Package Directories sections and add path like this.

[MCG Tools Directories]
tools_dir=C:\path\to\my\tools
other_tools=C:\path\to\other\tools
[MCG Compound Directories]
common_compounds=C:\path\to\my\compounds
experimental_compounds=C:\path\to\experimental\compounds
[MCG Package Directories]
networkPackages=\\path\to\network\packages

Custom MCG path without using 3dsMax.ini #1

But, what if you do not want to use 3dsMax.ini. The one way of using own .ini file for MCG path would be modifying ProceduralContent.ms. Open the file,C:\Program Files\Autodesk\3ds Max 2020\scripts\Startup\ProceduralContent.ms, search “getMAXIniFile()”. Then, replace with whatever path you want.

fn RegisterCustomGraphPaths =
(
local iniFile = getMAXIniFile()
local settings = dotNetClass "Viper3dsMaxBridge.Settings"

Custom MCG path without using 3dsMax.ini #2

But, then you have to modify on all workstations and render node. That might be too much. The next methods is taking the function from ProceduralContent.ms and make own script.

If you check the code, you can see all the functionality is coming from Viper3dsMaxBridge.Main dotnet class. So, I check what kinds of methods it has with showMethods command. CompileGraphsByFolder is what we need. There are a lot more methods. But, I revmoed not to scare you.

bridge = dotNetClass "Viper3dsMaxBridge.Main" 
dotNetClass:Viper3dsMaxBridge.Main
showMethods bridge
.[static]CompileGraphsByFolder <System.String>folder
....

Now, this is the final maxscript you can use

local viperbridge = dotNetClass "Viper3dsMaxBridge.Main"
-- Just in case if Viper3dsMaxBridge.dll has not been loaded yet
if viperbridge == undefined then (
    local bridgePath = (symbolicPaths.getPathValue "$max") + @"\Viper3dsMaxBridge.dll"
    dotNet.loadAssembly bridgePath returnPassFail:true
    viperbridge = dotNetClass "Viper3dsMaxBridge.Main"
)
viperbridge.ReloadOperators()
viperbridge.CompileGraphsByFolder @"D:\myfolder1\"
viperbridge.CompileGraphsByFolder @"E:\myfolder2\

Put this in a .ms file like myMCGload.ms. Then, throw in one of your network shared plugin folder. I’m sure you probably already have a plugin folder for a free plugins. Any .ms fil in plugin folder will be automatically runs when 3dsMax start.


A few more things to know

  • mcg files are registered in 3dsMax file as an asset. It will show up in Asset Tracker and asset metadata stream.
  • If you use BackBurner and use Include Maps, .mcg filw will be submiited with the job like maps.
  • When 3dsMax starts in slave mode, it will automatically evaulate all .mcg file in the folder where the max files are. Therefore, if you use 3rd party render farm, all you need to do is put .mcgs in the same folder as max file. You don’t need to set any path.

I hope this post is helpful for MCGers.

MCG : Camera Map Multi

This MCG modifier allows you generate multiple camera projected UV with independant resolition per camera. It is essentially  a MCG version of CameraMapGemini.
3dsMax 2018+


Download MCG : Camera Map Multi


Compare to the built-in Camera Map modifier, Camera Map Mult provide the following additional features.

  • Multiple camera support up to 8 cameras
  • Resolution per camera
  • Animated camera support

How to use is very simple. Select a camera with Select Camera button. Then, set the resolution and the frame to project. If you just want to project from the current camera animation, turn on Animated. Then the Frame value will be lock to the current frame. The Frame value is animatable so you can have more control than just matching to the current frame. The last option to set is which UV channel you want to use. For your convinience, there are also Get resolution and Set resolution button to get/set reslution from Render Setup dialog.

I know it CemeraMapSemini had also a companion map. But, making a map plugin is beyond my capacbility.  But, who knows someday I might. Let’s cross fingers. 🙂

It is free as always.

A special thanks to Kelvin Zelt at Autodesk for helping me to solve the last piece of puzzle.


MCG : ReorderVertsByProximity

It takes a lot more time than I expected to make this MCG. Personally it was a great learning experience for mesh structures in 3dsMax. A big thanks to Kelvin and Martin at Autodesk for the new operators in 3dsMax 2018. Without the operators, it was impossible to make this.

———————————————————————————————————————

This MCG allows you to reorder vertex IDs using the proximity of the position to the vertex position of the reference object.

Download MCG : ReorderVertsByProximity

ReorderVertsByProximityYour model might look exactly same as other model. But, the internal data structure could have been changed because you export/imported the model or deleted some verts/faces and rebuilt it.

If that happens, you will have a problem when you try to use them as morph targets.

In 3dsMax or most DCC application, there is no way to “reorder” verts. What this MCG is actually doing is building a new mesh with the vertex IDs we wants.

This MCG provide 3 ways to find a matching vert.

  • Object space verts pos
  • World space verts pos
  • UV

If the pivot of both meshes are at the same place, you can use Object space verts pos. Then you don’t need to align object together. The MCG will use the position from the pivot point.

One thing you must remember is that you must ResetXform first if you adjusted the pivot of the mesh. It is because MCG returns the vertex position without offset transform applied.

If you used ResetXform or exported mesh as object when object was not at the origin, your pivot point would have been changed. In this case, you can align two meshes and use World space verts pos option.

Or… you can use UV to find a matching verts, if you have an UV information. This option is also useful for the case which you changed the shape of mesh.

The last option is Copy Topology. When this option is on, the MCG will try to match not only verts ID but also face ID and the verts indices for faces. You would need this option if you need to copy/paste UV from the fixed mesh to the original mesh. This is a little bit experimental feature. It will fail if there is a big different between the topology of two meshes.

Obviously this modifier is supposed to work with 2 meshes with same number of verts. But, I didn’t put the limitation to force that. If this MCG works as you wanted even though the number of verts are different, then good for you! If not, then that’s what it is.

Lastly, this MCG is not that fast especially with Copy Topology On. So, be patient. 😉

This MCG uses some of the new operator which is included in 2018. Therfore, it will only work for 3dsMax 2018+

3dsMax 2018 MCG improvement #1 – Easy Map / Live Types / Undo

3dsMax 2018 MCG has many fundamental core changes which make MCG easier to use/make for users. The MCG guru at 3dsMax dev team Martin has the introduction post of 3dsMax 2018 MCG on Area with awesome new sample packs. I’ll try to go over some of these changes here. Today let me talk about Easy Map / Live Types / Undo.


Easy Map

When you try to learn MCG, the first obstacle would be the understanding Map and Combine. Map/Combine is equivalent to for in other programming languages. It allows you to iterate a function through an array(or arrays).in 2018, Map operator actually renamed as For Each. Considering the most typical MCG task is doing something over a vertex/face array. This is probably the most important function in MCG world.

The problem was that how Map/Combine was presented in MCG editor was not that intuitive. You can not directly connect your input array to the connector of the function. You must leave the input connector open and draw the imaginary line in your mind to know which input goes where.

In 3dMax 2018 , you don’t need to use Map or Combine anymore for most cases. You can just directly connect input array to a function operator. Check out the following image. This is a simplified version of my ExtractDelta MCG modifier. I removed all error checking and stuff to make it easy/clear to see the core functions.

MCG_1_easyMap

What this modifier does is that, it read 2 objects and calculate the difference of vertex position between them and put that difference(delta) into the curent mesh.

Look at the calculate Detals. group. in 2017 graph. you need to use Combine to iterate over two vertex position arrays and subtract vectors from one array to another.

In 2017 graph(top). you need to use Combine to iterate over two vertex position arrays and subtract vectors from one array to another. The open connector of value1 is invisibly connected to the mesh vertices array of corrective shape. The open connector of value2 is invisibly connected to the mesh vertices array of original geometry.

in 2018 graph(bottom), you can see that you can just plug the two mesh vertice arrays into Subtract operator input.

The 2018 graph is more intuitive and a lot easier to understand what’s happening in the graph.

Next look at Add deltas to mesh group. After we got the deltas array, we want to multiply Amount input to the deltas and add the result to the vertex position of our current mesh.

In 2018, you can just directly plug delta array and Amount value to the Multiply Vector operator and plug the connection to Add operator. You don’t need to use Combine operator at all.

You can still use Map/Combine if you want to make your MCG backward compatible to the older version. If you use Easy Map method, your graph will be compatible with older version.


Live Type

Let me borrow the explanation from Martin’s blog.

One of the major challenges in previous versions of MCG was keeping track of all the types flowing through your nodes. If a problem crept up, you only knew about it when you tried to evaluate your graph, and that often meant doing some detective work based on an error message as your only clue.

In 2018, the types flowing through your nodes are updated as you wire them, so you know exactly where you’re going. If two types don’t match up, a red wire will indicate that the connection is incompatible or that the graph is incomplete.

So… what does this actually means in MCG graph? Let’s check out the above image again. If you see the output connector of Mesh Vertices operator and the input connector of Subtract operator in calculate Detals. group, 2017 graph connector label just shows as value(IArray). It doesn’t show what kinds of array this is. 2018 graph display the same thing as Array[vector3] to give more clear information. This labels will be dynamically updated as you update the connection. If you make a wrong connection,

Also If you make a wrong connection, for example trying to connect vector array and integer array for Add operator, the connection line color will be changed to red to show the input is wrong.


Undo

Finally you can undo your mistake in MCG editor! Ctrl+Z and Ctrl+Y.

OK. That’s al lto today.

MCG : Tubo shape object

Download MCG : Tubo spline object

This MCG shape allows you generate smoothly connected spline between two objects with sagging option.  You can animate start/end object. Tubo will dynamically connect two objects while trying to keep the overall length of spline.

tubo_UIThe core engine of this MCG is hermite interpolation. This is an way to interpolate between two point using the position and vector of each point. MCG provide Hermite node by default. So I just needed to make an way to defined those 4 numbers.

Using this MCG is very easy. Just create this MCG(Create panel > Shapes > Max Creation Graph > Tubo). Then assign start and end object. Num of Vertices will determine how many verts will be created.

This MCG will try to keep overall length same. But, it doesn’t have any mathematical function to ensure the same length. Most of time, it will look OK. But, if you are seeing too much of length change, you can animate Length value to compensate.

You can choose which axis would be the direction of tube. Check Flip checkbox if you want flip the axis. You can also offset the start/end point with Start Offset/End Offset. If you check Create Offset Segment. the segment between original point and offset point will be created.

If you increase Start Tension/End Tension value, the spline from the point will look more rigid. This value is actually the multiplier for incoming/outgoing vector for hermite interpolation.

If you want to add sagging effect, increase Sag Amount value. I originally tried to use caterary curve. But, it didn’t look good since our spline is not free hang. So I used built-in affect region function which you use for soft selection control. That’s why there are Bubble/Pinch values. Even though I expose this parameters, I don’t recommend to change

By default, the sagging direction is set to world -Z. But, you can use any direction by using Gravity Ref. Object.


MCG : oneMesh object

Download MCG : oneMesh

This MCG object let you combine multiple object as one mesh while keeping animated transformation and deformation.

oneMmesh_UIYou have two methods to choose the object to combine. I’ll call it, Source Objects.

The first method is selecting Source Obj Tree Root. If you choose an object, all descendant of selected objects will be used as source objects. You can have non-mesh object in the hierarchy. The MCG will filter out non mesh automatically.

!!! This methods doesn’t support deforming mesh !!!

The second method is manually selecting objects by Add Item/Remove Selected button.

You can use both methods at the same time. Any object chose by either methods will be used.

Another feature of this MCG is that you can define local space origin and orientation with Local Space Ref.Obj. What? I know it sounds confusing. Let me explain.

If you don’t choose any object as Local Space Ref.Obj, the position of this MCG object becomes the world origin for combined object, and the orientation of this MCG object will defined the world axis of combined object. Therefore, If you make this MCG object at world origin without any orientation, the combined object will be exactly overlapped with source objects. If you transform this MCG object, the combined object will be offset as much as this MCG transform.

But, if you choose an object as Local Space Ref.Obj, the transform of the object will defined the origin position and axis orientation. In the vimeo video, you can see what happens if you choose the point helper which is projected from Bip001 object to ground as Local Space Ref.Obj, The combined mesh animation is happening around the helper object.

The last option is Use Src Obj Tree Rool. If you check this checkbox, the object which is used for Source Obj Tree Root will be used as Local Space Ref.Obj, too.

MCG : QuadScatter 1.5

quadScatter15teapot

QuadScatter MCG modifier is updated to 1.5 with 2 new functions.

Download : QuadScatter 1.5

A lot of peoples seems to think QuadScatter as just fancy “Greeble”. But, it does more than that. You can make wire fence, woven fabric, brick walls, bullet belts and etc. The newly added option will be useful for those things.

Follow Normal – this option will use original vertex normal when this MCG deforms object. If you want to weld togrther the cloned objects, turn on this option.

Place Guide ID – You can defined which portion of mesh would be aligned to quad. If you turn off this option, the bounding box of the source objects will confom to quad. Therefore, the entire object will be always inside of quad. If you need to have certain parts at the outside of quad, use this option. The faces which has defined ID will be use as guide to conform to quad.

Delete Place Guide – if you don’t need to keep the guide faces, turn on this option.

Original QuadScatter post.

MCG : QuadScatter

MCG : QuadScatter

Download MCG : QuadScatter

quadScatter

QuadScatterUIThis MCG modifier allow you scatter object on quad polygons.

“Quad polygon” is determined by QuadThreshold value. For each polygon, this MCG will remove the vertex if the angle between two edges of the vertex is small than QuadThreshold value(degree). After that, if a polygon has 4 vertices, that is “quad polygon” to use.

As you can see in UI, this MCG has 3 set of the same controls. You can use 3 different source objects for each  Material ID. IF you need more, you can apply this MCG multiple times. OR.. you can modify this MCG and add more sets which is actually not that hard to do.

When you assign object, if the object has any descendants, this MCG will choose the one of them randomly. If you want to change the randomness, change the Seed number.

Delete Original Faces will decide what to do with quad polygon. If your scattered object is cover quad entirely, you can use this checkbox to delete the original faces.

Rotate allow you rotate the scattered object. You can only rotate 90x degree. 1 = 90, 2 = 180, 3 = 270. If you check Random, this MCG will rotate scattered object randomly.

You can also adjust height with Height spinner. 1.0 means original height. If you want to randomize height, use Var. spinner. This is an offset value. So… if your Height is 3 and Var. is 1, you will get height between 2(3-1) ~ 4(3+1).

By default, the height/width ratio of scattered object is preserved. This means the height of each scattered object will be different. If you want to make all scattered object’s height. Turn on Constant Height.

The last option, Dir.Guide UV is the UV channel ID which is used for determining scttered object direction. IF you turn on this option, U direction will be used to guide X axis of the scattered object.

This MCG is still WIP. I haven’t done any optimization, and I have a few more features to add.

I hope you enjoy it!


For the scatter source, check this Greeble Packs from Wayne Joes (jedilaw)

In the video, I used pacl2.

scifi3d.com/details.asp?intGenreID=11&intCatID=52&key=644


3ds Max 2016 SP3 MCG performance improvement

Today Autodesk released 3ds Max 2016 SP3.

This SP also brings us two big MCG performance improvement.

  • Mesh related MCG oerformance is 300%-800% better.
    Here is a small benchmark number in fps.
    Thanks to Denis, I have cloneOnVerts maxscript vertion, too.
    The maxscript version runs at 4.4fps
 2016SP3%VertsFaces
LimitedPush.max1.123.43306.292,708185,408
cloneOnVerts.max1.207.03585.8153,458296,512
extractDeltas.max5.2218.43353.330,60360,000
spherify.max1.705.43319.860,002120,000
twist.max1.806.56363.960,002120,000
voxelizer.max1.303.73288.164,00096,000


  • MCG now only evaluates the graph when there is a change.
    This bug fix bring a big performance boost for static MCGs.
    My MatID_Swap modifier test on 120, 000 faces runs at 91.2fps instead of 1.8fps.


** I found a error for cloneOnVerts and corrected it.