Menu Close

Author: changsooeun

MCG : QuadScatter 1.5

quadScatter15teapot

QuadScatter MCG modifier is updated to 1.5 with 2 new functions.

Download : QuadScatter 1.5

A lot of peoples seems to think QuadScatter as just fancy “Greeble”. But, it does more than that. You can make wire fence, woven fabric, brick walls, bullet belts and etc. The newly added option will be useful for those things.

Follow Normal – this option will use original vertex normal when this MCG deforms object. If you want to weld togrther the cloned objects, turn on this option.

Place Guide ID – You can defined which portion of mesh would be aligned to quad. If you turn off this option, the bounding box of the source objects will confom to quad. Therefore, the entire object will be always inside of quad. If you need to have certain parts at the outside of quad, use this option. The faces which has defined ID will be use as guide to conform to quad.

Delete Place Guide – if you don’t need to keep the guide faces, turn on this option.

Original QuadScatter post.

MCG : QuadScatter

FFmpeg plugin for 3ds Max 2015-2017(mp4/dpx decoder)

3ds Max magician Qinming released a free FFmpeg reader plugin for 2015-2017.

Basically you can read any image/video that FFmpeg supports directly in 3ds Max as background or map. For example, mp4, dpx and jpeg2000. Yes, finally you can read dpx!

More importantly, 2016 and 2017 version supports image cache option. You can play image sequence in real time. I tested with HD(1920×1080) resolution dpx sequence on my PC, i7-2600K with GTX 960. When cache was off, I got 6.4fps. When cache is on. I got 31.2fps!

Josef Wienerroither posted a great demo video on YouTube. Must visit!

Qinming included a detailed readme file.Therefore, I would not repeat how to install and things here.

Here is a few important things to remember.

Only FFVideo Plugin supports image cache. If you want to cache image sequence. You have to use IFL2 format. IFL2 is exactly same as IFL. Qinming just uses this extension to show a different setup dialog.

IFL2 also give us a very important benefit. IFL2 allow user read other natively supported format like jpg through this plugin. Why is this important? Let’s say you want to cache jpg sequence for your background. 3ds Max will try to read jpg using native jpg reader/writer. If you remove the jpg reader/writer bmi, you can make this plugin load jpg, But then you can’t write jpg since this plugin only read image files. So… if you want cache jpg sequence. just make IFL2 of jpg image sequence. Then this plugin will be used to read the jpg sequence instead of max native jpg reader.

The easiest way to make IFL2 file would be just making IFL as usual with Sequence checkbox and rename it.

sequence

Set Display Performance resolution same as image size. If you put smaller number, 3ds Max will try to rescale image which slows down play back.

displayperformanceapture

If you turn on Gamma in 2016, the playback will be slower. 2017 is OK. The Gamma problem is fixed in 2017 by Qinming.

FFmpeg plugin for 3ds Max 2015/2016:
Link1: https://www.dropbox.com/s/zqwymzuoz…eg2015.rar?dl=0
Link2: http://7xt4sg.com2.z0.glb.clouddn.com/ffmpeg2015.rar
FFmpeg plugin for 3ds Max 2017:
Link1: https://www.dropbox.com/s/kpc7vjvx6…eg2017.rar?dl=0
Link2: http://7xt4sg.com2.z0.glb.clouddn.com/ffmpeg2017.rar
This plugin requires FFmpeg 2.8.6 LGPL library, download from here:
Link1(Official):https://ffmpeg.zeranoe.com/builds/w…pl3.0-opencl.7z
Link2:http://7xt4sg.com2.z0.glb.clouddn.c…pl3.0-opencl.7z

3ds Max 2017 – Fastest 3ds Max Ever

In 3ds Max 2017, there are a lot of performance improvements in may area.
I think It is the fastest 3ds Max ever.

  • Viewport is faster than ever in many cases. Selecting and manipulating sub-object is also a lot faster.
  • UV Editor is totally rebuilt with DirectX which is a lot faster and can handle bigger mesh.
  • TrackView also perform better and stable.
  • Now you can use alembic performance mode for any object and have an option for force cache.
  • Many unnecessary evaluation problem is fixed. For example, if object is hidden/frozen/display as box, the applied material would not be evaluated.

Here is some benchmarks numbers to show how much 3ds Max is faster than the previous versions.

 2012201420162017
Deforming Mesh6.932.045.495.3
HiRes Transform Anim25.017.920.027.7
Static Many Object3.83.93.714.8
Production Scene1.03.13.25.1

All numbers are fps. The fps number is measured by script. It is not from viewport statistics.

Deforming Mesh

This scene has 4 point cached characters.
4objs / 142k verts / 283k Faces.
Thanks to the brand new GPU mesh builder in 2017, 2017 is 1,300% faster than 2012.

HiRes Transform Animation

This scene has an animated hires rigged rigid mesh robot.
800 obj / 9.1mil verts / 18mil faces.

Many Static Objects

I made a 10+ buildings with Building Generator script. It has more than 20,000 low-res statics objects.
20,000 obj / 2.2mil verts / 3.2mil faces
You can see 400% performance improvement

Production Scene

One of sample scene file from Blur which is included in Brandon Young’s DVD.
Four point cached hires character and baked transforms.
106 obj / 407k verts / 791k faces
You can see 500% performance improvement compare to 2012.

MCG : QuadScatter

Download MCG : QuadScatter

quadScatter

QuadScatterUI
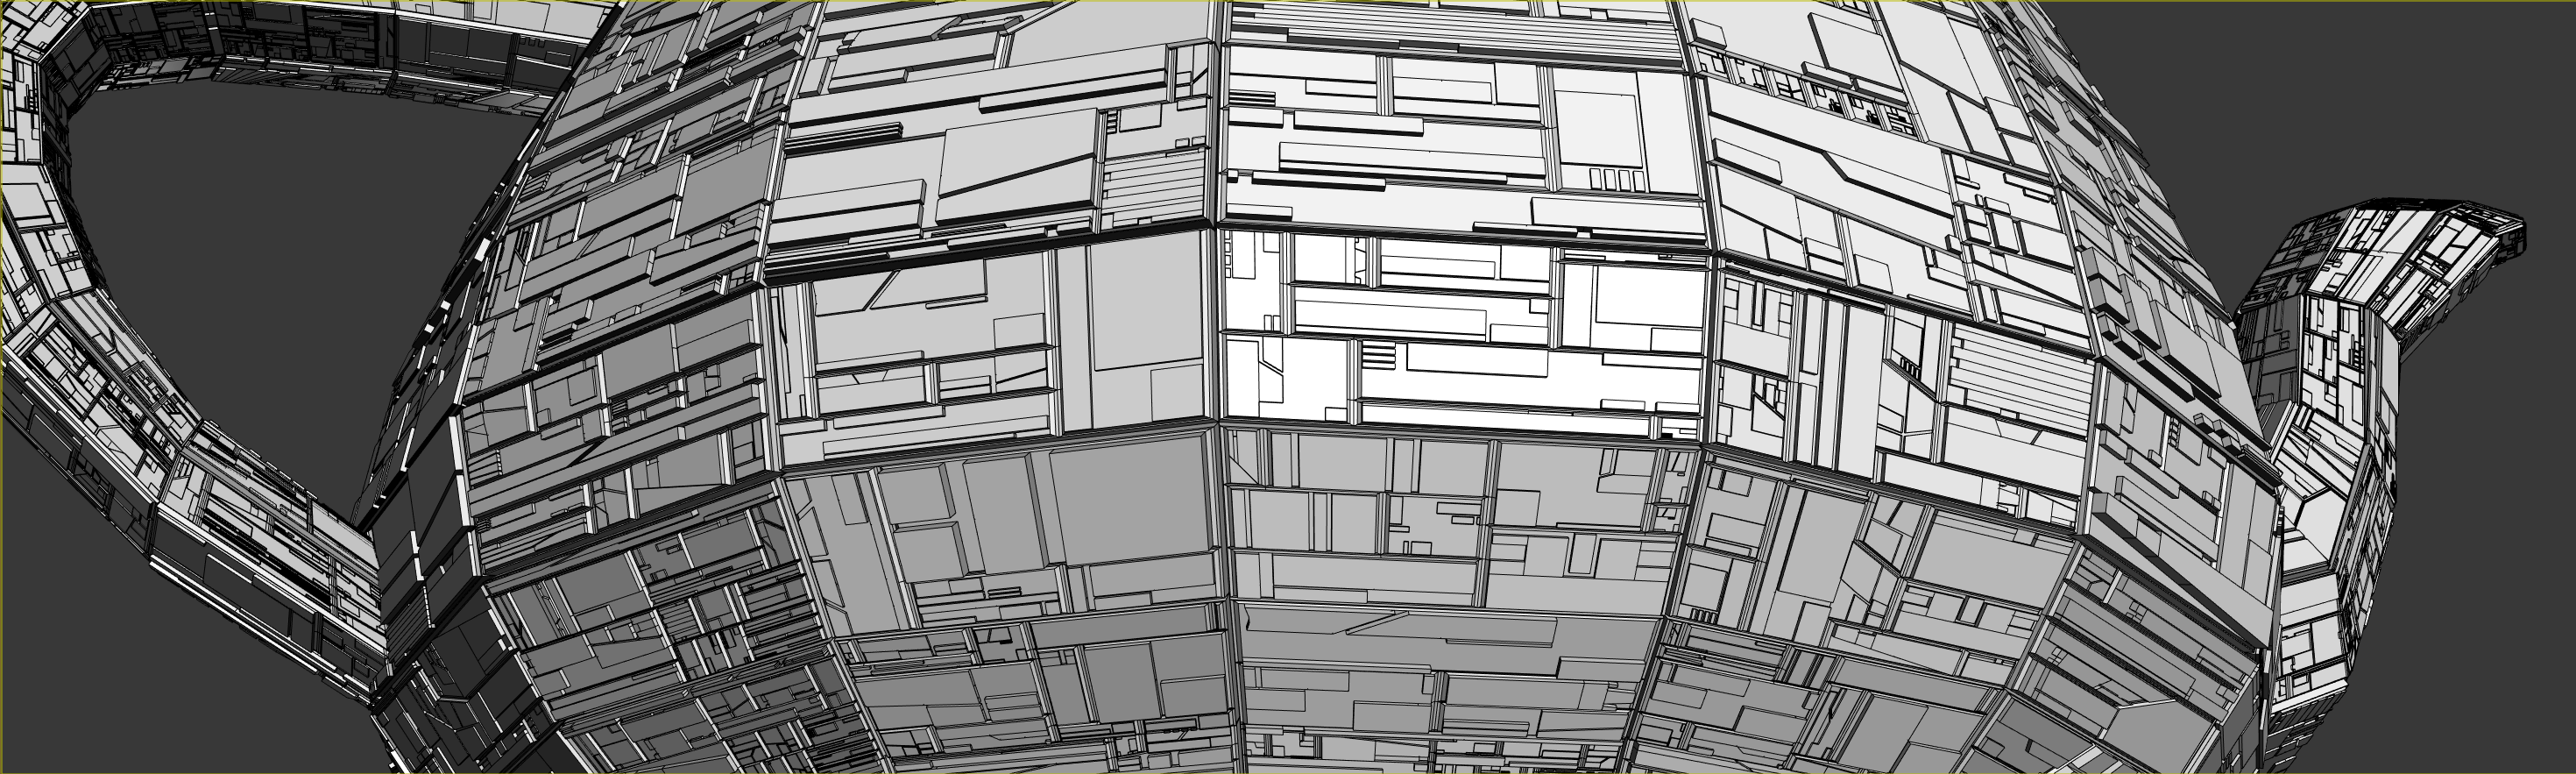
This MCG modifier allow you scatter object on quad polygons.

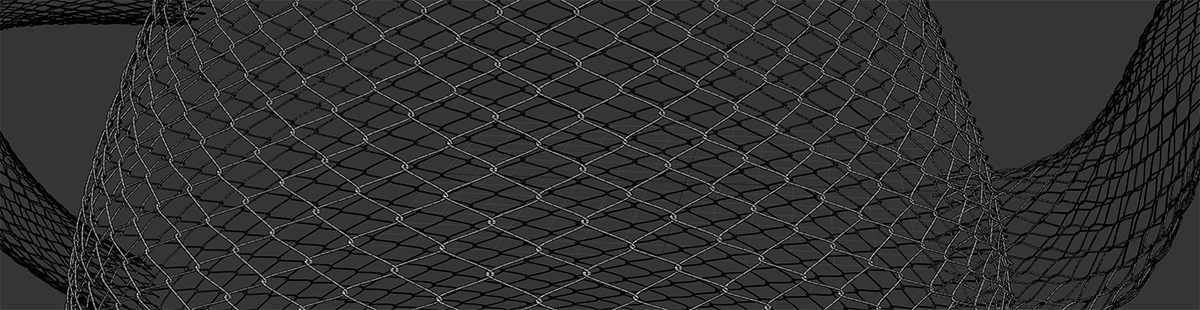
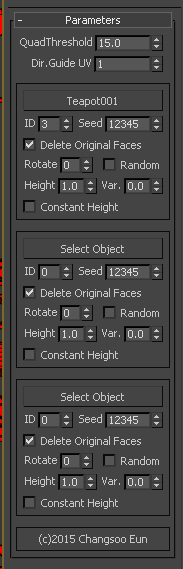
“Quad polygon” is determined by QuadThreshold value. For each polygon, this MCG will remove the vertex if the angle between two edges of the vertex is small than QuadThreshold value(degree). After that, if a polygon has 4 vertices, that is “quad polygon” to use.

As you can see in UI, this MCG has 3 set of the same controls. You can use 3 different source objects for each  Material ID. IF you need more, you can apply this MCG multiple times. OR.. you can modify this MCG and add more sets which is actually not that hard to do.

When you assign object, if the object has any descendants, this MCG will choose the one of them randomly. If you want to change the randomness, change the Seed number.

Delete Original Faces will decide what to do with quad polygon. If your scattered object is cover quad entirely, you can use this checkbox to delete the original faces.

Rotate allow you rotate the scattered object. You can only rotate 90x degree. 1 = 90, 2 = 180, 3 = 270. If you check Random, this MCG will rotate scattered object randomly.

You can also adjust height with Height spinner. 1.0 means original height. If you want to randomize height, use Var. spinner. This is an offset value. So… if your Height is 3 and Var. is 1, you will get height between 2(3-1) ~ 4(3+1).

By default, the height/width ratio of scattered object is preserved. This means the height of each scattered object will be different. If you want to make all scattered object’s height. Turn on Constant Height.

The last option, Dir.Guide UV is the UV channel ID which is used for determining scttered object direction. IF you turn on this option, U direction will be used to guide X axis of the scattered object.

This MCG is still WIP. I haven’t done any optimization, and I have a few more features to add.

I hope you enjoy it!


For the scatter source, check this Greeble Packs from Wayne Joes (jedilaw)

In the video, I used pacl2.

scifi3d.com/details.asp?intGenreID=11&intCatID=52&key=644


3ds Max 2016 SP3 MCG performance improvement

Today Autodesk released 3ds Max 2016 SP3.

This SP also brings us two big MCG performance improvement.

  • Mesh related MCG oerformance is 300%-800% better.
    Here is a small benchmark number in fps.
    Thanks to Denis, I have cloneOnVerts maxscript vertion, too.
    The maxscript version runs at 4.4fps
 2016SP3%VertsFaces
LimitedPush.max1.123.43306.292,708185,408
cloneOnVerts.max1.207.03585.8153,458296,512
extractDeltas.max5.2218.43353.330,60360,000
spherify.max1.705.43319.860,002120,000
twist.max1.806.56363.960,002120,000
voxelizer.max1.303.73288.164,00096,000


  • MCG now only evaluates the graph when there is a change.
    This bug fix bring a big performance boost for static MCGs.
    My MatID_Swap modifier test on 120, 000 faces runs at 91.2fps instead of 1.8fps.


** I found a error for cloneOnVerts and corrected it.

MCG: Trajectory Constraint Rotation Controller

Download MCG: Trajectory Constraint Rotation Controller

TrajectoryConstraintUITrajectory Constraint causes an object’s orientation to follow the trajectory(velocity vector) of a target object. For example. when you animate a car, the rotation of car would be defined my the direction of car movement.

Many of you probably know how to rig this with Script Controller and Look At Constraint. I just took the idea and implemented as MCG.

How to use this constraint is simple. Just assign as an rotation controller and pick Motion Target object.

When you assign Motion Target, this MCG will ask you if you want also constraint position to the Motion Target. You will probably need to say yes unless somehow you only need to have orientation.

This MCG also shows a good example of a benefit/advantage of MCG. This MCG is actually just a modified version of the new MCG_LookAt Constraint. I just replaced multi target list with a pick button and added a simple velocity calculation from Motion Target nodes. I did not need to reinvent all the parameter for upload. MCG allows you to easily modify/enhance someone’s MCG for your need. This is a big benefit.

One thing you need to know is that when you assign Motion Target node MCG will do the following things.
1) Assign Motion Target node as upnode
2) Turn off World from Upnode Settings
3) Set Upload Control as Axis Alignment.
4) Source Axis and Axis Aligned to Upnode as Z

What is does is letting you define up axis with the Z axis of Motion Target node.
Usually users uses just World Z as up axis. But, this can cause problem(flipping) when your object is moving vertically very close to World Z axis. To prevent flipping, you need to manage up ax, and I think this option is the best for that.

But, if you need to use other setting, then you can always change later.

MCG:CollapseSW + MXS

Download MCG:CollapseSW

CollapseSW_UIThis MCG and Msxscript combo will allow you to collapse/pointcache object with spacewarp(s) while preserving pivot and hierarchy.

The main calculation engine is CollapseSW MCG object. This MCG object converts vertex position from world space to local space.

Accompanying Maxscript calculate a new mesh using this MCG object and either replace original object with the collapse object or generate point cache and apply to the original object.

This MCG shows a few benefits of MCG.

1) The node based nature of MCG and the large amount of built in functions and Auto UI generation allow fast development. It took less than 5 minute for me to make this MCG object.

2) All MCG parameters are automatically exposed to Maxscript.


CollapseSW macroscript


To provide a complete workflow, I made CollapseSW macroscript. It is easier to make script than trying to explain in English for me.

The parameters are self-explanatory.

1) Select objects to collapse/pointcache. you can select multiple objects.

2) Choose what to do with Collapse/PointCache.

3) If you want to collapse, you don’t need to set anything. If you want to point cache, you need to set parameters for point cache and assign out file name.

4) If you select multiple objects and point cache, this script will only use the path portion and use object name as point cache name. If you check Make SubDir Per Obj, it will create a sub folder for each object automatically. If you choose to use One File Per Frame, you probably want to check this.

* Currently MCG mesh building is a little slow for high polycount mesh. It might take a while to point cache.


How to Install


CollapseSW.zip includes two files.

CollapseSW.mcg is the MCG package.Install this package through Scripting menu > Install MCG package..

csTools-CollapseSW.mcr is macroscript. Just drag and drop to a viewport. Then you will see Collapse/PoinrCache SW in csTools category.

CollapseSW_CustomizeUI


MCG: BlendedBoxMapping modifier

Download MCG:BlendedBoxMapping 1.1

Update: 03-14-2016

Fixed crash caused by EXT2. Thanks for Vu Nguyen.

BlendedBoxMappingUI

TBlendedBoxMappinghis is a modifier that makes Neil Blevins’ Blended Box Mapping technique simpler.

It assigns 3 different planar UV onto object using the bounding box of assigned objects. Use Select boxmap gizmo mesh button to select a gizmo object.

Currently you can only use an object which can be converted to mesh.

To prevent an accidental render of gizmo object, this modifier will turn off the object’s renderable property and apply Lattice modifier for your convenience.

If no object is assigned as gizmo, this modifier will use the object’s own bounding box as gizmo.

Since this modifier projects 3 planar UV from each axis, it will generate 3 UV channel. You can set the channel ID for each axis in UV group.

I also added the Use userdefined size checkbox so you can keep the texture scale across multiple objects.

If you check this option, a cubic bounding box with the  size of the below Size spinner will be created and used as gizmo.

Randomize Gizmo option allow you randomize the local bounding box gizmo center and/or rotation.

Amount(%) is a percentage of gizmo X size or 180 degrees. Currently this option uses the distance between the first vertex and local origin as a seed to generate ransom numbers. Therefore, if two objects are exactly same, they will get the same result unfortunately.

This modifier has an option to generate blending mask as vertex color.

If you turn on Generate blend mask VC checkbox, X/Y/X bleding mask will be generate as R/G/B vertex color.

If a vertex normal is parallel to projection axis, it will get 1.0. If a vertex normal is perpendicular to projection axis, it will get 0.0.

You can also limit the blending area with min/max value.
Then the blending will happen between min/max instead of 0.0/1.0.

The last button is Generate TemplateMtl button. If you click the button, a Composite map with 3 bitmap and 3 vertex color map will be created at active material editor slot.

BlendedBoxMappingMtl

MCG: MatID_Swap & MatID_Offset

Download MCG: MatID_SwapDownload MCG: MatID_Offset


MatID_Swap

This modifier let you change the current Material with a new MaterialID.
You can swap upto 10 sets of IDs at once.
the following image shows that the MaterialID on the teapot has been changed from..
1 -> 2
2 -> 3
3 -> 4
4 -> 1
If you set From to 0, the ID set would not be used.

MatIDSwap
This modifier also support the cache of updated MaterialID assignment.
If you turn on cache, this modifier will cache calculated MaterialID assignment once and reuse it until you force to update the cache.
Therefore, when you change the value, DO NOT turn on this option.
To refresh the cache, turn off cache and turn ON and OFF forceCacheUpdate.


MatID_Offset

This modifier let you offset MaterialID numbers.
If you had MaterialID 1, 2, 3, 7 and set Offset amount as 4, you will have 5, 6, 7, 11.

If you want to start MaterialID at a specific number, you can turn on Use Absolute StartID checkbox and set the Start ID spinner.
Then this modifier will automatically calculate offset number and apply them.

For the above case, you can turn on Use Absolute StartID checkbox and set StartID 5.

MatIDOffset