This will be a long tutorial. Be prepared!
I’m sure many of you already have used some form of pipeline or at least heard about it. Having a good pipeline could make your job easier, faster. It would reduce the burden of non-artistic tasks, and let you concentrate on making art.
If your studio is big enough to have dedicated TDs and engineers, you probably already have something. But, if you are a small team, the chances of having an automated pipeline would be low since it requires resources and effort. Or, simply you may not even know where to start.
I have had a chance to build a few pipelines from scratch and also have used a few existing pipelines, big and small. From those experiences, I want to share how I would build a new pipeline for a small team if I start again a small team.
Before we start, I just want to make sure that there is no “right” way for a pipeline. The best one is always the one that artists want/like to use, and every studio and every artist has their own taste. So, use this post as just a guide.
Does your studio have a rule for saving a max file and render outputs?
Let’s ask the first question. Does your studio have a rule for saving a max file and render outputs? If the answer is Yes. Then, you kinda already have a pipeline. You may not have an automated one. But, you certainly have a pipeline for sure. But, if it is not automated by code, a lot of benefits of having a pipeline will be lost. Humans simply can’t remember all those rules and execute the rules consistently all the time.
Consistency is the key for automation.
The first step for an automated pipeline can start from establishing a naming convention for project files and render output and making a tool for it.
Why? Because using a naming convention requires a minimum amount of coding. Sure, you can use custom DB or off-the-shelf solutions like ShotGun(Flow) or even xml/json. But, all these methods need to be coded and maintained by someone. If you don’t even have or can’t afford a TD, you probably can’t have a developer for this. Also, even when you could use these kinds of more advanced methods, it is good to have a solid naming convention.
Project folder and centralized storage
This workflow assumes everybody shares a central storage. In my 20+ years career, I never used project folders and have always used centralized storage. Considering a pipeline exists for multiple artists to work together, I’m not sure how the isolated project folder would work. So, this post assumes everybody has access to the same drive, either it is physically the same drive or synced.
Collect what kinds of information you need to define a task
Our goal is having a path and filename that would be unique per task.Then, we can add versions to the name. To get this, we need to collect what kinds of information is needed for a unique task. In this post, I’ll assume my studio is mostly working for episodic shows as an example.
To define a vfx task for episodic shows, you would need to know
- Show name – The name of project or show like House, Airbender
- Episode number – Usually you would combine season and episode as one entry
- Shot name – each shot name
- Task type – Is it modeling? Lookdev? animation?FX?
- Task name – each task of a task type
You can add more entries like artist name(I usually don’t recommend) or 2 level task name, But, I would have it as simple as possible.
This also can work for a feature film or commercial, you can use the episode entry for sequence. If it is a simple commercial or music video. You can just leave the episode as “000” or something.
Again, Keep it simple and unified. Don’t try to have exceptions and conditions. Yes, in the end, code can deal with all kinds of exceptions and conditions. But, the more parts you have, the more chance you have problems.
OK. The theory itself is simple. But, actually establishing a rule is not that simple. There are a lot to consider. Let’s get into the details.
Parse-able Filename
The first rule of a naming for codes – Never ever use space in the name nor path. NEVER! Trust me just don’t do it. Life is easier without space.
That being said, we can start by simply assembling each entry with “_” for the filename. Something like this. Then, we can say that… “To get the information from the file name, split filename with _. Then, the first one is the show name. The second is the episode number, and on and on”.
HOUSE_201_24x56_FX_Explosion_v001.max
Assembling filename by a naming convention is easy. But, the name also need to be pare-sable by code. Basically, we should be able to extract back the information that assembles the file name. In that sense, adding “_” between each item is not enough. What if your client wants to use “_” in a shot name? Like “24_56”? Then, the filename becomes like this.
HOUSE_201_24_56_FX_Explosion_v001.max
Now filename parsing logic doesn’t work anymore because the 4th element from split would be “56”, not a task type. So, we need to have more complicated rules than just adding “_”. Good thing is that any code is very good at handling those complicated rules as long as the rule is clear and machine friendly. FYI, if you google “regex”, you can see what codes can do for parsing strings.
Let’s try a simpler logic. One of the common tool for establishing a naming convention is using special characters as separators to divide the filename into sections. Usually “_” and “-” are used for the separator because a lot of other special characters are an illegal character for a filename and path.
Now let’s think about which items we have more control over.
- In my experience, there is a higher chance of possibility that clients could have their own naming convention for shots.
- We have complete control over the task type since it is an internal stuff.
- Usually project name and episode name could be a single word.
- We need to have a good flexibility for the task name
With this requirement, this is what I did.
I used “-” as a main separator between task related items and others. So, I added “-” in front of the task type and decided not to use “-” in the task name. Then, we can say that “Separate filename divided at the last -”. Since the last “-” is the divider between task and else. You can use “-” in the shot name if you need. Something like this.
HOUSE_201_24-56–FX_Explosion_v001.max
Then, split the front part with “_” and take the first item as a show and the second item as an episode.
HOUSE_201_24-56 – FX_Explosion_v001.max
Show_episode_shot –
Task part is even easier, split the green part with “_”. Then, the first item is a task type, and the last is a version, and the anything inbetween is task name. You can use any alphabet, number and underscore fore task name.
HOUSE_201_24-56 – FX_This_is_Your_Explosion_v001.max
Show_episode_shot –tasktype_taskname_version.max
File Path Naming Convention
A file path convention is easier than a filename convention since we just need to put each item at each level. But, there are a few extra things to consider compare to the filename convention.
Let’s see my sample file path first.
Z:\Project\HOUSE\201\work\24-56\FX\This_is_Your_Explosion\max\HOUSE_201_24-56 – FX_This_is_Your_Explosion_v001.max
First, you will need a root folder. That’s “Z:\Project”. Don’t make it too long or deep. Even tho we are making folders with code. The shorter, the better. Then, the show folder, “HOUSE”. Then, the episode folder, “201”. So far so Good. Easy.
But, what the heck is the “work” folder?
Currently we only have been talking about the project file, like max file and maya file, naming convention. But, you actually need a few different naming conventions for different things. For example, you can’t really use your max file naming convention for your render output. You will likely need more than one outputs, such as render element, from a max file. How about a published assets? If you build an asset publishing system, they will require a slightly different naming convention, “work” here means your working project files such as max and maya files, and we will put all project files under this sub folder.
Now you may wonder why under each episode? Why not under the show folder? Good question.
Your storage is expensive. You can’t store everything forever. At some point, you need to delete files. Even tho I do many things with scripts, I don’t really delete folders with scripts. You may think you made a perfect script for delete folders. But, imagine somehow your logic had a hole and all the project files for tomorrow delivery got deleted!
By having all your projects under the “work” folder under episode folder, you can clean up a project folder per episode easily. If you add this under show, you have to keep all projects for the show until the show ends or manually visit each episode and clean up. If you add it under the shot folder, you have to visit every shot to clean up projects files. Putting under episodes would be a happy medium.
We will talk later again. But, using the same logic, if we have “image” or “output” folder at the same level for render outputs and comps, you can clean up those folder first, and then clear projects later.
After “work”, continue just like file name, and the last folder would be DCC type or the project file format, and all versions for the DCC will be in the same folder.
Some might wonder why not have a folder for each version and have a DCC folder under there like this.
Z:\Project\HOUSE\201\work\24-56\FX\This_is_Your_Explosion\v001\max\HOUSE_201_24-56 – FX_This_is_Your_Explosion_v001.max
That kind of folder structure is usually for published assets which would have different formats for the same version all the time. For example, when you publish a model asset, you would publish an alembic file, a usd or a fbx along with your .max file. In that case, having the folder under the version folder would make sense.
But, usually you wouldn’t switch program between versions. If you ever need to switch to other program, you can just restart from v001.
OK, let’s see what we have again. This is the full path that I’m using.
Z:\Project\HOUSE\201\work\24-56\FX\This_is_Your_Explosion\max\HOUSE_201_24-56 – FX_This_is_Your_Explosion_v001.max
- Z:\Project – root folder
- HOUSE – show(alphanumeric one word)
- 201 – episode(alphanumeric one word)
- work – project folder root
- 24-56 – shot(alphanumeric & underscore & dash)
- FX – predefined task types
- This_is_Your_Explosion – task name(alphanumeric & any number of underscore)
- max – each program identifier
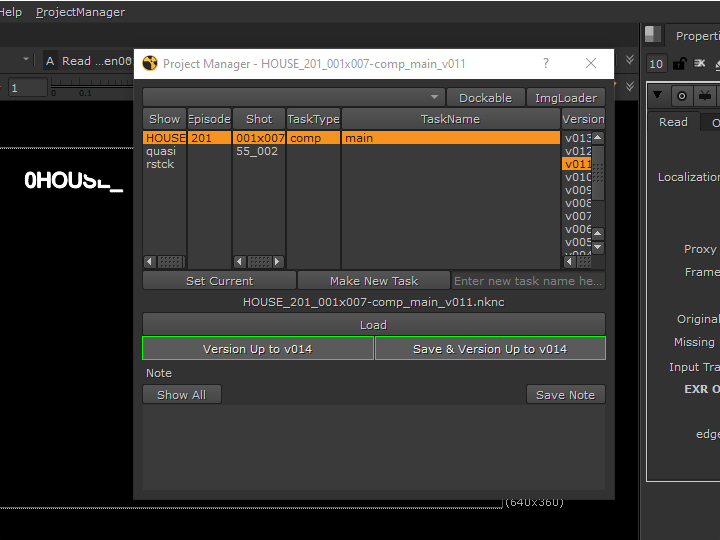
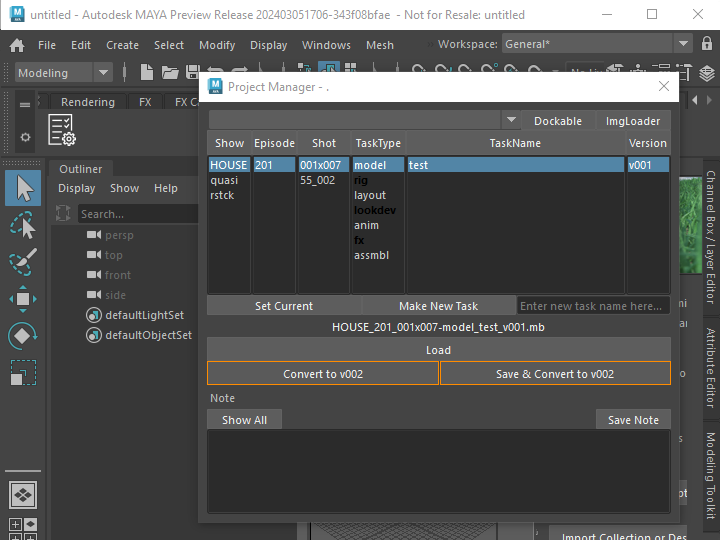
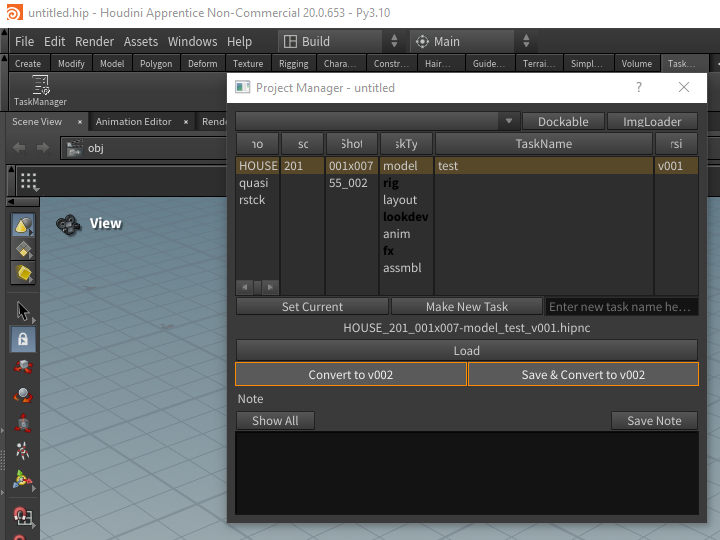
Project Manager Tool
Now we have a rule. Next, we need a tool. Because the consistency of the data is key for pipeline automation. As I said in the beginning, No human can remember these rules and execute correctly all the time. Only way to make this work is having a tool. Something like this.
- The tool hides the rules and the naming convention from artist and allow to browse the project easily.
- Allows to load/version up their project. When the version is up, it will automatically version up to the latest.
- Allows to create new task, and convert the current scene as the first version.
- Allows to add/edit notes.
- Remembers the history of project file load/save and allow to quickly select from history.
These list is just a start. Since you have a way to browse set the context of task. You can add more and more features to this tools. For example…
- The time logging could be integrated into this UI or even automate it by detecting the file being opened.
- Could have an easy shortcut to open folders for the chosen task.
- Could display Flow(ShotGrid) notes for the task.
- and more and more.
Thanks to the fact that most programs are now supporting Python. You can build the interface once and reuse it for many programs. You can see my example tool is working in Maya, Houdini, Nuke even for Photoshop.
Expand The Naming Convention to Renders
After the project file name convention and tool are sorted out, the next stop would be the render output file name.
For render output, we need to extend upon the project file naming convention so we can automatically track where the renders are coming from.
This is an example of render output file path and name convention.
Z:\Project\HOUSE\201\render3d\24-56\FX\This_is_Your_Explosion\ExplosionHero\v001\HOUSE_201_24-56-FX_This_is_Your_Explosion-ExplosionHero_v001.0000.exr
This is what I did.
- I changed “work” to “render3d” so you can have a render3d folder per episode. With this, you can delete render outputs first after a project is done while keeping project files.
- You would have multiple outputs from a project file. Usually we call them “pass”. So, I added the pass folder after the task name folder.
- I used “-” as a separator so I can use “_” in the pass name if I need.
- Then, we need the version folder since you will likely output an image sequence. It is always a good idea to have only a sequence in a folder.
- Then, you have the exr sequence file in the version folder. For frame number padding I would recommend to use “.” as a separator than “_”.
NOW here is a little bit controversial part, render elements(AOV). If you are using the multi-channel exr workflow. You wouldn’t need a render element sub folder. I personally am not a big fan of putting all channels in a gigantic exr file.
If you are using the split file workflow, you also need to add a render elements folder. As I mentioned once, it is always better to be consistent. So, I would have the RGB element in its own folder. But, some may opt to leave RGB in the version folder and only have other elements in their own folder.
Then, your file could be something like this.
Z:\Project\HOUSE\201\render3d\24-56\FX\This_is_Your_Explosion\ExplosionHero\v001\Bty\HOUSE_201_24-56-FX_This_is_Your_Explosion-ExplosionHero-Bty_v001.0000.exr
If you decide to have AOV folders, here is one more thing you might think about. You can swap the position of the AOV folder and the version folder like this.
Z:\Project\HOUSE\201\render3d\24-56\FX\This_is_Your_Explosion\ExplosionHero\Bty\v001
This makes deleting unnecessary AOVs easier since all versions for a pass are under a folder and. it is easier for a code to pull all the versions list. But, this also makes it harder to know what is the highest version of all to determine the next version, and deleting certain version becomes more difficult.
OK, now one last thing I need to talk about render output is how to decide the version number. Obviously the simplest method would be to keep versioning up for every render submission.
Another way of versioning is syncing the output version number to the scene file version number. For example, , If your scene version is v008, your render output also becomes v008. It is possible because the render output naming convention has all the items of the project file naming convention. There is no chance that different max files could generate the same render output.
If you do this, you have to version up your scene file to get a new version of renders. This also means you will have skipped versions. That sounds bad. Why would you do this then? Because it allows you to easily track where your renders come from without any extra system. If you automate max file version up after submitting render, you can always go back to the version of max file when you need and get exactly the same render again.
renderStacks to the rescue
Now you need a tool to set the render output path automatically. Yes, right. This is the moment that you need renderStacks. 🙂
In the following picture, you can see I just made a global function and feed it as maxscript token for rednerStacks. Now you never need to type render output path ever. renderStacks will automatically set the render output path every time when you submit or render.

Of course, you can use any other script/tool, too. The point is that you must have a tool to set it.
Comp/PreComp/Plates
Now you have a naming convention for project file and render output and have a tool to handle those path. Then, we can say you have a MVP(Minimum Viable Product) pipeline. But, if your workflow requires comps most of the time. Then, you would like to have naming conventions for comp and precomp as a next step.
This was the project file naming convention for max.
Z:\Project\HOUSE\201\work\24-56\FX\This_is_Your_Explosion\max\HOUSE_201_24-56 – FX_This_is_Your_Explosion_v001.max
For 3d projects, it made sense to have lookdev, fx, and animation task types. But, for comp, do you need them? Do you have a comp for fx and a comp for lookdev? Probably not…
Then, what should we do with the task type? We can remove the item from file and path name convention. That means you would need a separate naming convention for comps which means it will cost more to develop and maintain while having more chances to have a bug. As I mentioned a few times, it is always better to be simple and consistent.
Therefore, I would keep the task type. But, I would change the items. We can at least have a “comp” task type. How about the task name? Usually you would have 1 comp per shot. But, you never know if you would need more than 1 comp in the future. What if the director wants to have 3 options! Since we already have it in the naming convention, it is better to keep it consistent and flexible. But, we can have a soft convention to agree to use “main” as a default task name.
Z:\Project\HOUSE\201\work\24-56\comp\main\nk\HOUSE_201_24-56-comp_main_v001.nk
Now here is something to think about. How about other support task like precomp or roto? If it is for precomp for the same nuke file. It could be just another “pass” like 3d render. But, if it needs its own nuke file, you have 2 choices. 1) having its own task type 2) using a task name.
If you decide to have its own task type such as “precomp” or “roto”, you will have one more level of flexibility( task name + pass name). It also means precomp or roto will have their own sub folders which means it will be easier to clean up. But, you will have a lot of empty or folders with only one sub folder.
Or, you can just utilize the task name. Just make sure artists use “precomp_” or “roto_” prefix or build a tool that can force it.
Lastly, I would separate the comps from the 3d renders. Something like under “image2d”. Our final comp/precomp file naming convention will be like this.
Z:\Project\HOUSE\201\image2d\24-56\comp\main\main\v001\HOUSE_201_24-56-comp –main–main_v001.0000.exr
- main – is the task type.
- main – is output name from a comp project file. If you are using Nuke, this would be your Write node name.
Of course, you should never generate this path manually. For local rendering, you would make own render dialog with automatic path update. For network render, you would a code to update Write nodes version to latest before open network render submission dialog.
Happily ever after
After you implement a good naming convention and tools, you can start to take an advantage of the consistent and predictable structure of files. For example, this is the image loader for my project manager. It build the list of all image assets(render3d, comp, precomp)
This is a Nuke Read node updater.
Assets, Caches and Beyond
If you want to go further, you can start to explore a pipeline for asset publishing. I wish continue this tutorial to cover asset publishing. But, unfortunately, everybody works differently, and it is hard to make a universal solution without bloat.
But, I have a few cents that I can share from my experience.
- Start from the simplest asset. Usually the camera publishing is the best candidate. The data is small, and it is such an essential.
- The next would be the cache or proxy that you would use most often. If you use Phoenix, that would be a good candidate.
- The best pipeline is just automating what you have done. Do not try to force what you saw or heard from the internet. Again, each company has own way of working. Do not try to change it. Try to improve it.
- Don’t try to do too many thing too fast. In terms of pipeline, the stability is more important than features. If artist can’t trust the pipeline, they will try to avoid it and work around it.
OK! That’s it. Now you know where to start to build your awesome pipeline. I think I put enough information in this post. But, if you think you need help or just want to use what I have built. Contact me through LinkedIn message. I’m available for consulting. 🙂