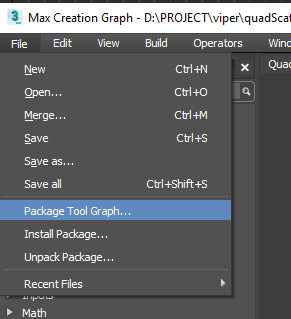
3ds Max 2027 is out, and it finally adds some really important improvements to the MaxScript commands getMaxFileObjects and mergeMaxFile, including the ability to query and merge layer information and more. As a little test project for the new features, I made a Python script called csMerge. It’s also my first full Python script.
This is the UI. As you can see, it supports both layer-based and hierarchy-based merging.
Manual
csMerge is a 3ds Max tool for merging selected layers and objects from an external .max file into your current scene. You can also merge layers only — without bringing in any objects. All standard merge prompt options (duplicate names, materials, and reparenting) are exposed directly in the UI.
Installation
Unzip the package into any Application Plugins folder. The default location is:
C:\ProgramData\Autodesk\ApplicationPlugins
Restart 3ds Max — the tool will be available under File > Import > csMerge.
File Browse Button
Select a file to merge – Opens a file browser. Pick a .max file to load. The tree populates with its layers and objects. You can change the file at any time by clicking again.
Search Bar
Search box – Type to filter the tree by name. Updates automatically after a short pause. Press Enter to search immediately. X (Clear) – Clears the search and restores the full tree. Aa (Case Sensitive) – Off by default. Turn on to make search case-sensitive — spine will no longer match Spine.
Toolbar — Toggle Buttons
Show Tree (tree icon) – On by default. Shows layers and objects in their parent–child nesting. Turn off for a flat alphabetical list. Show Searched Only (filter icon) – On by default. While searching, hides everything that doesn’t match — the tree collapses to matches only. Turn off to keep the full tree visible; instead of hiding non-matches, the tool selects the matching items. Show Objects (eye icon) – Off by default. Shows individual objects nested inside each layer. Turn off to see layers only. Only works in Layer mode — disabled in Hierarchy mode.
Toolbar — Mode Buttons
These two work as a radio pair: exactly one is always active. L (Layer Mode) – Default. The tree is organized by layers. Objects appear under their parent layer. H (Hierarchy Mode) – The tree is organized by scene parent–child object relationships, regardless of layer. The Merge Layers Only button and Show Objects toggle are disabled in this mode.
Toolbar — Superclass Filter Buttons
Eight buttons, all on by default. Each hides a specific object type from the tree. Click to toggle off; click again to restore. These are not saved between sessions — they always reset to all-on.
Alt+click – a button to solo it — all other buttons turn off, leaving only that type visible.
Alt+click – the same button again to restore the state from before the solo.
Right-click – any button for a context menu with: Select All, Select None, Invert Selection.
Tree — Right-Click Context Menu
Right-click anywhere in the tree for a context menu.
Select All — selects every visible item in the tree
Select Children — adds all children of the selected item to the selection
Select None — clears the selection
Invert Selection — deselects selected items and selects everything else
Expand All — expands every node in the tree
Expand Children — expands all children of the selected item
Expand Selected — expands the selected items
Collapse All — collapses every node in the tree
Collapse Selected — collapses the selected items
Options Section
Display Influences (checkbox) – Off by default. When on, selecting an object (or a layer in Layer mode) highlights its influence objects in amber in the tree. The tree also expands to show them. Checking a layer highlights the combined influences of all objects in that layer. Select Influences (button) – Adds the currently amber-highlighted influence objects to your selection. Does not deselect anything you already have. Only useful when Display Influences is on and Influences are shown. Merge Render Settings (button) – Merges the render settings from the loaded file into the current scene. Sits on the right side of the same row. Does not require any selection — it always acts on the currently loaded file. Match Layers by Name and Parent (checkbox)- Off by default. Controls how incoming layers are matched to existing scene layers.
Off: matched by name only.
On: matched by both name and parent layer. Use this when your scene has multiple layers with the same name under different parents.
Duplicate Name – What to do when a merging object has the same name as an object already in the scene.
Prompt — 3ds Max asks you each time
Delete Old — removes the existing object, brings in the new one
Merge — keeps both
Skip — skips the incoming object, keeps the existing one
Auto Rename — renames the incoming object automatically
Duplicate Material – What to do when a merging material shares a name with one already in the scene.
Prompt — ask each time
Use Merged Material — replace the scene material with the incoming one
Use Scene Material — keep the existing scene material, ignore the incoming one
Auto Rename-Merged Material — rename the incoming material, keep both
Parent – What to do when a merging object has a parent that also exists in the scene.
Prompt — ask each time
Always Reparent — reconnect the parent relationship using the matching scene object
Never Reparent — bring the object in with no parent attached
Merge Buttons
Merge Layers Only Merges only the selected layers — no objects. Use this to copy a layer structure into the scene first. Only available in Layer mode. Merge Merges the selected layers and/or objects.
Selecting a whole layer ? merges the layer and everything in it
Selecting individual objects ? merges those objects (creates their layer if it doesn’t exist)
Selecting some objects within a layer ? merges only those objects, not the whole layer
Mix of whole layers and partial layers ? handled per the above rules
Maxscript Update
getMaxFileObjects
2 new keyward arguments are added to layer information and renderSettings of an external file.
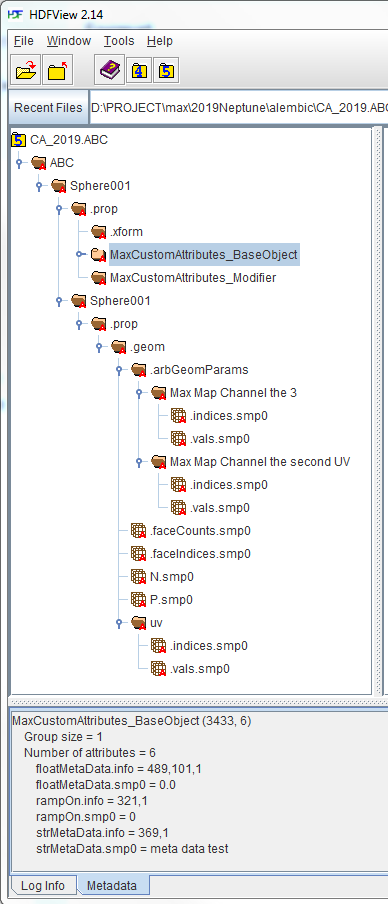
Node name Node hiearchy level Node handle Node Parent handle Layer name Whether the node is a Bone Node Whether the node is a Group Head Whether the node is a Group Member Node’s influenced nodes as an array Node’s category (superclass) Node color as RGB DWORD integer WireColor
renderSettings:<&var> If specified, a node handle corresponding to the ‘Render Settings’ in the merge dialog is saved to var. This value can be passed to mergemaxfile in the list of handles to merge to merge the render settings.
mergemaxfile
Added way to selectively load layers (with or without nodes).
If mergeNodesByLayer is false or not specified, just the specified layers(and their parent layers, recursively) are loaded. If mergeNodesByLayer is true, the specified layers (and their parent layers, recursively) are loaded, and the nodes in the specified layers are loaded
When you download the plugins, you’ll notice there’s no installer—just zip files. So how do you install them?
The short answer: Simply unzip the contents into this folder:
C:\ProgramData\Autodesk\ApplicationPlugins
Now, for the longer explanation:
Autodesk Application Plug-in Package format
3ds Max introduced the Autodesk Application Plug-in Package format quite a while ago—so long, in fact, that it’s hard to remember exactly when, but it’s been around for at least a decade.
What is the Autodesk Application Plug-in Package format?
It’s a self-contained folder structure that includes everything your plugin needs. Within this folder, there’s a special XML file called PackageContents.xml that tells 3ds Max what’s inside the package and where each component is located.
The key point here is the self-contained folder structure. Before this system was introduced, a plugin installer had to scatter components across multiple locations: register entries in plugin.ini, install macroscripts, copy over various support scripts, and worst of all, drop DLLs directly into the 3ds Max root folder. This made installations messy and risky.
With the Application Plug-in Package system, everything—DLLs, scripts, macros—can now live neatly inside a single, isolated folder. This creates a clean separation from the 3ds Max root folder. At this point, NO ONE should be adding or modifying anything inside the 3ds Max root folder.
3ds Max looks in specific places for application packages. One default location is: C:\ProgramData\Autodesk\ApplicationPlugins
If you open this folder, you’ll notice many built-in features—like MaxToA, Retopology, and USD—are implemented as application plug-in packages.
If we open one of the folder like C:\ProgramData\Autodesk\ApplicationPlugins\USD for 3ds Max 2026, you’ll find a file called PackageContents.xml. This file tells 3ds Max what to load and where to find it.
This PackageContents.xml file must be placed directly inside the first-level folder under C:\ProgramData\Autodesk\ApplicationPlugins.
So, when you download plugins like those from Josef’s website, the ZIP files contain subfolders for each 3ds Max version, with each one having its own PackageContents.xml.
That means the version folder must go directly under the ApplicationPlugins folder, like:
But, some developers bundle multiple versions under one top-level folder like guruware’s PLY importer/exporter. If you unzip gwPlyIO_v1.42-max-guruware.zip, you’ll find:
You just extract gw_PlyIO into C:\ProgramData\Autodesk\ApplicationPlugins, and all supported Max versions (2017–2026) will be available at once.
ADSK_APPLICATION_PLUGINS
Since 3ds Max 2022.3, Autodesk supports defining a custom application plugin folder using the ADSK_APPLICATION_PLUGINS environment variable. Any path added here acts like the default ApplicationPlugins directory.
For example, if your environment variable points to: D:\PROJECT\_maxDefault\ApplicationPlugins
Then the plugin installer should place the plugin like this: D:\PROJECT\_maxDefault\ApplicationPlugins\Thinkbox_KrakatoaMX_2026
This gives the studio and users a lot of freedom in how they manage plugins.
Pipeline Integration
Again, I strongly recommend utilizing the pipeline integration as much as possible. After ti setup this once, I hardly setup anything when I upgrade 3dsMax.
With the newer OCIO-based color management, you now have the ability to save your output files in a variety of color spaces. This is a big change from the old days when you were mostly limited to gamma-corrected floats.
While it’s great to have more options, that doesn’t mean you should use them all at render time. In fact, it’s best practice to save your renders in the same color space as your rendering space, and handle any color conversions later during post-processing.
3dsMax 2024
In 3ds Max 2024, the Render Output Defaults were set to “No Conversion,” and users could only select one color space for all automatic render outputs.
This setup worked well for studios primarily outputting EXR files. However, it wasn’t ideal for users who also needed to export legacy gamma-encoded formats like PNG or JPG.
3dsMax 2025
The developer received user feedback and updated the default settings to align the Render Output Defaults with the Display and Views defaults.
This change affects only gamma-encoded formats; linear formats like EXR or HDR will continue to use “No Conversion.”
It seemed like a good compromise at first, but it introduced a new issue. Some studios were using ACEScg as their rendering space, yet they required linear sRGB output for their post-processing workflows.
I should note that using different color spaces for rendering and output can lead to issues—for example, data render elements may contain incorrect information. However, the user needed to use this workflow regardless.
3dsMax 2026
In 3ds Max 2026, two sets of defaults are available—one for gamma-encoded formats and another for linear formats—giving you control over each scenario. These settings are also exposed in MaxScript (MXS) accordingly, by adding a fileType argument to the GetDefaultOutputConversion() and SetDefaultOutputConversion() methods.
That said, I still strongly recommend not using different color spaces for rendering and output.
Other Color Management Update for 3dsMzx 2026
Finally, network rendering (slave mode) is now fully supported for both Backburner and Deadline.
IFL support is also included.
setclipboardBitmap global function, Image button, Angle UI, ImgTag UI, and createDialog now has doDisplayTransform:<boolean> parameter For Bitmap UI, the keyword arg is doDisplayTransformBitmap.
colorContext keyword argument for ColorPicker UI has been added.
This new approach allows easy appending or overriding of default hotkeys and menus, making them fully supported by application plugin packages. Scripted setup is now largely unnecessary, and third-party developers are expected to use application packages for hotkey and menu definitions.
Studios that previously used scripts for custom menus may find it trickier now, as script-based menu edits are no longer recommended.
To help with this, 3ds Max 2026 introduces a way to load new hotkey and menu files after plugins/scripts are initialized but before the final user configuration is applied.
This is implemented by a new 3dsmax environment variable, ADSK_3DSMAX_CUI_PRE_USER_CONFIG_%MAJOR_VERSION%. , so e.g. ADSK_3DSMAX_CUI_PRE_USER_CONFIG_2026.
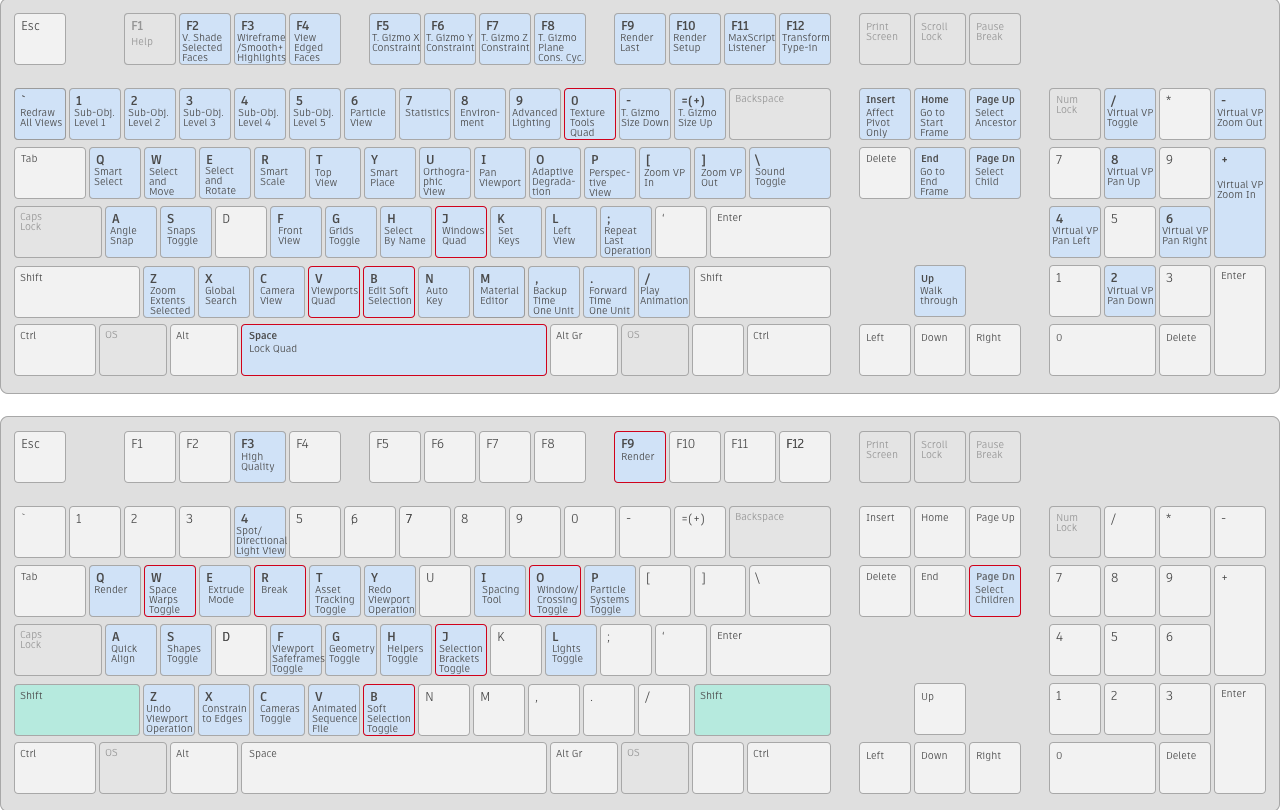
The new environment variable allows a list of cui files such as .hsx(hotkey) and .mnx(menu), separated as usual for envVars by a semicolon ‘;’ like the following image. Order of evaluation will be as specified in the list.
This is my menu setup.
Here’s what I did:
I created a “csStudio” menu, removed Arnold, Civil View, and Substance, then saved it as D:\PROJECT\_maxDefault\menu\csStudio.mnx. After that, I set the ADSK_3DSMAX_CUI_PRE_USER_CONFIG_2026 environment variable as shown above.
Next, I added a “MYMMYMY” menu and saved the .mnx file in the User Settings folder.
With this setup, studios can deploy a default menu without scripting, while allowing individual artists to maintain their own custom menus.
Bonus Tip, ADSK_3DSMAX_USERSETTINGS_DIR !
I also set the ADSK_3DSMAX_USERSETTINGS_DIR environment variable, which lets me keep all settings in a shared folder across 3ds Max versions. Since I didn’t use the version token, changes made in one version—like a viewport preset saved in 2025—automatically carry over to 2026, 2027, and beyond.
If you prefer to keep settings separate per version, you can include the major version token in the path to isolate each version’s folder.
Hold up—so what’s the difference between the new env var and ADSK_3DSMAX_USERSETTINGS_DIR?
The User Settings folder just tells Max where your custom files are. You can have a bunch of config files there and choose which one to load manually, like in the screenshot.
You can copy those files over to a new machine or a new version of Max, but you still have to load the one you want at least once. That choice gets saved in 3dsMax.ini.
The new env var works differently—it takes the full path including the file name, so Max just loads it automatically when it starts. And it gets applied before any user settings, so users can still tweak things on top of it if needed.
If you’re the only one using Max, you can probably just use the new env var and not worry about the User Settings folder at all.
Recap the loading order
all application plugin packages
Files from ADSK_3DSMAX_CUI_PRE_USER_CONFIG. It accepts multiple files and loads them in the order they’re listed. So if you’re using a custom app launcher, you could set it up like this: S:\pipeline\studio.mnx;S:\pipeline\dept_lighting.mnx;S:\pipeline\show_starwars.mnx
The selected user configuration file in the User Settings folder
More to read
With this pipeline integration setup, nearly all of my customizations automatically carry over to future versions of 3ds Max. Also, even if I delete the ENU folder, these settings remain intact since they’re stored outside of it.
So, check out the following tutorials and give it a try. It might take a bit of time upfront, but it’s definitely worth it in the long run.
3ds Max has long offered excellent .NET integration, allowing Maxscript to seamlessly tap into the power of any .NET library. Personally, I’ve made extensive use of .NET features in my own tools.
Previously, 3ds Max relied on the .NET Framework 4.8 and was recently updated to 4.8.1 for the 2025 release. However, with 3ds Max 2026, Autodesk has transitioned to .NET Core 8. This shift brings a more modern foundation but also removes support for certain features from the older framework.
One notable example is the CSharp.CSharpCodeProvider.CompileAssemblyFromSource method, which many scripters used to dynamically compile C# code—eliminating the need to distribute separate DLL files. Unfortunately, this method is no longer supported in .NET Core 8.
As a result, any script that relies on this method will crash in 3ds Max 2026 like this.
The good news is that 3ds Max now provides an alternative: CSharpUtilities.CSharpCompilationHelper, which allows dynamic compilation of C# code in the new environment.
Please visit this link for an example on how to update your scripts using the new approach.
The bad news? If your scripts are affected, they’ll need to be manually updated—there’s no automatic fix for this transition.
If you’ve installed the Windows 11 24H2 update, you may notice that some of your macro scripts and plugins have suddenly gone missing. The most obvious symptom is toolbar buttons indicating the script is missing, or custom hotkeys for the scripts no longer working.
So, what’s happening?
According to the 3ds Max developers:
Windows 11 24H2 sets the #system attribute on the following folder: C:\Users\<user>\AppData\Local
As a security measure, 3ds Max does not load startup scripts (including macroscripts) from folders with either the #system or #hidden attribute set.
If you check the max.log file, you’ll see something like this:
By relocating all relevant files outside the ENU folder, as outlined in the tutorials, you can eliminate the need to repeatedly configure your scripts and plugins—whether for new software versions, new machines, or after resetting the ENU folder. Personally, I install a beta version of 3ds Max every two weeks, and since setting this up, I haven’t needed to reinstall any scripts.
I’ve always wanted to create long-form 3dsMax courses, and now that I have some free time, I’ve decided to kick things off with the “Maxscript for Artists” course. The progress has been great so far, and it’s currently in the beta testing phase. That’s right, we’re actively beta testing the course!
I’m excited to introduce “Let’s 3dsMax” as the brand for all future courses, with “Let’s Maxscript” being the first. I hope to expand into courses like “Let’s DataChannel” and “Let’s OSL” in the future, and I’m even open to collaborating with other fantastic authors.
On that note, I’ve launched a pre-registration mailing list. If you join, you’ll receive a significant discount coupon once the course goes live!
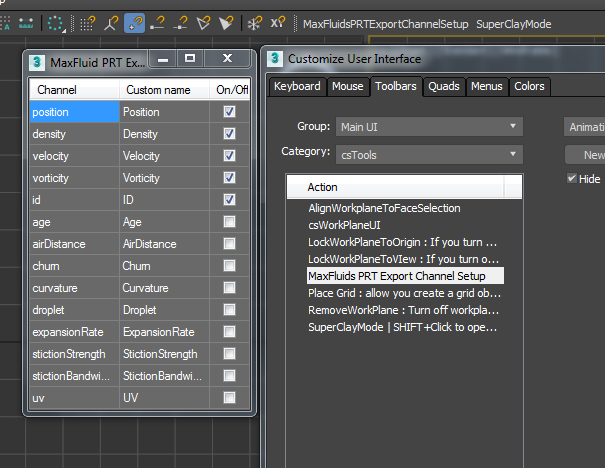
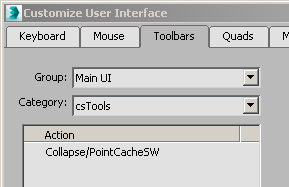
This script allows you to toggle GPU hit testing on or off. You can create a toolbar button that displays the current status of GPU hit testing and enables you to switch it on or off.
It is under “csTools”
So, what the heck is GPU hit test?
When navigating the 3ds Max viewport, 3ds Max often needs to determine what is underneath the cursor.
For example, in 3ds Max, when you hover over an object, it shows the object’s name under the cursor. When zooming or panning, 3ds Max must calculate the cursor’s 3D position. Similarly, when selecting an object or sub-object, 3ds Max needs to determine what is underneath the cursor.
This process is called hit testing. 3dsMax cast a ray from the cursor point and detect that the ray hits. So, as you can expect, the more object and polygon you have, the more time. If you have ever experienced a hiccup for slight delay when you start zoom, pan or select object. That could be caused by the hit test time.
Around 3ds Max 2014, when the development team was focused on improving hit testing performance, they created a GPU-based version of hit testing. However, this approach had some issues, and since 3ds Max still had a software driver mode that relied on CPU hit testing, the team decided to improve the CPU version instead. Eventually, they achieved similar performance with the CPU, and the GPU version was gradually forgotten.
However, the code for the GPU version was still present, and it could be enabled using Maxscript.
Now, in 3ds Max 2025.2, there is a bug in CPU hit testing, and enabling the GPU version can be used as a workaround. Interestingly, after a decade of GPU advancements, it also appears to deliver better results.
I’ve talked to some of my colleagues and most of them have massive viewport performance gains with this enabled. On average they have high core count CPUs (but lower Ghz ~= 3Ghz) but quite beefy Nvidia cards. But indeed it comes with some drawbacks, so far I (only) found that:
You can’t select the PhysicalCamera object unless it’s targeted (then you can select the target line, but even that is wonky and works only with region selection) or also works if you select with a big rectangle around it so you select the (invisible) cone as well, no problem with the other camera objects.
ForestPack, RailClone, if disabled or not generating anything can only be selected with region selection.
Most of the Forces and Deflectors can only be selected with region selection.
I have no problems with splines, lights, meshes, or selecting any of the subobjects in both low or high poly objects, in a mix of scenes.
I found so far that, I have far better accuracy when selecting objects in my scene. No more selecting objects behind the view for instance, some objects were hardly selectable in some cases, I don’t have that anymore. In some scenes (didn’t have to be big or complex even), there was always one second delay before panning or orbitting, this has completely vanished as well as a higher FPS in viewport 2-3x sometimes, and a lot snappier navigation.
With the script, you could easily switch between CPU/GPU hit test as you need.
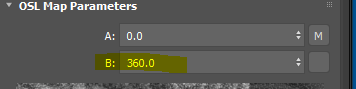
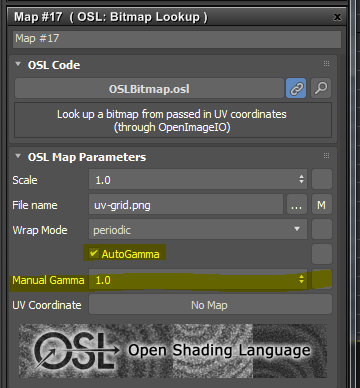
#3dsMax 2025.2 features Scientific color OSL map by Fabio Cramel.
It is 32 color gradient map with sRGB based interpolation under the hood. But, what’s important is the presets. The map comes with the full sets of 39 Scientific colour maps by Fabio Crameri.
That being said I gathered even more color maps and made another preset. It has 371 additional maps from the following sources.
Smooth Cool Warm by Kenneth Moreland. Viridis by Eric Firing Plasma, Inferno by Stéfan van der Walt and Nathaniel Smith Kindlmann, Extended Kindlmann by Kindlmann, Reinhard, and Creem.
To use this, download the attached ScientificColorMaps.csv file and replace this file. C:\Program Files\Autodesk\3ds Max 2025\OSL\ScientificColorMaps.csv
I’m sure many of you already have used some form of pipeline or at least heard about it. Having a good pipeline could make your job easier, faster. It would reduce the burden of non-artistic tasks, and let you concentrate on making art.
If your studio is big enough to have dedicated TDs and engineers, you probably already have something. But, if you are a small team, the chances of having an automated pipeline would be low since it requires resources and effort. Or, simply you may not even know where to start.
I have had a chance to build a few pipelines from scratch and also have used a few existing pipelines, big and small. From those experiences, I want to share how I would build a new pipeline for a small team if I start again a small team.
Before we start, I just want to make sure that there is no “right” way for a pipeline. The best one is always the one that artists want/like to use, and every studio and every artist has their own taste. So, use this post as just a guide.
Does your studio have a rule for saving a max file and render outputs?
Let’s ask the first question. Does your studio have a rule for saving a max file and render outputs? If the answer is Yes. Then, you kinda already have a pipeline. You may not have an automated one. But, you certainly have a pipeline for sure. But, if it is not automated by code, a lot of benefits of having a pipeline will be lost. Humans simply can’t remember all those rules and execute the rules consistently all the time.
Consistency is the key for automation.
The first step for an automated pipeline can start from establishing a naming convention for project files and render output and making a tool for it.
Why? Because using a naming convention requires a minimum amount of coding. Sure, you can use custom DB or off-the-shelf solutions like ShotGun(Flow) or even xml/json. But, all these methods need to be coded and maintained by someone. If you don’t even have or can’t afford a TD, you probably can’t have a developer for this. Also, even when you could use these kinds of more advanced methods, it is good to have a solid naming convention.
Project folder and centralized storage
This workflow assumes everybody shares a central storage. In my 20+ years career, I never used project folders and have always used centralized storage. Considering a pipeline exists for multiple artists to work together, I’m not sure how the isolated project folder would work. So, this post assumes everybody has access to the same drive, either it is physically the same drive or synced.
Collect what kinds of information you need to define a task
Our goal is having a path and filename that would be unique per task.Then, we can add versions to the name. To get this, we need to collect what kinds of information is needed for a unique task. In this post, I’ll assume my studio is mostly working for episodic shows as an example.
To define a vfx task for episodic shows, you would need to know
Show name – The name of project or show like House, Airbender
Episode number – Usually you would combine season and episode as one entry
Shot name – each shot name
Task type – Is it modeling? Lookdev? animation?FX?
Task name – each task of a task type
You can add more entries like artist name(I usually don’t recommend) or 2 level task name, But, I would have it as simple as possible.
This also can work for a feature film or commercial, you can use the episode entry for sequence. If it is a simple commercial or music video. You can just leave the episode as “000” or something.
Again, Keep it simple and unified. Don’t try to have exceptions and conditions. Yes, in the end, code can deal with all kinds of exceptions and conditions. But, the more parts you have, the more chance you have problems.
OK. The theory itself is simple. But, actually establishing a rule is not that simple. There are a lot to consider. Let’s get into the details.
Parse-able Filename
The first rule of a naming for codes – Never ever use space in the name nor path. NEVER! Trust me just don’t do it. Life is easier without space.
That being said, we can start by simply assembling each entry with “_” for the filename. Something like this. Then, we can say that… “To get the information from the file name, split filename with _. Then, the first one is the show name. The second is the episode number, and on and on”.
HOUSE_201_24x56_FX_Explosion_v001.max
Assembling filename by a naming convention is easy. But, the name also need to be pare-sable by code. Basically, we should be able to extract back the information that assembles the file name. In that sense, adding “_” between each item is not enough. What if your client wants to use “_” in a shot name? Like “24_56”? Then, the filename becomes like this.
HOUSE_201_24_56_FX_Explosion_v001.max
Now filename parsing logic doesn’t work anymore because the 4th element from split would be “56”, not a task type. So, we need to have more complicated rules than just adding “_”. Good thing is that any code is very good at handling those complicated rules as long as the rule is clear and machine friendly. FYI, if you google “regex”, you can see what codes can do for parsing strings.
Let’s try a simpler logic. One of the common tool for establishing a naming convention is using special characters as separators to divide the filename into sections. Usually “_” and “-” are used for the separator because a lot of other special characters are an illegal character for a filename and path.
Now let’s think about which items we have more control over.
In my experience, there is a higher chance of possibility that clients could have their own naming convention for shots.
We have complete control over the task type since it is an internal stuff.
Usually project name and episode name could be a single word.
We need to have a good flexibility for the task name
With this requirement, this is what I did.
I used “-” as a main separator between task related items and others. So, I added “-” in front of the task type and decided not to use “-” in the task name. Then, we can say that “Separate filename divided at the last -”. Since the last “-” is the divider between task and else. You can use “-” in the shot name if you need. Something like this.
HOUSE_201_24-56–FX_Explosion_v001.max
Then, split the front part with “_” and take the first item as a show and the second item as an episode.
Task part is even easier, split the green part with “_”. Then, the first item is a task type, and the last is a version, and the anything inbetween is task name. You can use any alphabet, number and underscore fore task name.
A file path convention is easier than a filename convention since we just need to put each item at each level. But, there are a few extra things to consider compare to the filename convention.
First, you will need a root folder. That’s “Z:\Project”. Don’t make it too long or deep. Even tho we are making folders with code. The shorter, the better. Then, the show folder, “HOUSE”. Then, the episode folder, “201”. So far so Good. Easy.
But, what the heck is the “work” folder?
Currently we only have been talking about the project file, like max file and maya file, naming convention. But, you actually need a few different naming conventions for different things. For example, you can’t really use your max file naming convention for your render output. You will likely need more than one outputs, such as render element, from a max file. How about a published assets? If you build an asset publishing system, they will require a slightly different naming convention, “work” here means your working project files such as max and maya files, and we will put all project files under this sub folder.
Now you may wonder why under each episode? Why not under the show folder? Good question.
Your storage is expensive. You can’t store everything forever. At some point, you need to delete files. Even tho I do many things with scripts, I don’t really delete folders with scripts. You may think you made a perfect script for delete folders. But, imagine somehow your logic had a hole and all the project files for tomorrow delivery got deleted!
By having all your projects under the “work” folder under episode folder, you can clean up a project folder per episode easily. If you add this under show, you have to keep all projects for the show until the show ends or manually visit each episode and clean up. If you add it under the shot folder, you have to visit every shot to clean up projects files. Putting under episodes would be a happy medium.
We will talk later again. But, using the same logic, if we have “image” or “output” folder at the same level for render outputs and comps, you can clean up those folder first, and then clear projects later.
After “work”, continue just like file name, and the last folder would be DCC type or the project file format, and all versions for the DCC will be in the same folder.
Some might wonder why not have a folder for each version and have a DCC folder under there like this.
That kind of folder structure is usually for published assets which would have different formats for the same version all the time. For example, when you publish a model asset, you would publish an alembic file, a usd or a fbx along with your .max file. In that case, having the folder under the version folder would make sense.
But, usually you wouldn’t switch program between versions. If you ever need to switch to other program, you can just restart from v001.
OK, let’s see what we have again. This is the full path that I’m using.
This_is_Your_Explosion – task name(alphanumeric & any number of underscore)
max – each program identifier
Project Manager Tool
Now we have a rule. Next, we need a tool. Because the consistency of the data is key for pipeline automation. As I said in the beginning, No human can remember these rules and execute correctly all the time. Only way to make this work is having a tool. Something like this.
The tool hides the rules and the naming convention from artist and allow to browse the project easily.
Allows to load/version up their project. When the version is up, it will automatically version up to the latest.
Allows to create new task, and convert the current scene as the first version.
Allows to add/edit notes.
Remembers the history of project file load/save and allow to quickly select from history.
These list is just a start. Since you have a way to browse set the context of task. You can add more and more features to this tools. For example…
The time logging could be integrated into this UI or even automate it by detecting the file being opened.
Could have an easy shortcut to open folders for the chosen task.
Could display Flow(ShotGrid) notes for the task.
and more and more.
Thanks to the fact that most programs are now supporting Python. You can build the interface once and reuse it for many programs. You can see my example tool is working in Maya, Houdini, Nuke even for Photoshop.
Expand The Naming Convention to Renders
After the project file name convention and tool are sorted out, the next stop would be the render output file name.
For render output, we need to extend upon the project file naming convention so we can automatically track where the renders are coming from.
This is an example of render output file path and name convention.
I changed “work” to “render3d” so you can have a render3d folder per episode. With this, you can delete render outputs first after a project is done while keeping project files.
You would have multiple outputs from a project file. Usually we call them “pass”. So, I added the pass folder after the task name folder.
I used “-” as a separator so I can use “_” in the pass name if I need.
Then, we need the version folder since you will likely output an image sequence. It is always a good idea to have only a sequence in a folder.
Then, you have the exr sequence file in the version folder. For frame number padding I would recommend to use “.” as a separator than “_”.
NOW here is a little bit controversial part, render elements(AOV). If you are using the multi-channel exr workflow. You wouldn’t need a render element sub folder. I personally am not a big fan of putting all channels in a gigantic exr file.
If you are using the split file workflow, you also need to add a render elements folder. As I mentioned once, it is always better to be consistent. So, I would have the RGB element in its own folder. But, some may opt to leave RGB in the version folder and only have other elements in their own folder.
If you decide to have AOV folders, here is one more thing you might think about. You can swap the position of the AOV folder and the version folder like this.
This makes deleting unnecessary AOVs easier since all versions for a pass are under a folder and. it is easier for a code to pull all the versions list. But, this also makes it harder to know what is the highest version of all to determine the next version, and deleting certain version becomes more difficult.
OK, now one last thing I need to talk about render output is how to decide the version number. Obviously the simplest method would be to keep versioning up for every render submission.
Another way of versioning is syncing the output version number to the scene file version number. For example, , If your scene version is v008, your render output also becomes v008. It is possible because the render output naming convention has all the items of the project file naming convention. There is no chance that different max files could generate the same render output.
If you do this, you have to version up your scene file to get a new version of renders. This also means you will have skipped versions. That sounds bad. Why would you do this then? Because it allows you to easily track where your renders come from without any extra system. If you automate max file version up after submitting render, you can always go back to the version of max file when you need and get exactly the same render again.
renderStacks to the rescue
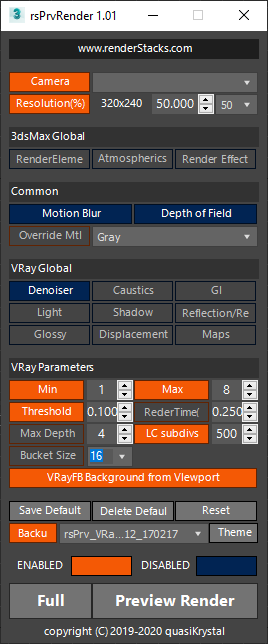
Now you need a tool to set the render output path automatically. Yes, right. This is the moment that you need renderStacks. 🙂
In the following picture, you can see I just made a global function and feed it as maxscript token for rednerStacks. Now you never need to type render output path ever. renderStacks will automatically set the render output path every time when you submit or render.
Of course, you can use any other script/tool, too. The point is that you must have a tool to set it.
Comp/PreComp/Plates
Now you have a naming convention for project file and render output and have a tool to handle those path. Then, we can say you have a MVP(Minimum Viable Product) pipeline. But, if your workflow requires comps most of the time. Then, you would like to have naming conventions for comp and precomp as a next step.
This was the project file naming convention for max.
For 3d projects, it made sense to have lookdev, fx, and animation task types. But, for comp, do you need them? Do you have a comp for fx and a comp for lookdev? Probably not…
Then, what should we do with the task type? We can remove the item from file and path name convention. That means you would need a separate naming convention for comps which means it will cost more to develop and maintain while having more chances to have a bug. As I mentioned a few times, it is always better to be simple and consistent.
Therefore, I would keep the task type. But, I would change the items. We can at least have a “comp” task type. How about the task name? Usually you would have 1 comp per shot. But, you never know if you would need more than 1 comp in the future. What if the director wants to have 3 options! Since we already have it in the naming convention, it is better to keep it consistent and flexible. But, we can have a soft convention to agree to use “main” as a default task name.
Now here is something to think about. How about other support task like precomp or roto? If it is for precomp for the same nuke file. It could be just another “pass” like 3d render. But, if it needs its own nuke file, you have 2 choices. 1) having its own task type 2) using a task name.
If you decide to have its own task type such as “precomp” or “roto”, you will have one more level of flexibility( task name + pass name). It also means precomp or roto will have their own sub folders which means it will be easier to clean up. But, you will have a lot of empty or folders with only one sub folder.
Or, you can just utilize the task name. Just make sure artists use “precomp_” or “roto_” prefix or build a tool that can force it.
Lastly, I would separate the comps from the 3d renders. Something like under “image2d”. Our final comp/precomp file naming convention will be like this.
main– is output name from a comp project file. If you are using Nuke, this would be your Write node name.
Of course, you should never generate this path manually. For local rendering, you would make own render dialog with automatic path update. For network render, you would a code to update Write nodes version to latest before open network render submission dialog.
Happily ever after
After you implement a good naming convention and tools, you can start to take an advantage of the consistent and predictable structure of files. For example, this is the image loader for my project manager. It build the list of all image assets(render3d, comp, precomp)
This is a Nuke Read node updater.
Assets, Caches and Beyond
If you want to go further, you can start to explore a pipeline for asset publishing. I wish continue this tutorial to cover asset publishing. But, unfortunately, everybody works differently, and it is hard to make a universal solution without bloat.
But, I have a few cents that I can share from my experience.
Start from the simplest asset. Usually the camera publishing is the best candidate. The data is small, and it is such an essential.
The next would be the cache or proxy that you would use most often. If you use Phoenix, that would be a good candidate.
The best pipeline is just automating what you have done. Do not try to force what you saw or heard from the internet. Again, each company has own way of working. Do not try to change it. Try to improve it.
Don’t try to do too many thing too fast. In terms of pipeline, the stability is more important than features. If artist can’t trust the pipeline, they will try to avoid it and work around it.
OK! That’s it. Now you know where to start to build your awesome pipeline. I think I put enough information in this post. But, if you think you need help or just want to use what I have built. Contact me through LinkedIn message. I’m available for consulting. 🙂
One of the new 3dsMax 2025 features is the completely rewritten new menu system for menus and quad menu. This is a part of the initiative called Upgrade-Safe UI which was introduced in 3dsMax 2020 for the hotkeys first.
For users, the most important and beneficial change is how the customization is stored and loaded.
The legacy UI customization system was the “Save and Load” system. When users customize menu items and save them, the entire menu status is saved in a .mnux file. Then, when users load the .mnux file, the entire menu items will be replaced by the content of the file. This causes the following issues.
Dev added a feature XYZ in a new version and added menu items for that. All these newly added items will disappear when users loaded a .mnux file from an older version of max.
A user had a plugin ABC and menu items for it when they save the .mnux file. But, the new 3dsMas version doesn’t have the plugin anymore. When users load the ,mnux file, all the menu items for the plugin ABC will remain in the menu and be broken.
To address these problems, the new menu/hotkey system uses a transformation approach. Basically instead of save/load the explicit configuration of the menu, the new system stores only the delta(change) from the default menu/hotkey and applies back the changes and overrides the default status.
This will allow users to keep the changes they made while still receiving updates from the global changes. This also means the menu customization will be portable between versions and machines.
This also means it is very easy to go back to the default menus if you need to by simply choosing the locked “3dsMax Default Menus” configuration. This is the same for hotkeys since they are using the same system. Everybody probably had an experience where you had to jump on other’s max and realized that all the hotkeys and quad menu are heavily customized. Now you can easily revert to Default and back to the custom.
User Settings Folder
The menu file(.mnx) are saved in the “User Settings” folder by default. This folder is in the “Autodesk” folder in the user folder, not the hidden AppData folder. C:\Users\[username]\Autodesk\3ds Max 2025\User Settings
You can also set a custom location using ADSK_3DSMAX_USERSETTINGS_DIR env var.
This means that all these settings will survive when you nuke ENU folder to fix issues. Also, you can just copy everything in this folder to another version or machine to get all the settings in this folder.
Currently the following settings are stored in this folder. Any files in this folder is portable and upgrade safe. When you move version to version. Just copy them to the new version folder.
Hotkey Set File(.hsx) – need to load to apply
Menu Configuration File(.mnx) – need to load to apply
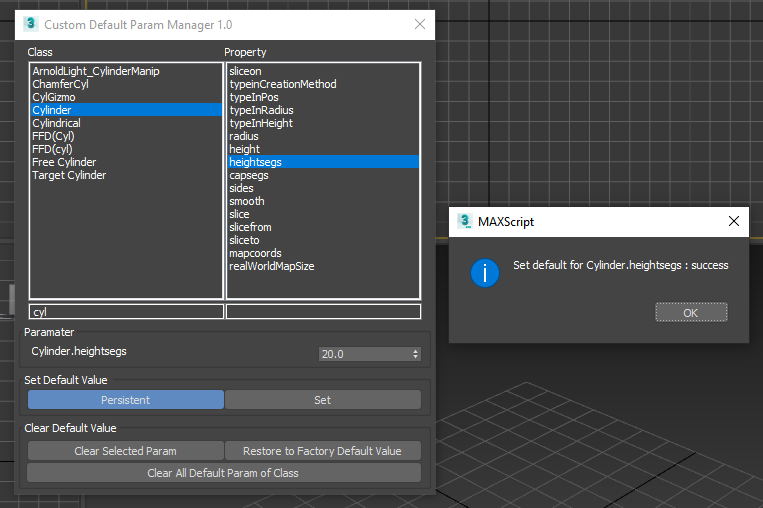
Custom Default File – DefaultParameters.ini
MaxToA settings
Viewport Settings Preset – High Quality/Standard/Performance are just presets of Per-Viewport Configuration. You can even make your own, and the own preset settings file is stored in this folder as .json file.
Plugins/Script Developers
The old menu system is gone now. So, Maxscript Menu Manager interface(MenuMan) is gone. If your plugin/script/pipeline has been using MenuMan for adding custom menus. You need to update to the new system.
A good news is that now you don’t necessarily need to code to add menus. The application package now support “menu parts” component. I updated my csMakePreview to demonstrate how you can use this for any scripts.
You can download and check the package. But, in short, I modified the menu and saved .mnx with the new Menu Editor. Then, add the .mnx file in the package and added this line.
The plugin package will replace the built-in Make Preview viewport menu with csMakePreview like this.
To assist this, The “Developer Mode”.has been added to the new Menu Editor. When you switch to this mode, only the base and either the selected preset or an empty preset is loaded(no plug-in and user defined menus)to provide a clean configuration to work with.
How to Upgrade/Transfer All Your Customized UI, Preference, Plugins, Scripts
UI
There are 5 UI items you can customize. Mouse, Toolbar, Menu/QuadMenu, Hotkey, Color.
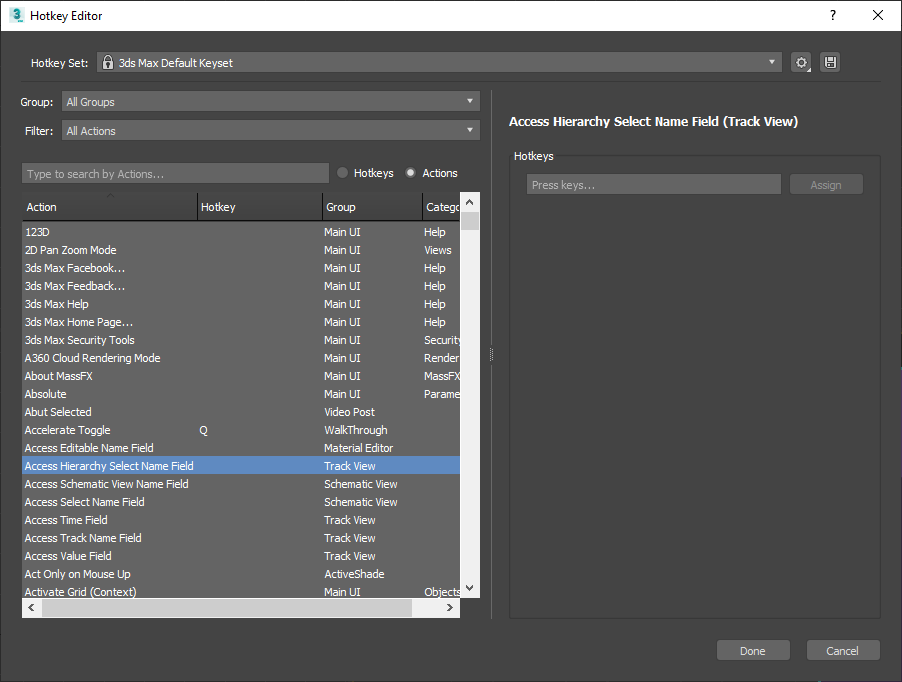
Hotkeys – If you use a newer than 3dsMax 2020.1, just copy files in the User Settings folder and load your Hotkey Set File(.hsx)
Menu/QuadMenu – Since the menu system is just introduced(2025), you will get the benefit from 3dsMax 2026. But, if you need to transfer the customization for 3dsMax 2025. Same as Hotkey, just copy files in the User Settings folder and load your Menu Configuration File(,mnx).
Mouse, Toolbar, Color – These are still using the legacy system. I really hope the 3dsMax dev works on the toolbar sooner than later. For these, you need to load the customization files from an older version.
But! Which file is THE file you need to use? Isn’t there a million places that have ui files? Well… Yes and No. First, the answer to the question is \en-US\UI\MaxStartUI.* files under ENU folder.
This is the ui files that gets updated when you close 3dsMax when you turn on “Save UI Configuration on Exit” in the Preference, and they are loaded when 3dsMax starts.
Browse to the 3ds Max ENU folder you want to load UI from and load them. MaxStartUI.cuix is for the toolbar, and MaxStartUI.clrx is for the color. For mouse, MaxStartUI.musx is not automatically generated. So, you can save anywhere and load it.
AGAIN, NOW YOU JUST NEED TO COPY .HSK .MNU BETWEEN VERSION(OR MACHINE) AND LOAD IT TO UPGRADE OR TRANSFER CUSTOMIZATION TO .OTHER MAX
A Friendly Reminder!
Before you transfer any of this UI customization. You need to make sure to install all your plugin/scripts first. For that matter, I already have 3 parts for this. I highly recommend you to read this and try. Since I have implemented this setup, I never ever needed to touch any plugin/scripts install/setup ever again.
!!! Updated to 1.1 If you have downloaded 1.0, please download again !!!
This is a simple script that syncs a camera with an active perspective view. If you want to control a camera view just like perspective view navigation, this is the script for you.
How to use is simple. Select a camera to sync from drop down and turn on Sync. If you turn off the button or close the dialog, the sync will stop.
A few things to remember!
It can’t support targeted camera. Use Free camera or turn off “Targeted” for a Physical camera.
It controls “fov” parameter. So, as long as the camera has and is set to control with “fov” parameter, it would work. THis also means you must turn on “Specify FOV” for Physical camera.
Substitute modifier is one of the most underrated modifiers in 3dsMax and one of my favorite modifiers. As the name suggests, this modifier replaces the object’s mesh/poly. How to use is very simple. Just apply the modifier, turn on “Pick Scene Object” button and pick an object in the scene to substitute.
You can choose to use the substitute mesh only for viewport or render.
You can also choose to use an object from another max file.
We can think about a few useful situations such as…
I already have a big stack and animation started from Box. Now I wanted to start from ChamferBox instead of Box.
I can substitute highres objects with low res ones only for viewport to make viewport faster.
I can have low res placement holder objects in the scene and substitute with highres objects in another max file.
You can have multiple versions of mesh in an object while keeping all the connection to other portions of 3dsMax.
BUT! That’s not all. Substitute modifier has more super powers.
It automatically disables the evaluation of all the modifiers under it
It makes sense since the Substitute modifier provides a mesh from the stack point. Whatever at the below of the stack doesn’t do anything in any way. The best part is that you don’t have to set anything manually. This modifier just does it. Combined with the feature that allow to use Substitute modifier only for viewport display, this provide a great work around to improve the scene performance when you have a lot of hires animated meshes.
For example…
if you substitute an animated tree with a static low res tree, this modifier blocks the evaluation of animation.
If you have an animated alembic cache object, this modifier will stop loading the alembic file every time when you scrub through. In the following image, I snapshot a frame and used that for display using Substitute modifier. You can see alembic object stopped loading the cache file.
Turn off VRayVolumeGrid preview which will load files and update every frame. Make a preview mesh and use Substitute modifier to display it. This will allow you to directly place vdb without waiting for every singler cache file loading.
It can embed the replacement mesh data in the modifier
This is a really really powerful feature. After you pick an object from the scene, you can delete the object. Then, the modifier will hold the mesh information in itself which essentially act as a cache modifier.
This means that you can collapse the stack while keeping all the history. l Some of you probably have been duplicating objects and collapse in the scene and save a copy in another max file for future use. You don’t need to do that any more. Everything can be just stored in the same scene
one of the benefit of caching a big stack is to improve max file loading time. I want to cover this topic in depth some day. In short, 3dsMax file doesn’t save the result of stack in the .max file. If you make a Box and apply Bend modifier. 3dsMax just stores the class(Box, Bend and its parameters. Then, when the file is loaded, it evaluates all the classes and generates a mesh. This means if you have very big stack or very calculation intensive modifiers. The file opening can take a long time. That’s why some modifiers like Boolean, Conform or Retopology have own caching mechanism. With Substitute modifier, you can cache any objects with modifier in the scene if you want. Obviously, it has a trade off. It will increase the max file size. You gotta pick your poison.
Another benefit is that it can be used as a countermeasure for possible mesh corruption. As a procedural evaluation system, if anything goes wrong in the middle of the stack, the above of the stack would produce an unwanted result. For example, Edit Poly is an awesome and powerful modifier. But, it can be fragile with certain operations. In fact, Edit Poly never stored the result of change in the modifier. It is actually a mini stack in a stack. It stores every operation you did and re-execute then you open the file. So, even tho it is slim, there is a chance that one of hundreds of operations, especially one that removes or adds sub-objects, could go wrong. For that case, you can use Substitute modifier to lock/freeze the status of stack.
csStackCache
So, I made a small script called csStackCache to take advantage of Substitute modifier’s super power. You can find from csTools > csStackCach in the Customize UI dialog.
How to use is simple.
Select objects that you want to cache.
All – all geometry objects
Selection – Selected objects
Selection Set – the chosen selection set
Press “Cache”. This script will add a Substitute modifier named “csStackCache” just above of the first viewport enabled modifier. In the following image, It is added under TurboSmooth because it was set to Off in Viewport. If you already had “csStackCache”, it will use the position. So, if you need to add “csStackCache” at certain position. Use the “Add Cache” button to add and move around it. Then, Cache them. For example, if you have any animated modifiers, you will need to cache blow the modifiers. If you cache above them, it will freeze animation.
If you want to remove “csStackCache”, select objects in the same way and pres “Remove Cache
All Thinkbox plugins has been open-sourced. But, it still requires a good amount of effort to update for new SDK changes. I have been try to find a way to recompile this and was fortunate enough to find awesome volunteers.
The effort is still going on. I’ll keep adding as we get more. All the relase from me will be an application package format. You just need to unzip in C:\ProgramData\Autodesk\ApplicationPlugins folder or your own application package folder.
FrostMX
The first one is FrostMX with VRay6 and TP support. Big thanks for Vlado for recompiling! Also, big thanks for Marc Auvigne for testing. Thinkbox_FrostMX_2024
XMeshLoaderMX
Big thanks for David Baker from maxplugins.de for recompiling! Also, big thanks for Marc Auvigne for testing. Thinkbox_XMeshLoaderMX_2024
Ben Lipman also compiled Krakatoa(without TP support). You can find the download link here. https://www.facebook.com/groups/stackthis/posts/2064066623939823/
There has been many requests for providing a way to adjust clipping plane by numbers. Your voice was heard. 3dsMax 2024.2 bring MXS exposure for the clipping plane.
vpSetting = NitrousGraphicsManager.GetActiveViewportSetting()
vpSetting.ViewportClippingEnabled = true
vpSetting.ViewportClipNear = 0.05
vpSetting.ViewportClipFar = 0.8
vpSetting.ResetViewportClipNearFar()

Note: Same as UI, the allowed range of near/far is [- 0.1, 1.1], and the specified value should obey the rule: near < far
Of course, I know there are many who don’t/can’t script. So, I made a script for you which you saw in my video.
Now you have a USD file. How would we consume in 3dsMax? Traditionally, you would just “import” the data from the file, and native 3dsmax data would have been created.We have used .obj, .fbx, .iges, and other CAD formats in this way.
Another way is referencing the file through a “container” object. Instead of generating max native data in the max scene, the data will be generated on-the-fly as it needed. Many renderers’ proxy object and 3dsMax native alembic import uses these methods. Scene Xref is the same concept.
The obvious advantage of this workflow is that It makes your max scene lighter. Since all the data is outside of the max file, the file saving is quick. The scene navigation and evaluation are also faster since everything in the references file is considered as one object in the master file. It is like you attached all the objects as a single object. But, that also means that we would lose control over individual items in the file.
When 3dsMax dev implemented Alembic, they took a hybrid approach. The data is still referenced. But, it was referenced at the object and controller level. This provided a certain advantage over the other 2 methods, But, it also had its own disadvantages.
For USD, 3dsMax dev is providing multiple ways of consuming USD data. You can just “import” like obj or fbx. Or, you can reference it. As of now, the focus has been more on the referencing side.
USDStage
So, what’s USDStage? According to Pixar, “Stage is the USD abstraction for a scene graph derived from a root USD file, and all of the referenced/layered files it composes. A stage always presents the composed view of the scene description that backs it.” Dang, such an un-artist-friendly explanation. In English, the Stage is the assembled(composed) scene. As I mentioned in the previous post, USD is not just a file format. It is a “Composition Engine”. It provides various ways to build a scene, and the Stage is the result.
If USD for 3dsMax is installed, you can make a new object called “USD Stage” from Create Panel > Geometry > USD > USDtage object and browse a USD file. Or, 3dsMax will make one for you if you can pick a USD file using File > Reference > UDS Stage… menu. We can reference a USD file with this object. Apparently, this is how we are supposed to consume USD. Importing a USD file as DCC native data is considered an old-school way.
This is what it looked like when I loaded the NVIDIA Attic sample as a Stage object. As you can see, there is only one “UsdStage001” object in the scene.
If you pick a USD file to load, this dialog pops up. “Root Layer” is the file we are loading. Why not just call it “File”? Well, that’s because this is the correct USD term. 3dsMax developers decided to stick with USD terms instead of 3dsMax terms for USD. You will notice it again in many places.
When you load an USD file, you can load only a few branches instead of loading everything in the USD file. It is called “Stage Mask”. Stage object currently allow to mask only one tree.
Now we have this foreign data referenced in 3dsMax. We need to display and render this data. But, we don’t necessarily want to convert all these data as max native data. Think about VRayProxy. It is render-ready data for VRay. There is no reason to convert this data as 3dsMax data and convert back to the VRay data. VRay directly loads and renders VRayProxy.
This is also a key concept of consuming USDStage. USD data stays as USD. This certainly affects some of the user experiences while using USD in 3dsMax.
Displaying USD Stage
When USD for 3dsMax displays the objects, it doesn’t create a 3dsMax mesh. It generates Nitrous mesh directly. Under the hood, there is a Hydra delegate for Nitrous. If you are a tyFlow user, this is also how tyFlow works by default. Unless a Mesh operator is added, tyFlow doesn’t make a 3dsMax mesh. It generates Nitrous mesh and sends it directly.
This is certainly helpful for display performance since it is reducing the overall process from 2 conversion(USD > Max data > Nitrous data) to 1 conversion(USD > Nitrous data). But, this also means that you will not get exactly the same viewport features available for 3dsMax objects for USDStage objects. For example, Flat Color or Hidden Line mode wouldn’t work for USD Stage objects.
Viewport Display rollout
But, having its own control for display also means that dev can try something new. This is one of the options in “Viewport Display” rollout in a Stage object. Stage objects provide 3 different display modes.
3dsMax Wire Color mode – uses the color of Stage object for all prims in the Stage object. Since it doesn’t display any materials. It ignores all uv data while building Nitrous mesh. Also, it allows to utilize consolidation 100% since all prims in the USD could be a potential consolidation target. This is the fastest way to play the USD Stage.
USD Display Color – uses each prim’s display color attribute. This also ignores all uv data. But, the consolidation will be limited to the same color of objects.
USD Preview Surface – shows the USD Preview Surface material with textures.
Viewport Performance Rollout
One interesting feature of the USD Stage object is the Viewport Performance rollout which gives control over “consolidation”. Consolidation is a technique for better viewport performance by merging/attaching multiple objects before sending the mesh data to GPU. Nitrous also uses this technique heavily. “Mesh Merge” option lets you choose to consolidate “Static” mesh or “Dynamic(animated)” mesh or to turn “Off”. You can also control “Mesh Size threshold” and number of meshes to merge(“Instances”)
There is no single optimal setting that works across all scenes. Consolidation is not free, and the consolidation cost could be bigger than the benefit. You kinda need to play with the settings. For example, the scene in the following image originally has around 5000 baked animated objects from a Thinking Particle setup. The original scene and Mesh Merge Off were playing at 13.7fps.When I set it to Dynamic merge with 1000 threshold. I got 45fps. To help users to get the best setting, Visualize checkbox is provided so you can see how consolidation happens.
Display Purpose
Purpose is a unique concept of USD. Each prim in a USD file has a purpose. As the name suggests, it defines the purpose of the prim. If a prim is for the final rendering, you set it as render purpose. Prims for fast viewport display can be set as proxypurpose. Prims that is not supposed to be rendered similar to helpers in 3dsMax would have a guide purpose. Some of you may remember that I mentioned that all bones and non-renderable objects with shapes are exported as guide purpose automatically. If no purpose is set for prims, they will fallback to default purpose which means the prim has no special purpose. 3dsMax Stage object and USDView both set to not display render purpose by default.
To set the purpose, you need to add “usd_purpose” custom attribute, and the value needs to be a string. In the following image, I used Parameter Editor to add the custom attribute on an Attribute Holder modifier and copy/pasted the modifier and set the purpose.
Stage object has “Display Purpose” option in “Viewport Display” rollout. You can toggle on/off Guide/Proxy/Render purpose prims. Invert button will provide a quick way to on/off between Render/Proxy. Default prims will be shown all the time. Obviously, this requires some setup on the user side. You could auto-generate a proxy with some scripting, or you can use cut-up geometry for the rig as a proxy.
Rendering USD Stage
Just like displaying USD data, the rendering of USD should be also handled by renderers directly. Thanks to the industry-wide support/hype(?)/pressure many major renderers like VRay, Arnold, and RenderMan already support the native rendering of USD.
Also, there is Hydra, an open source framework to transport live scene graph data to renderers. In English, it is a plugin API for rendering USD. If a renderer has a Hydra delegate, it can render USD scene. There are a few free Hydra render delegates such as AMD Radeon ProRender, Autodesk Aurora, DreamWorks MoonRay.
As a user, using and rendering USDStage objects is pretty much the same as using and rendering .vrscene objects, and you can expect most of the same benefits of using renderer’s own scene file format. For example, this is the VRayCryptomatte render element for the NVIDIA Attic scene. Even though it is one Stage object in 3dsMax, you can see that VRay generates a mask per prim.
You can also mix USD Stage with Max native object in the same scene. Again,it is just like using vrscene or Arnold Procedurals. In the following image, I added a VRayLight and Teapot and rendered it with Pixar’s Kitchen USD file. You can see the GI, shadow and reflection between 3dsMax teapot and USD prims intersect each other seamlessly.
OK, then, why should I use USD over vrscene if it does the same thing? Let’s see some interesting USD features.
In-memory Stage Data Modification, Variant, USDSkel
One of the cool features of the USD Stage is in-memory Stage data modification. After you load USD with Stage object, you can change almost anything there. USD for 3dsMax doesn’t have any UI for this YET. But, you can still do it with Python today, and USD for 3dsMax comes with the full USD Python binding.
You can hide/unhide prims. You can move around prims. You can change purpose. You can add prims. You can do anything. You don’t need to ask anything to 3dsMax nor renderer developers. You can just do it. The following image shows I just hide the half of walls in the Attic USD file. This change will be saved in the session layer, and it can be saved out as a file or even stored in the 3dsMax scene.
What does it mean? It means that you can have the flexibility of comprehensive editing while benefiting from the performance as an external reference.
I understand that all these may not sound exciting or really sink in yet since we don’t have any UI for this. But, I’m sure we will see the editing UI from either Autodesk or 3rd party(renderStacks :)) at some point. Or, if your studio has a pipeline dept, they can build USD land using Python right now!
Another unique USD feature is the VariantSet. VariantSet is a set of variants(duh). This is like the new Material Switcher material which was added in 3dsMax 2024. Material Switcher allows you to have multiple different materials and choose one of them to use. VariantSet is the same. It has multiple variants. You can choose to use one of them. A variant can be anything. It can be a prim or prims, or It can be a big USD tree or material.
Lastly, there is USDSkel, Skin and Morph animation. Basically, instead of caching every single vertex position, USD caches bone animation skin weights just like FBX does. The benefit is obvious. The file size is a lot smaller. This scene has about 300 animated Populated agents and 411k verts. When I exported it as deforming vertex animation for 280 frames, the USD file size was 3.2G. When I exported it as USDSkel, it was 354M.Almost 1/10 size. It even plays faster. USDSkel version is playing at 30fps while vertex deformation version is playing around 24fps. The original 3dsMax was playing at 9fps.
Waiting for godot
“Wait a min. I heard that I can save a Maya/Arnold scene as USD and render in 3dsMax/VRay and get the exact same render if I use USD. Why don’t you mention that?”
Well… NO! Sorry. But, that’s not happening. It doesn’t work in that way.
Let’s think about what we need to get a rendered image. We need to define the shapes of things(geometry) and the look of things(material and light) and the movement of things(animation). The geometry and animation parts are relatively straightforward. There are well-established ways for presenting polygonal and volumetric data. Animation is even easier since they are a series of transforms of nodes/vertex or snapshots of geometry for each frame.
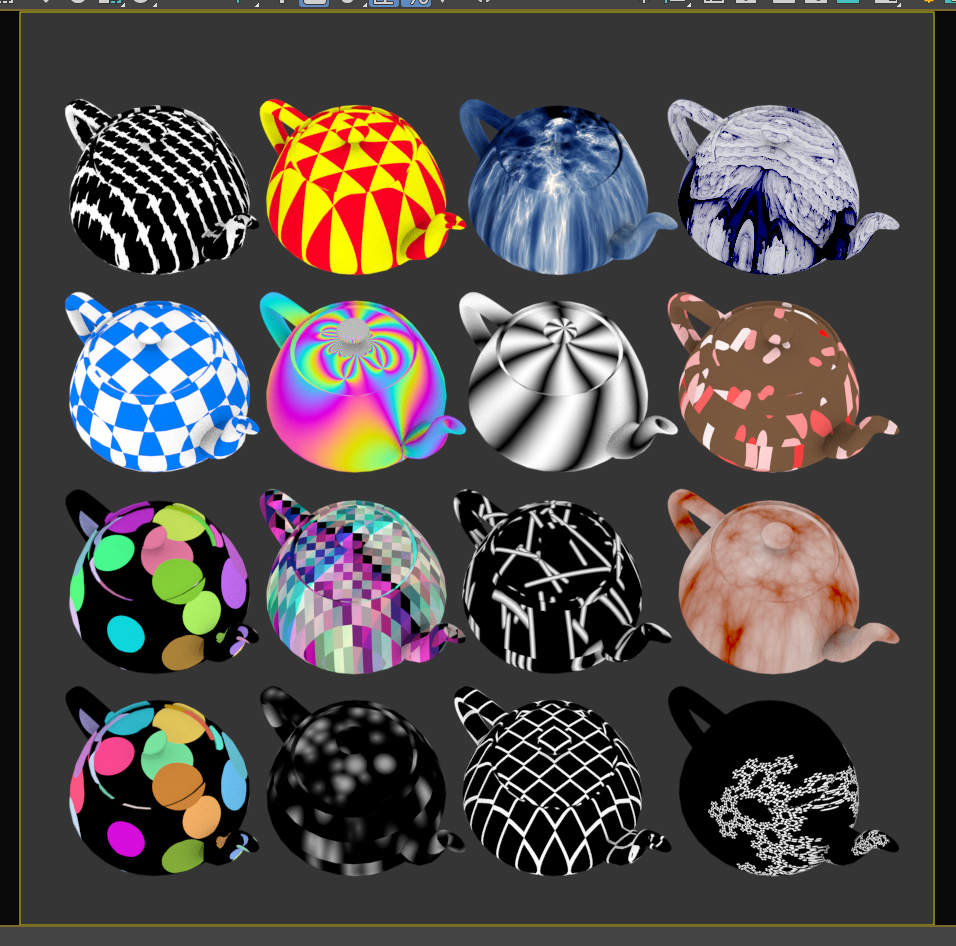
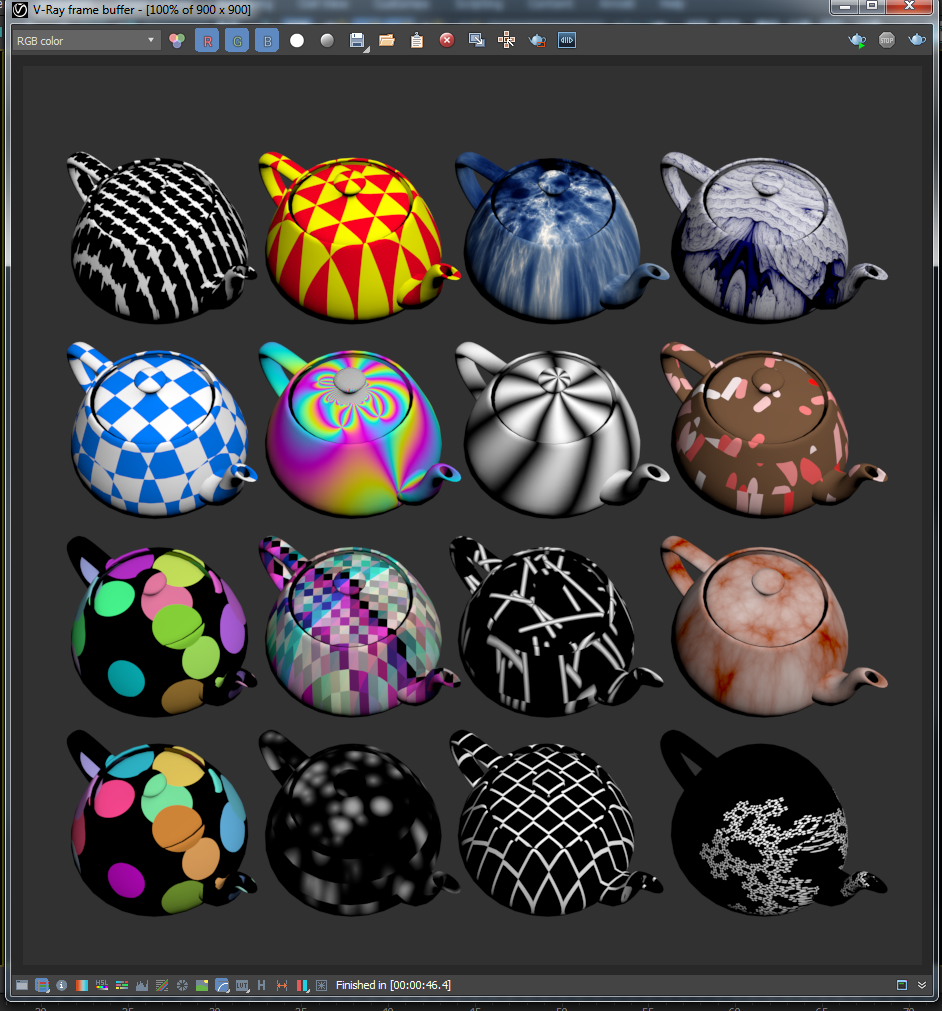
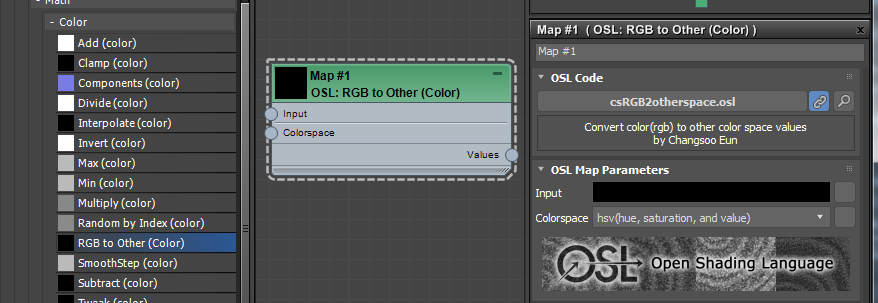
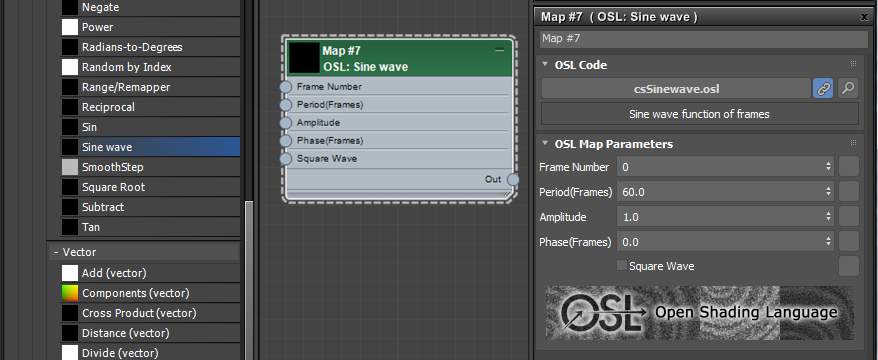
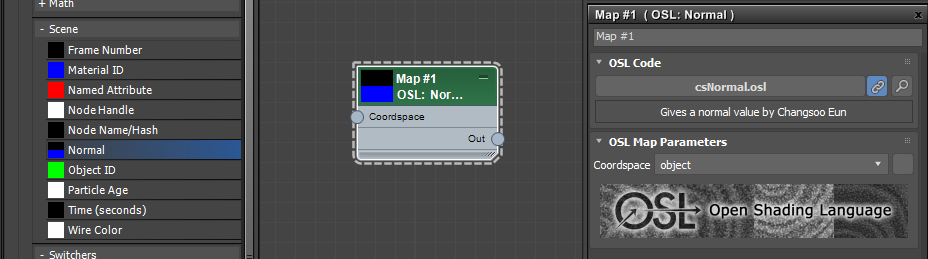
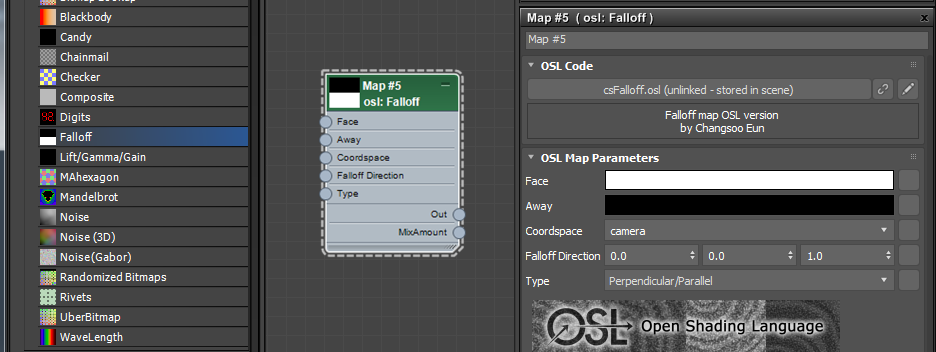
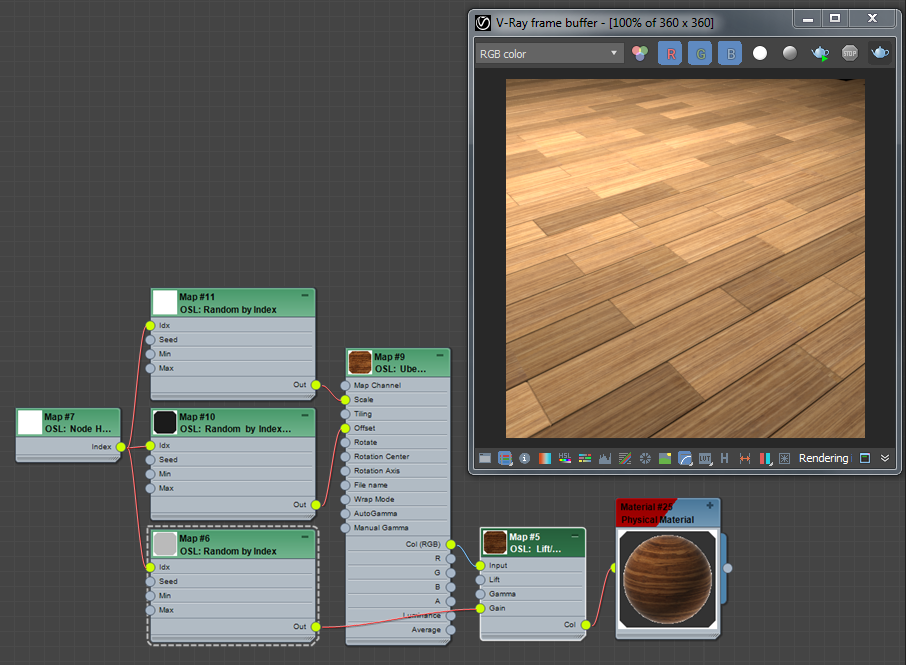
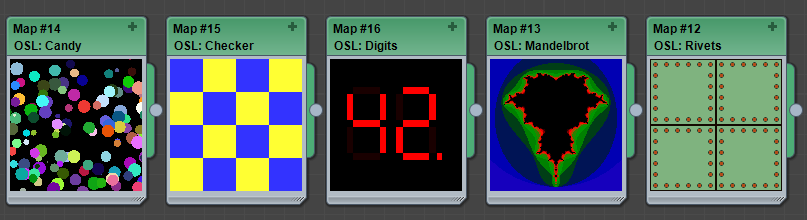
But, material and lighting are not that simple. Let me show you a very single example. This is Checker, OSL:Checker , and Arnold Checkerboard maps. Probably the simplest map we can imagine. Check the following image, all 3 have different sets of parameters. Checker map doesn’t even have a parameter to set the number of tiles. OSL:Checker uses one “Scale” value for both u and v direction. Arnold Checkerboard has separate values for u and v.
Now imagine you have a checker map in the middle of somewhere here. Having a different value or missing a parameter could produce a completely different render. To get the exact same render result, you must have every single node in the image for VRay and Arnold, and all of the maps must calculates value exactly in the same way. That sounds very impossible.
It doesn’t matter if USD can store all the parameters in an USD file or not. Storing the data is not a problem here. You can do that easily with .xml or .json or even .ini, and many of pipeline folks have done this for years and years even before USD was born. NO. USD doesn’t help anything here. It doesn’t bring anything new to solve this problem.
To make this happen, we need a well-defined shader standard that can cover a wide range of feature sets. Then, all renderer dev must agree to strictly follow the standard which means literally using the same code. Oh, wait. There is one, MaterialX! Yes, indeed. MaterialX is aiming to solve this problem. It provides a wide range of features and actually generates shader code for multiple different targets. So, it is certainly better than using baked-down bitmaps only material standard. But, check yourself since MaterialX is now in 3dsMax.The current shaders that are provided by MaterialX are nowhere near production-ready enough. Also, there are shaders, such as AO or Curvature shader, that rely on the features of the host application or renderers. Those shaders can’t be really standardized to have a pixel-match result. They would also need its own optimized code for each renderer or host application to be production worthy.
Also, this means renderer developers can’t really add any new shaders by themselves. If you want any new shader, you will need to ask MaterialX folks and wait until it is included in MaterialX spec. Then, you will need to wait for the support of the new MaterialX version for your DCC and renderer. Then, make sure all the parties you are working with upgrade to the new version. For example, Let’s say you used the “awesome” shader that’s added in the latest and greatest version of MaterialX 13.21 because you are using 3dsMax 2040. But, the other studio you are working with is still using Maya 2035 which only supports MaterialX 12.18. They will not be able to render the “awesome” shader.
A common standard NEVER means the best of all. It always means the least common denominator. You will need to sacrifice flexibility and features over compatibility. Some industries may value compatibility over flexibility. Some would not. How about you? What’s more important for you?
Let me repeat again. There is no way to save a Maya/Arnold scene as USD and just press render in 3dsMax/VRay to get the same render now. You can wait for godot if you want tho.
BUT! Yes, there is always BUT! If your goal is sending material/lights for the same renderer between different host applications. You have good news. In this case, USD kinda works because the renderer dev knows what data to save and how to use the data exactly. I mean vrscene can already do that. You can save vrscene from Max and render in Maya or Vantage and get the same result. The following image is a comparison between a render of VRay proxy and a render of USD Stage object. This asset is from Chaos Cosmos which was originally a VRayProxy object. It was converted as an editable mesh and exported as USD. You can see the render is almost the same.
Material Override
In the end, If we are rendering the USD data in 3dsMax, why not just use native renderer lights and material in 3dsMax? Then, we don’t need to be limited by MaterialX or USD Preview Surface material or USD lights.
Lights are easy. Just make VRay/Arnold lights and set parameters and place them in the scene. As I showed in the Pixar Kitchen render.
Overriding material would need a more involved workflow and UI. But, our friend at Chaos is planning to give us something sooner. In the latest nightly VRay build, you can override materials in USD Stage objects using Multi/Sub material as UI. It is actually almost same as the fallback mode I’ll cover next.
In the following image, I downloaded fender_stratocaster.usdz from Apple and unzip the file and loaded it as a Stage object . USD for 3dsMax doesn’t support direct loading of .usdz. But, .usdz is literally just a zip file. You can unzip with any zip utility and load the USD file in there..
This USD file has total 20 materials. I overridden just one of them. All I need to do is to set material path “/fender_stratocaster/Looks/pxrUsdPreviewSurface1SG” as “Name” of sub material(Not the sub materials’ name) and assign the material I want to use. In the image, I overridden with VRayCarPaint material.
This is a simple yet very effective workflow. Kudos to VRay folks! If you are an Arnold user, ask Arnold dev to have same thing. I’m sure there could be a more USD-like workflow. But, I prefer to have a more familiar Max-like workflow.
Fallback Render Mode
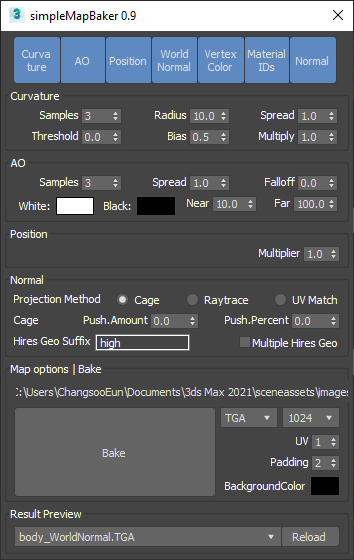
But, I’m a Corona renderer user, and it doesn’t support the native USD rendering yet. I’m still using VRay 5, and USD support is added only for VRay 6. Am I screwed? Well… no. I have good and bad news for you.
3dsMax dev implemented a fallback render mode for USD for 3dsMax. If the renderer doesn’t support the USD native rendering and requests render mesh for the Stage object, 3dsMax provides render mesh to the renderer just like any other object. Stage object also automatically builds Multi/Sub material for all materials in the file. You can even override materials! Many of you probably have used this kind of multi/sub material workflow for tyFlow, TP, and Alembic caches.
We can generate the multi/sub material for the Stage object using “Assign USD Materials” button in USD Render Setup rollout. The following image, I overridden the material of the body with a new CoronaPhysicalMtl and CoronaBitmap, and render with Corona renderer.
This is great news. But, we have a small problem for pre-VRay 6 and Corona users. I don’t know why. But, only VRay and Corona are having issues with smoothing group/.normal in the fallback mode.
This is the Toy Drummer USD from Apple and rendered with Corona using the fallback mode. If you render with Scanline or FinalRender. This doesn’t happen. I have already submitted a ticket. But, if you are a Corona user. You should ask to fix this, too.
Animation control
As a container which support animated cache, USD Stage also has controls for animation playback. The options are similar with Alembic playback options. But, USD has my favorite new option, Custom Start & Speed.
USD uses TimeCode for their time unit instead of frame. So, Stage object will adapt to your scene fps setting regardless of the source USD file’s fps. Stage object will show the original USD time code and how it map to 3dsMax time.
One thing you need to know is that the Source Info is the reading of metadata in the USD file. If a USD file doesn’t have correct information, you will see the incorrect information as is. But, if there is animation data, the Stage object plays it correctly regardless of the displayed number.
Epilogue
OK, I think that’s enough to read for the USD Stage object for now. I think this is my longest blog post ever. But, there are still a lot more to know about Stage like how to edit and composite. I’ll have a new article as USD editing workflow comes into USD for 3dsMax. For how to assemble(composite) an USD scene, you probably have to learn by yourself.
USD provides various ways to composite Stage such as sublayer, layer, layerstack, reference and payload. Personally, I don’t think an “artist” should know or care about any of these. If you work for a studio which is big enough to care/utilize these, they should have a dedicated pipeline developers to handle all these and just expose some UI for you. If you are a freelancer or work for a small studio, you are probably ok with just assembling Stages in 3dsMax just like you were using vrscene/proxies. In the end, there is no right or wrong answer about how to use USD. It is just another tool. You should just use as you need and a way that you feel comfortable.
Lastly, here is s video which shows some of what I mentioned in action.
USD for 3dsMAx 0.5 has been released. You can see how it has progressed in the What’s new section of the official documentation. Even tho it is still in a beta stage, it is actually pretty production-ready in terms of both features and stability.
I think it is a good time to review what USD for 3dsMax can do at this point. Also, we probably need to have some time to understand what USD is, how different it is compare to other data exchange formats. USD is a little bit complicated animal. Then, we also need to see what kinds of new workflow it would bring.
So, I decided to have a few blog post about the current status of USD in 3dsMax. I originally just try to have one post. Then, it was getting too long. I decided to split to multiple post. This is #1 – Export.
So, what is USD?
USD stands for “Universal Scene Description.” It is a system for encoding scalable, hierarchically organized, static and time-sampled data, for the primary purpose of interchanging and augmenting the data between cooperating digital content creation applications. USD also provides a rich set of composition operators, including asset and file references and variants, that let consumers aggregate multiple assets into a single scenegraph while still allowing for sparse overrides.
It is a bunch of C++ libraries and specs for making a scene assembler. This is why it is called “Composition Engine”. Yes, it also provide data exchange format. But, that’s just part of USD. Pixar even said it is not just another file format. NVIDIA Omniverse is an implementation of this library as an application.
Therefore, utilizing USD is not exactly same as using Alembic or FBX. Yes, you can just simply use as another data exchange file format. But, you can also take advantage of new possibilities to improve your workflow(not necessarily reinvent your workflow). USD world is big and complicated. Keep in mind that this is made by Pixar for Pixar. There are a lot of Pixar-ness in it which is not necessarily align with a 3dsMax users. You can start with learning some concepts and terms.
You don’t need to feel pressure of “I must use USD because it is the future”. It has its own pros and cons. In the end, it is just a tool, you just need to utilize as you need.
Lastly, I must admit that I’m not an expert on USD at all. I just learned while beta testing USD for 3dsMax. Just take my post with a grain of salt.
Export
USD is a scene assembler, so we gonna have some data to assemble, right? USD actually can read some existing file formats such as Alembic and Obj. But, even Alembic is not enough to store all the data that USD need to store. Also, it wouldn’t be 100% efficient for new framework to use legacy formats since they were developed before USD developed. Therefore, USD also provides a very comprehensive data exchange format.
It supports mesh with various attributes, transform animation, deformation animation, topology mesh changing animation(like Alembic), and also skin and morpher(like FBX). It can also store lights and cameras with more parameters, shader trees and more. Think it as Alembic + FBX and more. BUT! Remember it is still all BAKED CACHE. It can’t store a live character rig. It can only store baked transforms. Like it or not, this is the only way to achieve Interchangeability. No, you can’t rig in Maya and use it in Max. It will never happen. No, you can’t keep the modifier stack from Max to Maya. It will never ever happen.
Since 3dsMax is primarily a “Digital Content Creation” program,The development focus for USD for 3dsMax has been more on generating USD(Export) than consuming(Import). In this article, I’ll go over where we are at for exporting USD data. You can find the official document here.
Geometry
Obviously you can export your mesh/geometry.
Mesh Format – You can choose to export as Poly(Convert to Polygons) or Trimesh(Convert to Triangles) or as is in the scene(Preserve Existing). If you wan to export everything as you see in the viewport, use Convert to Polygon to since USD doesn’t care hidden edges.
You can choose to Bake Offset Transform(You shoudl always) and Preserve Edge Orientation by converting curved faces in your scene to trimesh.
Normal – can be exported As primvar or As attribute or choose not to export(None)
Vertex Channels – As you can see, all UV and vertex color channels can be exported as PrimVar. One cool thing about this implementation is that you have complete control over which channel to export with what name and type.
Wait a second. Let’s take a break here. I have very important thing to mention. When you import/export between application using a data exchange format, both import and export need to work together. Even tho your exported data is perfect, if importer is not good, you will NOT get all the data correctly.
When the formats were very simple like .obj, it was easy since it carried very limited data such as static mesh, normal and single uv. FBX was more complicated format. But, it worked ok because it was closed format and everybody had to use the the same SDK.
When Alembic came out, all hell broke loose. It can have all kinds of data. But, it didn’t have much of spec or standard about what the data means. For example, Alembic only has one official uv channel. Other uv can be saved and loaded using arbGeomParams. But, as the name suggest, it is arbitrary. There is NO agreement on what would be uv channel 2. There is no spec for what vertex color channel name should be. Every DCC have their own way of export the same data! The data is there for sure. But, either it can’t be loaded or loaded incorrectly. I still have PTSD about this because I had to deal with this as a pipeline guy. When 3dsMax dev worked on Alembic in 3dsMax 2019, I had to make sure to have at least some control over it. So, when I heard about USD, I had high hopes. Maybe, maybe, finally, we might have a solid spec. Well, I was wrong. The situation is not any better. I don’t think there is even a standard name for uv. It has been changed a few times for USD for 3dsMax, and currently the name is “st”. See? The above image was not that long ago, it was “st0”!
This is why the custom primvar setup option is important. At least, you make USD file that other side is expecting.
Material ID – will be exported as GeomSubset.
Wireframe color will be exported DisplayColor primvar
Non-renderable object(Renderable object property off) exported and Bones/Biped/CAT will be exported as Guide purpose which means they do not render, and by default are not shown in USDView.
usd_purpose/usd_kind – custom attribute to set purpose and kind
Instanced geometry will be exported as instamced.
Camera
Standard (Physical, Free and Target cameras), 2 types of Vray cameras, and 4 types of Arnold camera are supported
Color, ColorTemperature(value and on/off), Exposure, Intensity, Normalized on/off, Shadow(color and on/off), Shape, Diffuse. Specular
Photometric SunPositioner exports to USD including sun orientation, mapping color and intensity.
Shape/Spline
If Enable in Viewport/Rendering is off, spline will be exported as UsdGeomBasisCurves.If the option is on, it will be exported as UsdGeomMeshes.
Helpers
Exported as Transform node
Animation
Node Transform animation – usual moving objects
Vertex Deformation – Non-vertex count changing mesh animation like point cache
Changing Topology animation – Vertex count/topology changing messh such as meshed fluid.
Skin/Morph Targets as USDSkel – just like FBX skin/morph export
Spline animation including vertex changing spline
Material
USD Preview Surface – Dedicated USD Preview Surface material
Physical, PBR Material (Metal/Rough), PBR Material (Spec/Gross) will be exported as USD Preview Surface
Bitmap map, OSL BitmapLookup, OSL UberBitmap are supported.
MaterialX shadier as reference -If object has MaterialX material assigned. The file path will be referenced. This means whatever change you made in 3dsMax material editor will NOT be exported unless you save the file.
I know you have some questions about Material in USD. I’ll talk about it in the next post.
Stage
Stage is a composed USD scene. In 3dsMax, you can have a Stage object which containes the content of a USD file. l explain about this when I explain how to consume USD in 3dsMax.
USD Stage objects or prims are exported as USD references. It is similar to nested scene xref. It is very similar to a nested scene xref.
Because the Stage objects are exported as a file reference. Any in-memory change or animation setting change in the scene will NOT be reflected in the exported USD file. Same as MaterialX.
As you can see the most major data types for any traditional productions are already all supported. There are a few missing ones. But, I’m sure they will come in the future. But, how about all the 3rd party plugin data? What if I need export something right now? Well, lucky for you. There is very easy way to make own exporters.
PrimWriter, ShaderWriter and Chasers
3dsMax USD SDK allow you build your own PrimWriter(scene nodes), ShaderWriter (Materials) and Chasers using either C++ or Python to hook into 3dsMax USD Exporter.
Prim writer/Shader Writer
Prim writer will execute for each Max node at export-time. So the exporter iterates through all the objects to export, and each object it checks the current list of registered prim writers for the first prim writer that says it supports exporting an object. If one is found, that prim writer will export that specific node into USD and other prim writers are now skipped.
In English, you have control over how to export each object type(class). For example, if your renderer dev is slow to support USD and you need to export the renderer’s camera right now. You can do with a little bit of Python. In SDK, there is a a sample prim writer,SpherePrimWriterSample, which export 3ddMax sphere as USD sphere with a radius value.
Shader Writer does same thing for materials.
Chaser
Chasers happen at the very end after all prim writers are done, and contain a mapping of the original Max nodes and the resulting USD prims. This allows you to append data to things already written.
For example. the current version of Exporter can’t export objects properties or user properties. But, in SDK sample, there is already an exporter does that, UserDataExportChaserSample.
If you Chasers, it will show up in “Plug-In Configuration” drop down.
File Format
.usd/.usdc/.usda
USD supports Binary(.usdc) and ASCII(.usda) format. The recommend USD workflow is having a lot of granular USD files and composite them as UsdStage. This is an image from Pixar.
It is recommended to use .usdc for data heavy asset data and .usda for composition. Remember 3dsMax USD exporter support exporting loaded Stage objects as references?
.usda is also very useful when you need to debug your export.
USDZ
.usdz is zip-compressed package file format. To export as usdz, just give .usdz extension in the Exporter.
USDView
3dsMax USD includes USD python binding and various pre-compiled toolsets. One of them is USDView. They are here. C:\ProgramData\Autodesk\ApplicationPlugins\3dsmax-usd-2024\Contents\bin
If you just drag and drop an USD file into, C:\ProgramData\Autodesk\ApplicationPlugins\3dsmax-usd-2024\Contents\bin\RunUsdView.bat file. But, this file has to be in this folder. If you run form anywhere, put this line as a .bat file. Then, you can put this batch file anywhere and drag and drop an usd file to view.
This utility is a god send for troubleshooting. You can see everything in the USD file. I’m not sure if you really want this much tutorial, But, NVIDIA has USDView tutorial here.
Another very important use of this utility is that it serve as a ground truth of your USD file. When you send and receive a data exchange file, the importer and exporter both need to work properly. When something is not right, it could be a fault of exporter or a fault of importer. When I use Alembic, I have had to deal with so many “Why can;t 3dsMax read this alembic? 3dsMax alembic is not good”. Well, guess what? In most cases, the problem was the exported alembic file. Either it was not following the needed naming convention or just badly organized data. Sure, it would re-imported correctly to the program which exported the file. That doesn’t mean that the file is sound!!! With this USDView utility, you can examine every single aspect of the USD file and find what the problem is. If this utility can’t read the USD file. Then, the file need to be re-exported. Period.
What’s left
I can say that, as of today with 0.5.1.1, USD already can do more than Alembic. Also, Arnold and VRay already started to support own exporters, and the Prim/Shader Writers and Chaser even allow you to implement custom exporter easily. So, you can certainly use 3dsMax for authoring USD data in production. Just try it.
So,what’s left in terms of export?
Velocities channel – This need support from 3dsMax dev.
Animated Custom Data – We already can export static values for custom attributes, user properties and other node properties for artist with Chaser. But, we arew waiting animated vale export support from 3dsMax dev. We need UI forartists.
Variant Set – This is a unique concept of USD for switchable reference(Variant). It could be low/high res or different combination of parts or different materials. You can actually do this with Prim Writer if you need. But, we will need UI for artists.
PointInstancer – This also can be made with Prim Writer if you need. But, we will need UI for artists.
OK, I guess this is it for export. I’ll talk about Stage object in next post.
The USD for 3ds Max 0.5 release adds full support for MaterialX to 3ds Max. You can load, import, edit, create, and export within 3ds Max using native tools.
MaterialX is an open standard for representing rich material and look-development content in computer graphics, enabling its platform-independent description and exchange across applications and renderers.
MaterialX addresses the need for a common, open standard to represent the data values and relationships required to describe the look of a computer graphics model, including shading networks, patterns and texturing, complex nested materials and geometric assignments. To further encourage interchangeable CG look setups, MaterialX also defines a large set of standard shading and processing nodes with a precise mechanism for functional extensibility.
So, it is an open standard for material. It is a specification, an explicit set of requirements. Any renderer that follows this spec should give the same result for a MaterialX document. We could author a MaterialX material in 3dsMax/VRay, render in Maya/Arnold, and get the same result as long as we follow the spec. I’ll talk about it later again.
This update allow users to 1)Load MaterialX document 2)Render them with any renderer that supports Physical material/OSLmap(All CPU renderer and supported GPU renderer) 3) Edit the loaded material/maps 4)Author MaterialX material from scratch 5)Export as MaterialX document and 6)Export as material binding when export USD file. What do you need more than this?
Now why is MaterialX released as a part of USD for 3ds Max? This is because MaterialX is emerging as a material standard for USD. USD has UsdPreviewSurface. However, it only supports a very basic bitmap-based material tree without more advanced features such as subsurface and anisotropic specular highlights. Also, Material X has its own XML-based file format which goes along well with USD. USD loves files.
Let’s see how it actually works in 3ds Max.
Loading MaterialX
As I mentioned, MaterialX has its own file format, and the new MaterialX Material allows loading this .mtlx file.
As you can see, .mtlx file supports multiple materials in a file, and you can choose a sub-material from the dropdown.
OK, that was easy.
MaterialX Import/Export Utility(MtlXOIUtil)
Another way of bring MaterialX into 3dsMax is using the new MaterialX Import/Export Utility(MtlXOIUtil).
Press “Import MaterialX…” button and choose a .mtlx file. Then, the MaterialX materials are imported and assigned to the selected objects.
If you have not selected objects or selected less objects than materials in the file, this utility will automatically created teapots and assign the imported materials on them.
If you choose a material library file(.mat) and check “Add to Material LIbrary”, imported materials are stored in the material library. They will be imported(exploded), Physical material not MaterialX material.
“Populate Material Editor” will put imported materials in the material editor slots.
Editing MaterialX
MaterialX in 3dsMax is implemented using Physical material and OSL maps. I heard that one of the reasons for adding OSL map support to 3dsMax was actually part of the grand plan for this initiative.Therefore, you can edit MaterialX material tree just like any other 3dsMax materials/maps using CME or Slate. This also means that any third-party renderer that supports 3dsMax Physical material and OSL map will be supported automatically.
MaterialX material provides 2 ways to edit the material tree.
Explode Permanently – Pressing this button will convert the MaterialX material to Physical material + OSL map setup. The MaterialX file loader material will disappear from Slate and the new Plysical material will be assigned to the objects.
Open for Edit – Pressing this button will make a new tab with the Material node name(Not the MaterialX file name. The 3dsMax Material name) and put exploded material tree there. As you can see, the MaterialX material is still assigned to the objects(the white triangles around the corners show that). But, any changed on the material tree in the new tab will be applied to the objects.
Authoring MaterialX
If we can load and edit a MaterialX shader tree, well, that means we can make one from scratch, too. I mentioned any renderer that supports MaterialX will give us the same result for Material materialsas long as we follow the spec.
MaterialX certainly can do more than bitmap-only-based PBR material. It has a bunch of Standard Library Nodes, and 3dsMax MaterialX supports them. Would this set of nodes cover all your production needs? Well, see for yourself. Here is the spec document. You will probably need to sacrifice the flexibility and features for compatibility. “Standard” always means the least common denominator. It will never be the best of all. But, When you need it, you will need it. Having good comprehensive support for such an open standard is a good thing.
Let me say it again. A material standard only works when you follow the standard exactly. Even one parameter difference in the shader tree can make totally different result. Some might want to have an automagic converter for all our 3dsMax maps and 3rd party maps. But, doing that will open a can of worms. I rather have a clear explicit way to author MaterialX when I need MaterialX.
As I mentioned, this MaterialX support is implemented by Physical material + OSL map combo. Therefore, only Physical material is supported for the material. The good thing is that most 3rd party renderers support Physical materials which means they will get MaterialX support automatically.
For maps, there are MaterialX maps category under OSL. You can find 1:1 MaterialX Standard Library Nodes here.
Here are a few things you need to know.
3dsMax “Normal Bump” can be used for MaterialX “normalmap”
Each data type has its own map. For instance, there are 4 “acos” maps for float, vector2, vector3, and vector4. This may seem tedious, but in my experience, it actually makes it much clearer which data type I am currently working with. If you use the wrong data type, MaterialX will simply not export those invalid trees.
Make sure to use “color” type for color. Never use “color” type for data. All color-type maps will be color-managed. This means you can’t load a map and use it for baseColor and Roughness. You must use 2 separate texture nodes to load one as color and another as data.
Bitmap material is supported. But, only the filename will be used. If you want to adjust tiling and offset, use “mx_image” or “mx_tiliedimage” maps.
If you want to know what each map does, check the MaterialX spec document.
This is what I made in 3dsMax using Physical material and
And loaded in QuilitiX
Hers is another good news. 3dsMax has a few specialty materials that use Physical material under the hood. If you use any of these materials, you can exported them to MaterialX.
PBR Material (Metal/Rough)
PBR Material (Spec/Gross)
glTF Material
USD Preview Surface Material.
Exporting MaterialX
You can export the new/edited materials using MaterialX Import/Export Utility(MtlXOIUtil). Just select objects with materials to export and Press “Export MaterialX”
If there are multiple materials in the selection, all those materials will be stored in a .mtlx file.
Make sure to check Maxscript LIstener for validation checks. Your material tree might not be valid. If you see warnings, you must fix them to export properly.
Integration with USD
The MaterialX plug-in comes with a Shader Writer for the 3ds Max USD Plug-in that will allow the USD export to bind references to the MaterialX files to USD Prims when exporting scenes using a MaterialX Material.
Here is a short video of MaterialX in 3dsMax in action.
csMakePreview is a scripted UI of the newly improved MXS createPreview function in 3dsMax 2024. For the details, please check this post. Now it has been updated to 1.21 with a few new features including the new Mini mode.
Press Mini Mode button to change to Mini mode. Mini mode on.off status will be saved in the settings file which means it will be kept across max session.
Only few options are exposed in Mini mode. The intended workflow is making presets using full mode and use for Mini mode. .
If you want to return to full mode, click “Mini” button.
Other new features
Custom resolution by pixel. Turn on the “Resolution” button and set the preview resolution as you want.
<version> token. It’ll add 3 digit padded version number. This value is saved for each scene file. So, you will know which version you used last time for the scene.
Preview path preview button This button will show the preview of the resolved preview path. If you press button, the preview path will be printed in the listener.
Open/P{lay button will be disabled then there are no files in the preview path. When button is disabled, the line color will be slightly darker(left).
Quality Override for the temporary override of ShadowMap size and Anti-Aliasing setting.
Play When Done moved to Settings dialog.
Other features
csMakePreview looks similar and based on 3dsMmax MakePreview. But, it has a few additional features.
Use Current Viewport Settings check button If this button is on, the current Viewport Preset/Stylem Edges Faces and Texture settings of the active viewport will be used. Basically, it will make a preview as you can see in the viewport. This is on by default.
The output path textbox is editable. You can directly type/edit in the textbox.
Token support! It supports all tokens in “Name Template”. You can also use any global variable or global function. For example, you can make a setPrefiewPath global function and set <setPrefiewPath> as path. This script will run the global function and use the result as the output path. Ot, If you want to add fps in the name, you can use <FrameRate>.
mpt4 support via ffmpeg You need to download ffmpeg by yourself and set the path in the Settings dialog. Eventually.
Ramplayer, ChaosPlayer, Custom player support. To use a custom player, you need to make csPlayPreview global function with 4 arguments [output path], [fps], [start], [end].
Play Preview button
Open the preview folder button
Presets you can save/load as many as presets you want.
It seems everybody loves the new multiple image drag and drop to Slate material editor in 3dsMax 2024.1.
As I mentioned in the video. You can make own function for the new callback. Here is an example script that supports VRay, Corona, Arnold and OSL map. You can add this as a startup script folder. It will auto-detect VRay, Corona, Arnold, FStorm, Octane, Redshift and make a native image loader for each renderer. If you edit as “local useOSL = true”, it will generate OSL UberBitmap.
-- cs_sme_drop v1.1
-- by Changsoo Eun
-- www.changsooeun.com
(
local maxver = (maxversion())
if maxver.count > 7 and maxver[8] > 2023 and maxver[5] > 0 then (
fn cs_sme_drop test urls pos = (
if not test then (
for f in urls do (
-- Set this to true if you want OSL UberBitmap
local useOSL = false
local amap = (bitmaptexture())
amap.filename = f
if useOSL then
(
amap = (osl_UberBitmap2b())
amap.filename = f
)
else
(
if Corona != undefined and ((classof renderers.current) == Corona) then (
amap = (CoronaBitmap())
amap.filename = f
)
if vray != undefined and (matchpattern (renderers.current as string) pattern:"*v_ray*") then (
amap = (vrayhdri())
amap.HDRIMapName = f
)
if (matchpattern (renderers.current as string) pattern:"*FStorm*") then (
amap = (FStormBitmap())
amap.filename = f
)
if (matchpattern (renderers.current as string) pattern:"*octane*") then (
amap = (RGB_image())
amap.filename = f
)
if (matchpattern (renderers.current as string) pattern:"*redshift*") then (
amap = (RS_Bitmap())
amap.tex0_filename = f
)
if Arnold != undefined and ((classof renderers.current) == Arnold) then (
amap = (ai_image())
amap.filename = f
)
)
if useOSL then (
pos.x += 100
)
else(
pos.y += 100
)
amap.name = (getFilenameFile f)
(sme.getview sme.activeview).createnode amap pos
)
)
true
)
sme.fileDropCallback = cs_sme_drop
)
else (
messagebox "3dssMax 2024.1+ is required"
)
)
3dsMax 2024 bring a lot of new features. Some of them are hard to show in a video. This is one of those features.
I always have wanted to have a modified version of Make Preview. For example, if you are a pipe guy at a studio, you probably would not want to give assess to the output path to artists. How about forcing some consistent studio-default options?
I have used UIAccessor in the past. I also know some studio just made their own make preview utility. But, with the update in 3dsMax 2020, I really wanted to use Max’s own Make Preview engine since it can make bigger than screen size preview.
There is a MXS command, createPreview. But, it didn’t have all the functionality of UI version. Especially, there was no way to control viewport settings. Finally, the 3dsMax 2024 createPreview function exposes every single UI option to MXS function.
So, I re-created Make Preview dialog as a script for the following reasons.
I wanted to check if it still misses anything compared to UI.
I wanted to give a template implementation for other users.
I wanted to add some of the features that users wanted
Use Current Viewport Settings checkbutton – If this button is on, the current Viewport Preset/Stylem Edges Faces and Texture settings of the active viewport will be used. Basically, it will make a preview as you can see in the viewport. This is on by default.
The output path textbox is editable. You can directly type/edit in the textbox.
Token! It supports all tokens in “Name Template”. You can also use any global variable or global function. For example, you can make a setPrefiewPath global function and set <setPrefiewPath> as path. This script will run the global function and use the result as the output path. Ot, If you want to add fps in the name, you can use <FrameRate>.
mpt4 support via ffmpeg – you need to download ffmpeg by yourself and set the path in the Settings dialog. Eventually.
Ramplayer, ChaosPlayer, Custom player support. To use a custom player, you need to make csPlayPreview global function with 4 arguments [output path], [fps], [start], [end].
Set default button – you can save default settings per user.
Play Preview button
Open the preview folder button
Presets – you can save/load as many as presets you want.
This is a full procedural setup with some of the new additions of #3dsMax in recent releases such as Array modifier, Boolean modifier and Subdivide modifier. Especially, the new OpenVDB based boolean opens up so many new possibilities.
I originally planned to release a sample pack for Boolean modifier. But, somehow this video has gotten so much response. I decide to release this scene file first.
3dsMax is here with tons of new features. Here are some of highlights.
#3dsMax 2024 OCIOv2 Color Management OCIO v2 based color management is here, From image loading to rendering space, output and color picker, comprehensive color management is possible now.
#3dsMax 2024 – Boolean modifier New MNMesh2 powered modifier-based Boolean workflow. Capture mode will embed operands into the main object. If you don’t want to embed, you can still choose to live reference. For example, for animation, you may want live reference. The UX has also been a big focus for this modifier. You will notice a lot of small but thoughtful features throughout the modifier.
#3dsMax 2024 Boolean – OpenVDB Volume Boolean In addition to mesh boolean, OpenVDB-based volume boolean mode is added. It enables simple and easy mesh <> volume workflow. Combined with the Retopology modifier, it opens a lot of new possibilities
#3dsMax 2024 Boolean – SplitAttach 2 New boolean operationstypes. Split cut meshes by keeping Intersection and Subtraction result. Attach combines multiple objects into one without affecting their topology. It also has improved support for booleans across multiple elements. For example, when performing a Split or Inset operation on the Boolean Modifier, these operations will be processed one at a time on each element.
#3dsMax 2024 Boolean – Topology By nature, boolean is prone to generate bad topology. The boolean modifier has a lot of built-in clean-up code for input/output topology. This also allows more stable Boolean operations.
#3dsMax 2024 Qt Slate ME Slate material editor ahs been Qtfied with the new look and faster performance. Now it is dockable, and the colors of UI elements are customizable.
#3dsMax 2024 Compound material/map Allows the user to group and collect materials, maps, and node trees in a single collector that can be collapsed or expanded. Just use like anyother material/maps.
#3dsMax 2024 Material Switcher Allow to switch among sub materials up to 9999. You can switch between multi/sub materials, too.
#3dsMax 2024 Transform List controller Just like all other list controller. But, for transform. No need to have list controllers for position, rotation, scale separately. Also all list controller has been Qtfied and got a new index mode. The index mode allow you to simply switch between sub-controllers without weight adjusting.
#3dsMax 2024 Qt Modifier LIst The modifier list has been Qtfied which maker it a lot faster. It also now has search filter. Scroll bar now has size Preference option.
#3dsMax 2024 Array v2 Awesome Array modifie has gotten even better with New Phyllotaxis Distribution method. It also has new Mateiral ID option and Proigressive transform option, ransform Before Projection checkbox/.
#3dsMax 2024 STLCheck/STLImport Performance Improvement STLCheck/STLImport Performance has been improved thousands times faster. Ye, thousand times.
#3dsMax 2024 Triangulation Improvement The improved triangular algorithm which was introduced in 2023.1 has been improved further. Now also used in Edit Poly modifier. The following Editable Poly/Edit Poly operations now use the new triangulation algorithm – Face splitting by insertion of edges, Slice, Cut, Bridge, Vertex extrusion, Edge extrusion, Cap, Smart Extrude. Cap Holesmodifier is using this new algorithm
Smart Extrude is awesome. But, I know sometimes you want to be not so smart. Good news. There is a maxscript property which you can turn on/off “Smart”.
Editable_Poly and Edit_Poly has #enableEnhancedHotkeyExtrude property, and as you expect, it turns Smart Extrude on/off.
For your convenience, I made a simple macroscript. Unzip and drag and drop to a viewport. Since it is a macroscript, you can make button or assign to a hotkey or add to the quad menu and etc. Download
Because this is a property of Editable Poly and Edit Poly modifier, each Editable Poly/Edit Poly will remember the on.off status.
Nowadays “proceduralism” is a very hot trend. Yet many 3dsMax users don’t realize that 3dsMax has had a wide range of procedural features for decades. One of the not-so-well-known procedural features is Data Channel modifier which was introduced in 2017!.
A few days ago. I saw a question about how to make this animation on the tyFlow Facebook group. It was a perfect example of what DCM can easily do with a simple setup. Now with Array modifier, it took 5 min for me to put it together.
1. Let’s start with a box. I guess I don’t need to explain more. 🙂
2. Then, 15×15 Grid Array.
3. Then, Wave modifier. I rotated the gizmo 45 drgree.
4. Then, I applied Vol.Select. Rotate the Gizmo 45 degree again and moved out of mesh.
5. Then, animate the gizmo to select all vertex on the verts. This is frame 36.
Frame 72.
As you can expect, Ill drive the scale animation of each element with animated soft selection using Data Channel modifier. Apply Data Channel modifier.
6. Apply Data Channel modifier.
7. Click “Add Operator” button.
8. Add “Transform Elements” and “Vertex Output”
9. Transform Element modifer allow you to transform(move, rotate, scale) each element using a selected channel. For this setup, we will use soft selection channel as a driver. Set “Input Channel” as Soft Selection.
10. Set Transfrom as “Scale %(Uniform)”. Leave everything as is. It should look like the following image.
This setup means, DCM will scale each element from 0 to 100% using soft selection value 0-1. So, if the average of soft selection value of an element is 0. The element will be scale to 0. If the average is 0.5, it will be half size(50&), of the average is 1.0, it will be full size(100&).
11. Select “Vertex Output” and set Position/Replace. The Transform Element generates transformed vertex position data for each vertex and store in a vertex channel and pass down. We need to replace vertex position channel with the new vector channel to see the animation. “Vertex Output” operator is doing that,
12. If you want to make it more interesting, you can add one more Transform Elements for rotation. Make sure to right click the second Transform Element and change to “Replace” since you are adding a new separate channel. If you choose “Add”, the value will be added to the vector channel coming from the above “Transform Element”.
13. Set “Transform” to “Rotation” and set all “Max” value to 360. So, you can do a complete turn.
I know it is gross. This is the new OrganicNoise OSL map from 3dsMax 2023.3. It makes organic-looking noise! Like the above image. It is so cool because…
First of all, it ships with 28 ready-to-use presets!
Lots of options to play with
3D procedural noise. You don’t need UV
Animation-ready Phase parameter
Work well with displace modifier and gradient map
I renderers all 28 presets as animation. Check it out. Don’t forget to music on!
It has been only a little bit more than a month since we got big USD updates. But, this is December, the month of the last PU of the year.
The new Organic Noise OSL map will allow you to create organic looking noise patterns by modulating and filtering OSL noises.
The best part of new #3dsMax 2023.3 Organic Noise is that it comes with 28 ready-to-use presets. It is like having a holiday gift basket! I rendered all 28 presets with Phase/Scale animation and even put some background music. It is interesting to see that the scale adds even more variations.
When #3dsMax 2023.2 Array modifier was released, I had to connect a few OSL nodes to randomize maps per clone. Now you can just use a single UVWRandomizer OSL map for the randomization part
#3dsMax core optimization effort never stops. This time Poly to Mesh conversions performance has been improved across 3dsMax. If you have a stack with lots of channels and jump around Poly/Mesh a lot, you will feel the difference.
3dsMax USD 0.3 has been released. Here is the highlights.
USD Stage Object
SD Stage Node is now supported in 3ds Max. Reference a USD stage directly into 3ds Max to create a scene with USD assets from an existing file. Using this workflow, you can view and render USD data directly in 3ds Max.
Full access to working with in-memory stage data. You can build Python, C++ and MAXScript tools to interact with the data inside a USD Stage Object. The stage has a read-only property called CacheId that can be used to access the stage from a global USD cache. Using this you can directly manipulate and interact with USD data (moving prims, changing visibility, etc.)
USD Stage Rendering
USD Stage fallback rendering mode allows rendering USD Stage even when renderers do not support accessing a USD stage directly.
UsdPreviewSurface material support using texture transforms (UsdTransform2d) and texture wrap modes.
Assign USD Materials button to build a Multi/Sub material for fallback rendering mode. Users can override any parameters of the material tree.
USD Export & SDK
USD Stage Objects can now be exported as USD references.
SDK includes all you need to build your own PrimWriter, ShaderWriter and Chasers to hook into our USD Exporter using C++ or Python
3ds Max USD SDK comes with a set of working (simple) samples covering ShaderWriter, PrimWriter and Chaser, written in both C++ and Python to get everyone going rapidly with the new SDK
These are some Array modifier sample max files from me and other beta testers. I’ll eventually post something ti explain some of these files. But, if you are impatient, just open these files and figure it out! Enjoy!
3dsMax 2023.2 has been released with the new feature-packed Array modifier.
This is an array/tile “rigger” based on the new Array modifier. I originally wanted to make a series of tutorials. But, I had to admit that typical Max users are too lazy to follow all the steps. So, I just made this script. I still hope to have some tutorials. But, you can just use this meanwhile. Download
The generated object is “rigged”. If you change the base object size, the array/tile will adapt to it.
-A brand new feature-packed Array Modifier. As a modifier, it provides a fully procedural non-destructive modeling and animation experience.
Based on the brand new geometry processing engine, MNMesh2(MNMesh means Poly), which is built for performance, stability, flexibility, and scalability. It is the foundation for the future of 3dsMax, and Array is the first practical implementation using this technology.
Supports Mesh, Poly, and Spline
4 Distribution Methods – Grid, Radial, Spline, Surface
Array by Element allows each element as an array source
Extensive Transform options such as Incremental, Alternating, By Axis, Incremental By Axis and provide very flexible control.
Randomization
Clone ID UV data
Remove allow to remove clones by % or object volume
Create Instances – bake to instanced individual objects
3dsMax 2023.2 – Physical Material to glTF conversion
The Scene Converter contains a new preset called “PhysicalToGLTF” that allows you to easily convert all physical materials in a scene to glTF materials.
3dsMax 2023.2 – Object Color mode Material Evaluation Override
Improving/optimizing performance #3dsMax has been one of the big focus for a while. #3dsMax 2023.1 has another round of big performance boost. Especially these updates are for animators.
3dsMax 2023.1 – Spline Extrude
3dsMax is known for the best spline tool on the market. Yet it has gotten even better!
3dsMax 2023.1 – Progress bar update
File IO operations will show progress and progress will displayed in task bar icon.
#3dsMax 2023.1 – Isolate selection updates
Zoom Extents On Isolate (ZEOI) is now persistent from session to session (in 3ds Max.ini). Default value of ZEOI is set to off, means do not zoom extents on isolation.
#3dsMax 2023.1 – New Triangulation algorithm
New Triangulation algorithm prevents inverted or collapsed triangles, generates more regular fewer long, thin triangles and handles non-planar faces better. Chamfer and SmartExtrude utilize this new algorithm. It will eventually be deployed more broadly.
#3dsMax 2023 1 – Vertex Paint modifier Capture
A new button is available called “Capture” which copies all of the existing vertex colors that exist under the current Vertex Paint modifier into this level. This will allow you to blur and work with the existing data easier.
Improved playback speed with animated background if the source image is in sRGB or gamma 2.2. It is 2x-3x faster. Improved performance of Merge dialog when dealing with large number of nodes.
3dsMax 2023 includes the updated Retopology modifier. Retopology modifier is an automatic retopology solution that was introduced in 2021.3. It is based on a Autodesk’s proprietary tech called Reform.
One of the main update is “Preprocess Mesh” checkbox(On by default). If this option is on, Retopology modifier will preprocess/remesh to make a evenly triangulated mesh first before retopolizing the mesh.
Reform really love this preprocessed mesh which makes the retopology process really really faster. Especially, when you go from very high poly count to low count target. The above bunny has almost 70k triangles. When I retopo to 5k without preprocessing. It took 34 seconds. With preprocess, it took only 4.7 second.
Second, because the preprocess smooth out small details(or noises), it produce a better edge flow as you can see from the following image. Of course, if you want to keep all the details as much as possible, you might want to turn off preprocess.
Another important benefits of the preprocess is that it actually allow to retopo a highly detailed mesh to a very low target. Reform tend to try to keep all the details as much as possible. Because of this, Reform sometimes just fail or give you a result that has a lot more poly than you wanted. Preprocess solves this issue.
Here are some examples of retopo with preprocess on. I have Ryzen 2700X. Both models were sliced half and reassembled with Symmetry modifier.
Left – 2.4 million poly Center – 20ok poly / 77 seconds Right – 24k poly / 20 seconds
3dsMax mesh has more data than just vertex and faces such as UV, normal, smoothing group and material id. Now Retopology modifier keeps any of this data which you set as “Auto Edge” while preprocessing and processing. For example, if you turn on Auto Edge > UV Channel, it will create edges along the uv seams and re-project uv data to the new mesh.
I picked a Megascan asset and retopoed from high res model to 5000 poly target which is same as their LOD0 mesh. The left one is Retopoloigy modifier result. It took 26s with the default setting. UV after/before retopo
But, Let’s talk a little but more about Auto Edge especially for uv seams as Auto Edge.
I have scanned model. The green line is th euv seams. Do you see all those tiny uv elements? If I turn on Auto Edge with UV Seams, Retopology modifier will try really hard to keep all of them, which means retopo will likely fail unless you set the target really really big. So, please check your UV if your retopo process fails with Auto Edge/UV seam.
To solve this issue, you will likely create a new uv with less elements and bake maps to the new uv. This is the result after I created new seam abd used BTT to transfer the texture to new uv. It took 104 seconds to retopo to 25000. I’ll have a new post dedicated to this process in the future.
Here is some images of retopolized Megascan assets. Most of them was just one click.
Output Mesh type
Now you can choose to output either Retopology mesh or Remeshed Mesh(Preprocessed mesh) to the stack.
As you can see, remeshed mesh has extremely simulation friendly topology. As of now, you can’t just get remeshed mesh. But, remesh process usually a few seconds. You can just press ESC when retopology process starts to get only remeshed mesh.
ADSK_3DSMAX_USERTOOLS_DIR allow you to set user settings folder, The default location is C:\Users\[username]\Autodesk\3ds Max 2023\User Tools\
Why it is important? Because this is the folder where MCG goes. This is the default MCG installation location. C:\Users\[username]\Autodesk\3ds Max 2023\User Tools\Max Creation Graph\Packages
So, now I can set ADSK_3DSMAX_USERTOOLS_DIR as D:\PROJECT\_maxDefault\MCG and put all my mcg package file in D:\PROJECT\_maxDefault\MCG\Max Creation Graph\Packages.
After I set this up one time, I will not need to set MCG folder forever and ever. Update? re-install? new version? PR? I don’t need to do anything to get my MCG back.
And more…
ADSK_3DSMAX_AUTOBACKUP_DIR – Defines the path used by Autobackup to save files.
ADSK_3DSMAX_ROOT – An environment variable defined by the 3ds Max process that contains the directory from which the current 3dsmax.exe program is running, regardless of where 3ds Max is installed. Only defined when auto-tokenization is enabled.
ADSK_3DSMAX_ENVVAR_TOKEN_SUPPORT – Enables auto-tokenization of 3ds Max installation files, similar to the -envartoken command line switch.
3dsMax 2023 – Autobackup Improvement Your voice has been heard. A lot of work has been done to make autobackup experience smoother. New Autobackup Toolbar – Enable/Disable button, Autobackup Time Interval progress indicator, Reset Timer. Minimize user activity interruption – Timer only progresses when the scene is changed. Timer will pause when users are interacting with max. Compress on Autobackup, Prepend Scene Name , Better handling of simultaneous Max sessions. https://help.autodesk.com/view/3DSMAX/2023/ENU/?guid=GUID-0378F364-72C4-4C8D-9E05-B918656E1761
3dsMax 2023 – Compress Save Performance Continuing file save performance improvement of 3dsMax 2022.Save with compression performance has been greatly improved(500% to 2500% in my test) with New zstandard compression engine. Now saving with compression on will only take 10-15% longer than with off in my test case. Before this improvement, turning on compression on used to be 400-600% slower than off. In many cases, now saving with compression on in 3dsMax 2023 is even faster than compression off in an older version.
3dsMax 2023 – Pipeline integration v2 Now you can control pipeline integration env var per 3dsMax version! Also now autoback and MCG folder can be set by env var.%ADSK_3DSMAX_MAJOR_VERSION%, %ADSK_3DSMAX_MINOR_VERSION%, ADSK_3DSMAX_ENVVAR_TOKEN_SUPPORT,ADSK_3DSMAX_AUTOBACKUP_DIR,ADSK_3DSMAX_ROOT, ADSK_3DSMAX_USERTOOLS_DIR
3dsMax 2023 – Occlude selection mode improvement Further optimizations have been made to the Occlude Selected functionality. The selection performance and accuracy has been greatly improved.
3dsMax 2023 – FBX Maya Interop Improved FBX so now it supports the physical material and you can send to/from Maya without much loss of data.
3dsMax 2023 – Render/Viewport Instancing API This new API provides a consistent way for third party developers to provide instancing data for a Renderer and viewport.
3dsMax 2023 – Volume Display API This new API simplifies displaying a volume in the viewport when a plugin provides the voxels data, positions and display options. MaxToA Volume object in MAXtoA 5.2.0 is using this API.
I know a lot of 3dsMax users uses maxstart.max to set their default working environment. While that is certainly a convenient method. I haven’t used that for more than 10 years. Here is why.
It replaces everything. It is a load/save. I can’t pick and choose what to set. For example, all the renderer settings are saved and loaded. If the renderer developer changes some default value for their new feature. Your maxstart.max from the older version will override all that settings.
It is hard to know what you actually have set. There is no trace whatsoever what you have changed. If someone accidently changed settings and overwrote the file, there is no way to know until someone has an issue. This is actually the most important reason for me to switch to startup script.
Obviously there are settings that aren’t stored in a max file.
It is rare and probably ok now. But, back in the day, there was a bug that maxstart.max was loaded AFTER I already loaded a max file.
This is a sample startup template that you can use as a starter point. This include the #script and #userscripts folder setup that I posted in another post. Now I just throw this script in my “ADSK_3DSMAX_STARTUPSCRIPTS_ADDON_DIR” folder and good to go forever!
setdir #scripts @"D:\PROJECT\_maxDefault\scripts\"
setdir #userscripts @"D:\PROJECT\_maxDefault\scripts\"

-- system unit
DisplayType = #Generic
units.SystemType = #Inches
units.SystemScale = 1

-- animation
frameRate = 24
animationRange = interval 1 72
maxOps.autoKeyDefaultKeyOn = true
maxOps.autoKeyDefaultKeyTime = 1

-- gamma
IDisplayGamma.colorCorrectionMode = #gamma
IDisplayGamma.affectMEdit = true
IDisplayGamma.affectColorPickers = true
displayGamma = 2.2
fileInGamma = 2.2
fileOutGamma  = 2.2

-- renderer
if vray == undefined then (
    renderers.current = Arnold()
)
else(
    renderers.current = VRay()
)

-- autoback
autosave.Enable = true
autosave.NumberOfFiles  = 20
autosave.Interval = 10.0

-- UI
-- hide viewcube
ViewCubeOps.Visibility = false
-- hide Sign In
qtmax = python.import "qtmax"
(((qtmax.GetQMaxMainWindow()).menuBar()).children() as array)[2].close()

-- Viewport
-- Set all viewport background as solid
actionMan.executeAction 0 "618"

callbacks.removeScripts id:#startup4reset
callbacks.addScript #systemPostReset filename:(getSourceFileName()) id:#startup4reset
callbacks.removeScripts id:#startup4new
callbacks.addScript #systemPostNew filename:(getSourceFileName()) id:#startup4new

– To prevent “Do you want to savr?” dialog after fresh start
setSaveRequired false

format "startup script is loaded\n"
This is the second part of how to manage tools series, Plugins. I’m sure most 3dsMax users know about the plugin,ini file. When 3dsMax starts, it looks for the following 2 plugin,ini files.
C:\Program Files\Autodesk\3ds Max 2022\en-US\plugin.ini
This is a usual ini file with sections and keys and values like this.
[Directories]
Additional MAX plug-ins=C:\Program Files\Autodesk\3ds Max 2022\PlugIns\
[Help]
You can edit one of the above files with a text editor to add your own plugins folder or use Customize menu > Customize Users and System Paths dialog > 3rd Party Plug-Ins tab.
Usually a commercial plugin would have an installer to take care this for users. Then, users would make a plugins folder and throw all free plugin there and add the path to plugin.ini. Or, some still just throw everything in C:\Program Files\Autodesk\3ds Max 2022\Plugins folder. If your studio has TDs or IT department, they probably already have their own way to do it. Also you can specify a plugin,ini to use via command line option -p while launching 3dsMax
But, there are also 2 not-so-well-known ways of managing plugins to know.
[Include] section in plugin.ini This allows to nest plugin ini like this image. This is great for central management and exactly the same principle as my “seed startup script”. You just deploy a caller and do the real job in another file. This is what I have been using.
Autodesk Application Plug-in Package This is the new official way to distribute any plugins and a great way to de-couple plugin files from 3dsMax installations. VRay already has moved to this method and hopefully more commercial plugins adapt to this format. But, you can also utilize this for your own plugin management. It is a little bit involved. So, it might not be great for individual users or small studios. But, if you have TDs or IT department, it is worth checking.
ADSK_3DSMAX_PLUGINS_ADDON_DIR
The new pipeline integration also supports custom plugin and application package folder. You can use these two following env vars to control plugin loading location. Again this means I don’t need the seed .ini anymore!
ADSK_3DSMAX_PLUGINS_ADDON_DIR
ADSK_APPLICATION_PLUGINS
But, one thing you need to understand is that the current pipeline integration in 3dsMax 2022.3 is mainly aimed for using a batch file or Python script. Because of that, it doesn’t have a way to specify the 3dsMax version. That means all 3dsMax versions will pick up the exact same folder when you have multiple versions installed. This can cause problems if any folder you set has version specific data likek plugins folder. As you know, often plugins are not compatible between versions, if you set “ADSK_3DSMAX_PLUGINS_ADDON_DIR” as system env var, all the 3dsMax versions will try to to pick up plugins from the same folder. That wouldn’t work.
With 3dsMax 2023 updates, the above issue has been addressed. Please check the new post here.
Therefore, you need to set env var only for a session instead of the whole system. You can do this by using a batch file or Python script to run 3dsMax. If you have a Python launcher, you probably wouldn’t need a tutorial from me. Here is a sample batch file for “artists”. A good thing about this sample is that it doesn’t leave the command shell after 3dsMax started.
SET ADSK_3DSMAX_PLUGINS_ADDON_DIR=D:\PROJECT\_maxDefault\plugin_free_2022
c:
cd "C:\Program Files\Autodesk\3ds Max 2022\"
start "" "C:\Program Files\Autodesk\3ds Max 2022\3dsmax.exe"
“SET” command is the command to set env var in a batch file.
As you can see, this allows you to define the combination of plugins dynamically while launching 3dsMax easily. Imagine you need different versions of VRay, ThinkingParticles per project. Before the pipeline integration, you would need to build a plugin.ini per project and load. Now, you can just add directories directly in the launcher script.
This is it for plugins! But, the potential of the pipeline integration doesn’t end here. WIth new env var controls and token support in various ini. You can actually install each PUs side by side now like 3dsMax 2022.1, 2022.2, 2022,3. You can even install 3dsMax in a network folder and load from there. Sure, you need to figure out how exactly execute this for your studio. But, the technical foundation is there. So, try it!
We, 3dsMax users, love 3rd party scripts and plugins. But, we don’t necessarily like the process of installing and managing those. Sometimes this is one of the reasons why we don’t even upgrade 3dsMax. In this post, I’ll show you how to decouple the installation of 3rd party scripts from 3dsMax for easier management. I will also show how the new pipeline integration feature in 3dsMax 2022.3 will make this task simpler. We will use the famous Soulburn script as an example.
First, we need to know how scripts are loaded when 3dsMax launches. Fortunately there is already very good documentation here. In a nutshell, 3dsMax executes startup scripts and macros scripts from certain locations while being launched. Users need to install scripts in those locations so they can be loaded properly.
Startup scripts
There are a few reasons why users would want to execute scripts automatically when 3dsMax starts. For example, If you use any scripted plugins such as the famous Paul’s PEN_Attribute_Holder, you probably want it to be loaded and ready to use just like C++ plugins. Another important use of startup script is setting working environments, defaults and system directories which we will utilize in this post. I also have a separate post about this subject here. Please check it out.
As you see in the above document, 3dsMax reads the startup script from the various places. But, the most commonly used folders are these two folders.
system startup scripts folder – C:\Program Files\Autodesk\3ds Max 2022\scripts\Startup
user startup scripts folder – C:\Users\[username]\AppData\Local\Autodesk\3dsMax\2022 – 64bit\ENU\scripts\startup
One of the important rules of 3dsMax tool management is you never touch the 3dsMax root folder. If you need to add/modify anything, you should add/modify files in the appdata folder which is usually called the “ENU” folder. C:\Users\[username]\AppData\Local\Autodesk\3dsMax\2022 – 64bit\ENU\
But, as you can see, using a user data folder brings a lot of challenges, especially for a team. So, I have been managing startup scripts using a seed startup script, [3dsMax root]/scripts/startup.ms. This script basically calls the real script like this.
By using this seed script, I can update the startup script centrally without re-depolying again to all workstations. this is one of two files I allow an exception personally.
BUT! I don’t need this seed script anymore because of the new pipeline integration feature. This feature allows users to set various paths used by 3dsMax with Environment variables which means you can set paths from the outside of 3dsMax before it launches. Even though 3dsMax provides a great amount of control over every aspect of 3dsMax with Maxscript. The fundamental limitation of the script based approach is that everything happens after 3dsMax launched. The new pipeline integration removes this limitation. Also it allows you to control folders that never have been allowed to control before such as the appdata folder itself.
So, how can we use this feature? There are 2 ways to set environment variables in Windows.
The second way is using a batch file or Python to set env var only for the session. If your studio is using a launcher, they are already using this way.
For startup script, we can use the first method since scripts are usually compatible between 3dsMax versions and you can put a condition if there are any version specific things in it.
After I added “ADSK_3DSMAX_STARTUPSCRIPTS_ADDON_DIR” env var, my 3dsMax runs any scripts in this folder. I don’t need to add anything to 3dsMax root folder. I don’t need to worry about re-coying again this file after wiping out ENU folder to solve my 3dsMax issues. I don’t even need to do anything for any future version of 3dsMax. It is truly set it and forget it!
Setting custom system directories with startup script
Even though the new pipeline integration allows you to add “scripts” folders with “ADSK_3DSMAX_SCRIPTS_ADDON_DIR”. This folder actually doesn’t matter much because we never execute all scripts in these folders automatically. Also setting env var doesn’t actually change 3dsMax system directories, and most scripts are usually called other scripts or macroscript(We will discuss it later) using #scripts or #userScripts system directories to allow more flexible installation instead of hard-coded path. For example, this is a macroscript from the Soulburn script.
MacroScript blendedBoxMapMaker category:"SoulburnScripts" tooltip:"blendedBoxMapMaker" Icon:#("SoulburnScripts_blendedBoxMapMaker",1)
(
Include "$scripts/SoulburnScripts/scripts/blendedBoxMapMaker.ms"
on execute do blendedBoxMapMakerDefaults()
on Altexecute type do blendedBoxMapMakerUI()
)
As you can see, this action will try to find “/SoulburnScripts/scripts/blendedBoxMapMaker.ms” file under #scripts folder($scripts is a symbolic pathname for #scripts).
By default #scripts is set to C:\Program Files\Autodesk\3ds Max 2022\scripts and #userScripts is set to C:\Users\ChangsooEun\AppData\Local\Autodesk\3dsMax\2022 – 64bit\ENU\scripts. 3rd party scripts are suppose to use #userScripts. This means that we have to install the Soulburn script files under C:\Program Files\Autodesk\3ds Max 2022\scripts unless we change the location.
The good news is that we can change any system directories using the “setdir” Maxscript command! This is the first two lines of my startup script. This allows me to install any 3rd party script under D:\PROJECT\_maxDefault\scripts\ instead of 3dsMax root or my user folder.
TIP! As you can see from the 3dsMax system directories document, you can also set any project folders using “setdir” command. By default, they are set as a relative path to the current project folder. But, you can change those using “setdir“ command. For example, you can change autoback folder to “D:\3dsMax_Autoback” instead of in your Document folder.
setdir #autoback @"D:\3dsMax_Autoback"
Macroscripts
Macroscript is a script that defines “ActionItems” in 3dsMax. ActionItem is “that represents the action that can be assigned to Toolbars, Menus, QuadMenus and Keyboard Shortcuts using the Customize User Interface dialog”. Basically if you want to make an UI like a button or shortcut, you need a macroscript for the script. It also allows the script to show up in Global Search(X menu).
3dsMax executes the macroscripts in #userMacros and #macroScripts system directories by default when it starts. Now you may think we could change these folder to own custom folder like #scripts and #userscripts. BUT! We can’t do that for macroscript because 3dsMax and many 3rd parties actually use these folders. BTW, there is the new Autodesk Application Plug-in Package format which 3rd parties can completely separate their files from 3dsMax factory installation. If your favorite plugin doesn’t support this. Ask them!
Another problem of #userMacros folder is that it is used when user create macroscript by drag and drop. For example, if I type print “Hello, World” and drag and drop this line to a toolbar. 3dsMax makes “DragAndDrop-Macro1.mcr” under #userscripts folder. If you share this folder across many users, you will get macroscript from all your teammates.
Therefore, it is better to load the commonly shared macroscripts from an added folder using “ADSK_3DSMAX_MACROS_ADDON_DIR” env var.
If you are using 3dsMax without the pipeline integration, you have a few ways to do this.
Copy all .mcr files to #userMacros folder.
Just run all .mcr files with the “FileIn” function.
You can copy to the 3dsMax root folder. But, I wouldn’t recommend it.
Honestly none of the above options are good. This just shows how beneficial the new pipeline integration is.
Icons
This is the last piece of puzzle for 3rd party script management. Sometimes 3rd party scripts include icon files. We can use both startup script or env var for this. It doesn’t matter much. I choose to use “ADSK_3DSMAX_ICONS_ADDON_DIR” env var.
If you are using older version of 3dsMax, I will just set #usericons folder in a startup script.
Let’s put together all the pieces for Soulburn script
If you download the SoulburnScriptsPack_3dsMax_v112_R2013toR2022.zip file, it has 3 folders.
Copy all files in “MacroScripts” folder to D:\PROJECT\_maxDefault\usermacros (ADSK_3DSMAX_MACROS_ADDON_DIR)
Copy “SoulburnScripts” folder in “scripts” folder to D:\PROJECT\_maxDefault\scripts\ (#scripts)
Copy all files in “\UI_ln\IconsDark” or “\UI_ln\Icons” folder to D:\PROJECT\_maxDefault\usericons (ADSK_3DSMAX_ICONS_ADDON_DIR). You can’t use “Icons” or “IconsDark” folder in #usericons folder. .bmp icons are only supported for backward compatibility since 3dsMax 2017. If you want to have a different set of icons per theme, you need to use the new .png icon naming convention and “iconname:” argument. The details are here.
Now I have the Soulburn script in my 3dsMax 2021, 2022 and will have them in the whatever future version of 3dsMax without any more steps. I can nuke the ENU folder anytime without worrying about re-installing these scripts.
This also works with any 3rd party scripts.
If they are .mcr files, put in the ADSK_3DSMAX_MACROS_ADDON_DIR folder.
If they are .ms files, put in the #scripts folder.
If they have icons, put in the ADSK_3DSMAX_ICONS_ADDON_DIR folder.
To help your understanding, I’ll give one more example, another famous script, DebrisMaker2.
In this case, the downloaded file is .mzp file. This is a self-installation zip file. You can actually unzip with any zip uncompressor such as 7-zip.
If you unzip, it has 3 folders under “DebrisMaker2.0” folder. Guess where would you need to copy the files?
MacroScripts -> D:\PROJECT\_maxDefault\usermacros
Scripts -> D:\PROJECT\_maxDefault\scripts\
UI_ln\Icons -> D:\PROJECT\_maxDefault\usericons
Again, now you will have DebrisMaker2 in any 3dsMax 2021 and above!
Before I finish this post. Someone might wonders why I said “3dsMax 2021 and above”. Isn’t it a new feature of 3dsMax 2022.3? Yes, right. It is officially added to 3dsMax 2022.3 with more complete support. But, 3dsMax 2021.3 actually have had some env var support for Autodesk internal use. At least, the 3 env var we have utilized work for 2021.3, too. I let you know because setting env var as system env var will affect 2021.3. I don’t want you to be confused or surprised.
If you want to use the pipeline integration for only certain version of 3dsMax, you have to use batch file of Python script which I will cover in the next post.
3dsMax 2022.3 has been released with new/improved features and fixes. Here are some highlights. Please check Unofficial 3dsMax What’s New for all 3dsMax updates in detail!
Advanced Wood OSL shader
As an OSL shader, UVW can be modified with external shaders, and a random seed can be driven to have per-object variations.It is also fully supported in a ‘High Quality’ viewport and will render exactly the same on any OSL capable renderer.
Per-Viewport Filtering
You can hide/unhide objects by category or by class per each viewport. Each viewport’s settings can be set independently from one another, giving you the flexibility to display what you need in a given viewport. Per-Viewport Filtering does not affect the scene or renderer. User can copy/paste filter setting between viewport. Shift+K to toggle on and off the viewport filter Full MXS exposure with ViewportFilter interface. Per view settings/preference dialog is modeless and dockable now.
Pipeline Integration
You can control most 3dsMax path with environment variables. This reduce the need of extra file deployment. It also allow you have more flexible setup like different plugin configuration for same version easily.Support for Environment Variable Tokens in Paths found in Configuration Files.
Occlude mode – marquee(box)/paint selection support
High-polling rate mouse fix
Save Performance Improvement 2
We got the second round of file save performance improvement.,This is the sheet I made during beta testing. As you can see, 2022.3 saving is 20-40% faster on top of 2022.2. The % number in the table is how much it is improved. So, 100% means 2 times faster. 200% means 3 times faster.You can see some of big files are saving more than 4 times faster than 3dsMax 2016.
First check this video. 4.7 million tris/2.4 million verts playing @ 49fps on GTX960/Ryzen 2700X
I know you can not believe this. So, what’s the secret sauce? Alembic Performance Mode.
3dsMax 2016 introduced alembic import/export into 3dsMax. One of the feature was Performance Mode in Alembic Container object, the auto generated root object when you import alembic.
It does 2 thing.
Generate a Nitrous ready animated GPU cache of all children.
Temporarily hide all children from scene to clock any evaluation.
Even tho it was originally developed for only alembic cache, it added support for any generic object in 3dsMax 2017. So, if you make an Alembic Container object and link any object under it. You can generate the GPU for the objects just like alembic objects.
Like this. You can keep the original rig hierarchy under AlembicContainer. AlembicContainer will pick up all descendant under him.
Now,Click “Performance Mode” button. You can see all object under AlembicContainer disappeared from Scene Explorer, and all geometries are combined as one cache. You can also see yellow bar on timeline which means indicated that uncached frame.
Now if you go to any frames, that frame will be cached or play animation while turn off Real time playback to make sure for max to evaluate every frame.
Or, there is a better way. just press “Force Caching” button.
Then, you will see the yellow bar is progressing as green bar.
Make sure turn off the above “Real time”, and try to scrub or play animation. This guy was playing at 42fps before. Now it is playing at 140fps.
So, this is how I could play 4.7 million tri at 48fps.
This is not perfect. But, when you have to light heavy scene, it could be very useful. Or, if you need to make preview from multiple angles. It could save time, too. But, this feature is not play well with Real time option(literally). So, it will be hard to use for animation real time preview.
A fewthing…
You can choose to cache geometry only since anything other than geometry will not be include the cache in anyway. But, if you put the entire rig under AlembicContainer, it will block the evaluation of the rig which will improve fps even more.
Even tho you could do this in 3dsMax 2017+, I recommend to use 2019+ because 2019 would only cache animation range and a lot stable than previous version.
Now I want to ask you a favor. as you can see this tool has amazing potential. But, it also misses some features. I hope I could save/load cache instead of re-generating every time when I open max file. Also, I want to explicitly choose object to cache instead of relying on hierarchy. Also, it doesn’t like when Real time playback is On. So, I created user idea item and need your vote.
3dsMax 2022.2 has been released with new/improved features and fixes. Here are some highlights. Please check Unofficial 3dsMax What’s New for all 3dsMax updates in detail!
Unfold3D Packing – New
The well known Unfold3D tech has been introduced to 3dsMax 2022.2. You can enjoy Unfold3D Peel, Pack and Relax. Unfold3D Pack works great. But, it requires to have non-manifold clean faces. When it is not, Unfold3D struggle to fix by itself and usually ending up in mangled output. So, #3dsMax dev went one step further and implemented automatic uv data fix.
Unfold3D Peel – New
Unfold3D is the default algorithm used for the Peel functions now inside of 3ds Max 2022.2 with the Unwrap UVW modifier.
UV Editor Performance Improvement
Improved performance of selection and uv manipulation by multithreading and optimizing memory allocations of topology validation and selection algorithms. Also threaded and batched data gathering for uv window painting. Add modifier, opening UV editor, switching sub-object mode, selecting and transforming sub-object is now a lot faster. In the video, you can see selecting an UV element is 10 times faster.
Smart Extrude – Multi Cut-Through & Partial Merge
You can now drag a face through multiple surfaces, or drag a face partially through a volume of a mesh and it will cut and clean the geometry as expected. It has been enhanced to produce more accurate results that might occur from numerical precision on overlapping faces. The stability has been also improved when quickly moving the results back and forth before committing to a final position.
File Save Performance Improvement
File save code has been greatly optimized by caching data instead of recalculating it, minimizing moving file pointers, eliminating the object creation/destruction and setting\clearing flags instead. Tested with 10 files which took more than a few seconds to save previously. The file save without compression is now 193% faster and 423% faster with compression on than 2021.3. In many case, turning on compress in 2022.2 is faster than composers off in 2016. I have a 6G scene(compress off) with 25mil tris. 2016 compress off took 118s to save. 2022.2 compress ON took 102s.
Pen Pressure Improvement
More device support as long as they support Wintab32.dll. (E.g. Huion, XP-Pen). Now 3dsMax 2022.2 supports the full range of pressure sensitivity that is offered by the pen tablet device by checking with the Wintab32.dll on your local Windows system. (E.g. Huion Kamvas16 support 8192 level)
Improved Hide by Category
New Qt UI. New Show Renderable Only checkbox. New Scene Contents to show only categories which exist in the scene.
USD b0.2
A lot of new features has been added since beta 0.1 including transform/animation support. Various export options include fully customizable uv data export. Ready to use pre-compiled USDView with all required Python module.
I have been making some short videos to showcase the new release of 3dsMax version or Product Update. This is the collection of items for 2022.1
Explicit Normal Performance Improvement
Last year I have posted a tip about “3dsMax tips #3 How to make imported tree animation 15 times faster“. In that post, I hinted 3dsMax dev is working on improving the situation. Finally that effort come to fruition and released in 2022.1. Now all explicit normal computation is fully safely multithreaded. My test shows 2x to 4x “overall” performance improvement. The video I attached has 4 of 25k verts characters with explicit normals(total 100k deforming verts). It went from 9 fps to 36 fps! This was no simple task and touched the core of 3dsMax. As you can see from the last a few release, 3dsMax team is putting a lot of effort for modernizing the core and improving performance.
Occlude mode for EditablePoly/EditPoly
Occlude mode is for WYSIWYG selection for Editable Poly/Edit Poly. If you turn on this mode, you can only select objects you can see. In this video, I have a tons of verts behind box. As you can see, 3dsMax is not allowing to select any verts that you can’t see if I turn on Occlude mode.
Smart Extrude Performance Update
As you can see from the last a few release, 3dsMax dev is trying to provide not only cool but also performant feature. The original implementation kind of naively looked at every mesh face as a candidate for cut-through, until it did a test to exclude the face. The new improved smart extrude is using a spatial partitioning approach to drastically reduce the number of those costly tests. Even better, this improvement could also bring more cool new features to smart extrude.
MaxFluid Loader Particle ID support for Particle Interface
Now MaxFluid loader expose ID properly to particle interface. What does this mean in English? This means any particle system that supports interface can read MaxFluid data directly. Here is an example reading MaxFluid with tyFlow and instancing shapes. The green thingies are leaves. I know I should have made it bigger.
Everybody knows “Deleting ENU folder” trick to solve many odd issues. But, you also lose user macros and script by doing so. Also you have to remember those hidden folder location. Bow, 3dsMax will reset only needed setting for you with a button. Also it will give you one click shortcut to access the folder. A new Restore to Factory Settings button has been added to the General Preferences tab to let you restore 3ds Max default settings from within the software if you experience unexpected UI behavior or performance issues. The best thing about this feature is it is not removing the entire ENU folder. It only reset the needed settings. But, if you want to reset other folders, you can choose to do so, too.
No more MentalRay missing plugin error
Hidden gem of #3dsMax 2022.1. Apparently there is one important 2022.1 feature was undocumented in release note.
A new mechanism (came with a new SceneConverter API – AddSilentClassID ) was introduced in 2022.1 to allow to hide any missing plugin data (e.g., from MentalRay). In English, you wouldn’t see this popup anymore. It doesn’t matter if the missing plugin data is in xref or material library. The new feature will simply ignore them and will not show popups.
Here is the details from dev. —————————————————————————– By default, the scene contain only following types of MentayRay data which polluted scene even MentalyRay plugin was never touched wouldn’t trigger MissingDLLs and SceneConverter dialogs on file open.
If you want to hide more plugin data for missing plugin cases (not limited to MentalRay plugins) on file open, you can:
Open 3ds Max 2022 Installation Folder\stdplugs\stdscripts\SceneConverter.ms
Add a maxscript call to SceneConverter.AddSilentClassID with the class_id you want to hide. E.g, hide MentayRay mr Area Spot light objects:
SceneConverter.AddSilentClassID #(0x0001b669L, 0x000875c2L) –mental ray: mr Area Spot
Restart 3dsMax
NOTE: On file open, all plugin data from missing plugins will be removed automatically if “Automatically remove missing legacy assets on File Open” is checked, otherwise, they will be kept in the scene, and you can use Scene Converter later to remove or convert them. Remove all SceneConverter.AddSilentClassID calls from SceneConverter.ms will restore old behavior.
3dsMax is now 25 years old program. But, that doesn’t mean that all its core is 25 years old. The core of 3dsMax has been continuously updated and being updated at this moment. Upgrading core while not breaking the existing feature is a monumental task. It is very difficult and somewhat boring. But, that hasn’t stop 3dsMax team.
After 3dsMax 2021 has been released, 3dsMax developers put some great effort for modernizing modifiers and underlying cores related to modifiers I made a comprehensive list of the efforts since this kinds of things are hard to show as video.
EditPoly Remove Edges/Vertices [2533x!]
This was a typical case of “a good sample file load to fast and effective fix” case. I had to lower the poly count of a model which already had animation. I applied Edit Poly and was removing many extra loops. But, it was so slow as I remove more and more loops. I sent the max file to 3dsMax dev team. I got the fix. 3dsMax dev accelerated EditPoly Remove edges (with ctrl on) and Remove vertices in various places (including EditablePoly). How much is it improved? A LOT. REALLY A LOT.
I tested on an object with 318402 verts and removed 238,800 verts from it. 2021.3 : 4276.9 seconds 2022 : 1.688 seconds : 253370% improvement 2533 times faster!
Since Edit Poly is recomputed when you open a max file. It will also improve file loading time a lot if you have many deleted many verts with Edit Poly.
This change break backward compatibility. This means you will not see improvements when loading old files. Only the newly added Edit Poly modifier will use this improvement. Saving to previous versions will collapse EditPoly.
Bevel Faces and to a lesser extent Chamfer Edges [22x]
3dsMax dev accelerated underlying algorithms of Bevel Faces and Chamfer Edges. This change will also accelerate any code which uses max’s “mesh clusters”. One of test showed. 2021.3 : 85 seconds 2022 : 4 second. 2125% improvement
Auto Smooth [ 3.8x – 3057x ]
The underlying auto smooth algorithm has been totally revamped which means this improvement not just for Smooth modifier. EditableMesh and EditablePoly AutoSmooth command, EditMesh and EditPoly Autosmooth command, Autosmooth modifier and Renderable Spline with Autosmooth on.
The performance gains are significant. Yes, you saw it right in the headline. One of models showed 3000 times faster performance. The particular model was tree from MaxTree. Tons of elements. Most million+ big mesh shows 30-40 times faster performance. Now Smooth modifier is faster than any other 3rd party solution.
Turning on Enable in Viewport for an imported spline pattern / 523k knots. 2021.3 : 724.388 seconds 2022 : 12.432 seconds :5826% improvement
Extrude [ 4.5x – 130x ]
Optimized capping provides significant performance improvement for complex shape with a lot of elements. Also it is now cache the capped shape. Therefore, when you adjust the amount value, you can see the change instantly.
A spline with 220 spline / 523,176 points 2021.3 : 3576.56 seconds 2022 : 27.7 seconds : 12911% improvement
Relax [ 1.5x – 3x ]
It is fully multi-threaded now. It also provide the volume preservation option.
This modifier has some story. In the legacy Slice modifier, there is a mode button at the bottom which is set to “Poly” by default. I never paid attention to this button. But, apparently this button determines which data structure Slice would operate on. That means if you apply a Slice modifier on a mesh object. It will convert to editable poly first(!) and slice. This means there will be the conversion tax. On top of that, slicing poly is slower than slicing mesh. When I change the mode to mesh for highres mesh object, even the legacy Slice was not that slow.
Now, “Automatic” option has been added and is ON by default. It will use whatever native type which is coming from stack. BUT! Here is a catch. Because mesh slicing in 2022 is so fast now. Even with conversion tax, slicing in mesh mode is always faster. Therefore, I recommend to set to mesh especially you would use mesh for the above level.
Measuring performance was a little bit tricky because the shape of slice has greater effect than tri count. So, I applied Slice and animate rotation and measured the average time.
I mentioned that 2021.3 default is set to “Poly”. If I don’t change this option as Mesh. It took 9.49 second! Therefore, when you apply Slice modifier on a mesh object. the improvement is actually 900% compare to 2021 when you use the default option.
One more tip. When your sliced a section with a lot of elements, somehow mesh slicing slowed down a lot. It is not sure what is causing an issue as of now. But, dev need to investigate what’s going on. Good news is. Poly performs very well for this case.
This is a test with 100 elements in section. 2021.3 Mesh : 4.91 seconds 2021.3 Poly : 0.22 seconds 2022 Poly : 0.19 seconds
PathDeform [ 3x – 20x ] – 3dsMax 2021 PU3
PathDeform is now fully multi-threaded. You can see hi poly models shows 20 times faster performance.
A CAD Tank thread model / Verts : 1,078,300 / faces : 2,161,000 2021.3 : 63.463 seconds 2022 : 2.793 seconds : 2272.4% improvement
PathDeform is now fully multi-threaded. In the past, poly was performing worse than mesh. Now it is fixed. There is not much difference between mesh and poly. Therefore, you will see bigger improvement on poly objects.
I made this DCM(DataChannel Modifier) while ago to help my friend’s shot. I thought that it might be worth as my first DCM mini tutorial. So, here we go!
Let’s see the following picture. This is the famous Stanford Bunny model. Left is the original shape. The right is 3dsMax Push modifier. As you can see, when you push a lot the faces start to overlap. The middle is the result of “Smooth Push” which is a simple DCM setup. As you can see It pushed it, but it pushes more gently(?).
How Push modifier works is really really simple. It moves each verts along the its normal by the given amount. As you can see, Push modifier only has one parameter which is the distance the verts are moved along normals.
Becase the verts move along the normal, verts will meet each other if you have concave shape. To prevent that, I simple smooth or blurred or relaxed the normals and used that. Let’s see how that translate to DCM setup.
First, we need to get vertex normal for each verts.
Click “Add Operator”
Add “Vertex Input”.
Choose “Average Normals”.
As an Input operator, Vertex Input allow you to grab various data from each verts. The 3 dot icon in front of operator name indicates, you are processing vertex data.
Next, Add “Smooth” operator from Process operators. It has 2 values, Iteration and Amount just like Relax modifier. The bigger Iteration and Amount is, the the smoother result you will get. This operator will make more gentle normals by averaging normals with neighboring normals just like blurring an image.
Now we need to have a way to control amount of Push. This is simple. Let’s add “Scale” operator from Process operators. This operator multiplies the given value to float or vector. If the value is 1.0. The size of normal doesn’t change. If the value is 1.0, you ar making normal bigger. If the value is less than 1.0, you are making normal smaller. This is exactly what “Push value” in Push modifier does.
What we have now in the current Data Channel is the offset vector of the each vertex. So, you need to add these vectors to the original vertex position.
Add Vertex Output operator from Output operators.
Choose “Position” as output channel.
Change “Selection Method” from “Replace” to “Add”, which means you will add the current channel data to the existing vertex position data.
Often the riggers skin a low res character and use it to drive hires version of character with SkinWrap modifier.
When you use SkinWrap, your driver object need to be Mesh object. If it is not, it will convert to poly under the hood. The mesh <> poly conversion price is very high.When I tested this originally in 3dsMax 2014. The test result was 9.75fps vs 17.89fps. I retested other file in 2021.3. The difference was 10.8fps vs 13.1 fps. So, I guess there has been some progress. It is still taxing 30%.
Skin modifier doesn’t care about poly or mesh. Therefore, if your base object is Editable Poly, just apply Mesh Select before Skin. You will get performance boost.
OK. Part.2! In this post, we will focus on object with hard edges like booleaned model or CAD data.
Booleand Model
Booleaned model is usually pretty easy. Applying Retopology modifier, set the target number and pressing Compute is enough. But, again it might fail sometime, and you simply want to get better result. So, here is some tips for booleaned model.
Tips
Utilize Boolean Seams for very low angle sharp edges
Regularize option can help to get more even quad distribution and prevent spiral loops.
Adding Subdivide modifier can help a lot to solve and get better result.
Having some support edges helps to get better edge flow. Especially for flat circular shapes.
Example
Here is an example. I just apply Retopology modifier, set target to 3000 and just pressed Compute. Auto Edge was on with Smoothing group by default. We got something . But, the topology doesn’t look that great, especially the center circle.
So, I went back to the center boolean operand and give some Cap segments. You can see it makes better edge flow on the big one circular ngon.
Or, you can just add Subdivide modifier. I usually use “Adaptive” option with default. You can see the edge flow is a lot better for both center circular area and front flat face.
Let6’s see one more example. For this kinds of source object, you must Subdivide.
The Retopology result looks good. But, it has an issue. It created the infamous spirals. I fixed with by increasing Regularize to 1.0. Again this option doesn’t guarantee to remove all spirals. But, certainly worth to try.
CAD Data
Source Preparation
I guess I don’t need to explain how bad models from CAD can be. You all already know. The new algorithms in Subdivide modifier certainly does great jobs for making more Reform friendly faces. But, the mesh has split edges and inverted normal and overlapped double faces what not. Reform nor Subdivide will fail. Until we have T-1000 to retopo, you still gotta do what you gotta do. Here are some notes on mesh preparation.
Weld split edges and unwelded vertex. Reform would now know if that’s real edge boundary you want to keep or just bad meshed. The easiest way to check this is applying Relax or TurboSmooth. You will be able to see split edge easily. Then, you could apply Vertex Weld modifier with Threshold 0.001 to fix it.
3dsMax 2021.3 provide Mesh Cleaner modifier. Try that. It also fix some issues.
Check if normal is flipped between neighboring faces. Unify option in Normal modifier could help.
Delete very small random elements with only few polygons especially for scanned data.
Sometimes Quadrify modifier fixes bad topology since it rebuilds meshes. You can also try TurboSmoothwith iteration 0.
Tips
If it is small part, you can just treat like booleaned model, But, if it has complicated shape, evaluate how much minimum target is needed with Auto Edge OFF. If the target is too low, Reform often cause “IPOPT maximum iterations exceeded” error” which means basically Reform saying “I can’t solve this.”. By turning off Auto Edge, you can quickly check how much target is needed.
When you Auto Edge, you need enough information within the auto edge boundaries. If you don’t have enough information, again you will meet “IPOPT maximum iterations exceeded” error”. To increase the information, there are 2 options. 1) Subdivide more 2) Remove auto edge condition. For example, if you use UV seams, you could stitch unnecessary seams. If you use Smoothing group, you can smooth some minor edges.
Check if your hard edge is coming from the smoothing group or explicit normal. If you only have explicit normals for hard edges and turning on only smoothing group means you don’t get any hard edges. If you are lazy like me,. you can just use Angle option instead of Smoothing Group or Specified Nornal option.
Sometimes model could have bad smoothing group and that prevent Subdivide modifier to work properly. Use Smooth modifier to clean up smoothing group.
Since Retopology doesn’t preserve mesh data yet. It will look all smooth after it solves. Apply Smooth or Weighted Normal to check hard edges.
Often CAD data has nice UV seams, utilize it.
Example
This is a part from Fusion 360 sample scene. It had a unique problem. So, I thought that it was good example to show how I processed the model. You don’t have to go through like this for every model!
This is the source model.The First attempt with Specified Normal. I got solve. but, I don’t like the edge flow.I applied Subdivide modifier and set to Adaptive. OK.. something is wrong. I still see a lot of thin edges. This is because there are many smoothing groups there.I cleaned smoothing group. Subdivide look better.Retopoed again. Better edge flow. But, I want to improve.Subdivided more and set Regularize to 1.0.
Then, I was thinking how about go lower res model and TurboSmooth?
The new Reform algorithm in the new Retopology modifier in 3dsMax 2021.3 is a definitely one of the best automatic retopology tech on the market. But, this is not driven by crazy AI nor a silver bullet to solve everything with a click. You need a different approach for a different case to get the best result in short amount of time. This is a collected notes from my beta testing period. I hope you find it useful.
Scanned Data
OK. This is easy one. For any organic models, just 2 things.
Turn off Auto Edge. This is for preserving sharp edges for hard surface model.
Decimate with ProOptimizer A LOT. I mean really a lot. Usually the rule of thumb is matching ProOptimizer verts count to Target count gives you best result in the shortest amount of time.So, if you want to get 40,000 poly mesh, ProOptimized to 40,000 verts first the Compute. Think this way. if your target is 30,000 poly from 2 million poly source. You will not get all the details of 2 million in anyway. There is no reason to feed all those noise data to Reform.
If you want to retopologize to really high poly count to reserve all scanned details and Retopology doesn’t solve with that mesh, try InstantMesh mode as a pre-process instead of ProOptimizer. You can’t decimate as much as ProOptimizer with it. But, it generates more Reform friendly mesh. Therefore, it will give you a higher chance to get result.
Tips
If you want to process even faster? Then, apply Relax modifier before ProOptimize. You could get faster result in exchange of the loss of details.
After ProOptimize if you have very big flat polygon. Remove it or subdivide a little. This kinds of big single polygon can make Deform fail. I’ll show you in the following example.
Example
This is scanned model from Konrad O?óg, www.aunar3d.com. Thanks for the model. It has 1.95 million verts and 3.9 million tris. Look at that beautiful wireframe on right. If you just apply Retopology on this and press Compute. It will takes days.
I applied ProOptimizer and went down to 2%, 39012 verts. As you can see from the shaded view. ProOptimizer does great job for reducing poly count while keeping shape intact.
Then, I had a hiccup. This big lowres place at the bottom was throwing a wrench. I could subdivide this. But, I simply delete it. You don’t see anyway. Also I can recap later.
I turn off Auto Edge and set Target Face Count to 40,000. After 100 second. I got this with 43,000 poly.
The following images are high resolution retopology example using InstantMesh as a pre-process. I pre-processed to 500,000 poly with Instant Mesh and Reformed it to 150,000. It took 20 min on Ryzen 2700X.
Original scan – 1.95 million verts / 3.9 million triInstantMesh – 475k verts / 494k quadReform – 163k verts(1/11 of original) / 162k quad
3dsMax 2021.3 has been released. The biggest addition of this update is the brand new Retopology modifier. I’ll have another post for the collection of showcase and tutorial videos.
It comes with 3 algorithms to choose, Reform, InstantMesh and QuadriFlow. Reform is the internally developed Autodesk’s own retopology engine.
I have had a chance to beta test while is was developed. This post is the collection of images that I have created while beta testing. I tried my best to test many different types of sources includes 3D scanned model, ZBrush sculpting, CAD import, booleaned meshes and more. Enjoy!
Make sure click image to see big to see wireframe better. Under the image I also tried to post the original source of model as much as remember.
ZBrush Sculpt
296k , 408k
201,881 PolyOriginal model 1.2 million polyClose up60k, 210k, 2.8mil
Welcome to my 3rd OSL tutorial! In this tutorial, we well learn how to query scene/object data and utilize it with MATH! Yes, you heard it right. MATH! I know you always have been regretted that you didn’t pay attention to the math class when you were in middle school. But, never late than never. Re-learning some simple math will make your life easier. WE CAN DO IT TOGETHER!
Like always, we will not write a single line of code in this tutorial. We will use SlateME as our OSL editor. Let me say it again, YOU DON’T NEED TO KNOW HOW TO CODE TO USE OSL IN 3dsMax.
First, let’s see how we can query the position of pixel in the scene and utilize. For example, we can make a transition of 2 maps between certain heights from the ground.
You can use “Named Coord Space” map to get a position of a coordinate space.Let’s make one and s some basic setup for the tutorial.
Make “Named Coord Space” map and a Standard material.
Make Self-Illumination 100.
Connect UVW of “Named Coord Space” to the Diffuse Color of Standard material.
Make sure to turn on Show Realistic Material in Viewport.
Select “High Quality” mode in the viewport.
Apply the Standard material to Mat.
3dsMax OSL has an amazing OSL > HLSL auto conversion features as I posted before. You can see OSL map exactly same as render in viewport for most cases. All OSL map has a indicator at the bottom to show if this map could be displayed in viewport. To utilize this feature, your material must set to Show Realistic Material in Viewport, and your viewport must set to Advanced Rendering mode which High Quality preset has.
Your viewport should like this if you follow me correctly. What you are seeing is the World coordinate position as color. If you know what is World coordinate and Object coordinate, you can jump to the next section.
World position is the position from the world origin. Since we plug X, Y, Z, into R, G, B. You can see more Red color along X. Green along Y, Blue along Z. Color can only display from 0-1, that’s why you can only see a little gradient around an axis. Mat’s size is 8.2×1.0x9.4. If value is less than 0, it will be all black. If you rotate the model, you can see the color is not moving with object. Because the coordinate is fixed in world.
Another coordinate you might use is “Object” which is based on each object’s local coordinate. The origin will be at object’s pivot point. The axis will use object’s local axis. This means when the object is moving or rotating, the value will move with objects. If you need to make a map that is stick to the object, this is coordinate you need to use.
Now you know what World/Object position is and how to get the value with “Named Coord Space” map. Let’s utilize the value we got. We will try to blend 2 check map along the height(Z-axis)
Make a Maps > OSL > Math Vector > Component (Vector ).
Connect UVWof Named Coord Space to Inputof Component (Vector)
Make a Maps > OSL > Math Float> Range/Remapper.
Connect Z of Named Coord Space to Input Value of Range/Remapper
Connect Out of Range/Remapper to Diffuse Color of the Standard material.
This should be what it looks like. BTW, I turned off AO. What’s happening here. We took only Z axis value with Component (Vector) map. This map is you can separate each channel from a vector or assemble a vector from 3 floats. Then, we fed the Z value to Range/Remapper which doesn’t do anything with default values. You can see the gradient goes from 0 to height 1. Again, as a color we can only visualize 0-1. I put 1 unit height box as reference.
Now we need to manipulate this value so the value can go from 0.0 – 1.0 between height 1.5 – 3.5. That’s what Range/Remapper does. Click the map and set Input Range Startto 1.5, Input Range End to 3.5. Now this map takes World Z position as Input Value. You can see “M” button shows that the value is coming from the connection, Then, map the input value 1.5 – 3.5 as 0.0 – 1.0 as output. You can visually see the gradient is moved up and 2x wider.
We can utilize this value as the Mix value for Mix map.Mix map is a map that Mix 2 color. Surprise! I could use Composite Map, too. But, this map is simpler. Also this is a tutorial. You gotta something new.
Make a Maps > OSL > Math Color > Mix(Color) map.
Make 2 OSL checker map with different colors and Size 0.05.
Connect each Checker map as A and B ofMix(Color) map.
Connect Outof Range/Remapper to Mix of Mix(Color) map.
Now let’s make it a little bit more complicated. What if I want to have blue check only top of Mat’s head like snow on his head. We can utilize normal for that.
You can get the normal data with Normal map. Duh. It is under Scene Attribute. It has one option, Coordspace. It should be “World”. Normal is “normal is an object such as a line, ray, or vector that is perpendicular to a given object.” according to Wiki. You can thin think as an arrow that coming out of a face. OK, that’s cool. But, so what? How can it help me?
Usually you need two sidekicks to utilize the Normal data, “Dot product” and another vector. Wha… WTH is “Dot poduct”? My head is already hurting!!! If you really want to know what it is. You can suffer from reading this. Butm I have a good news for ya. You don’t actually need to know what it is. We just need to know how to use this.
Make a Maps > OSL > Math Vector > Dot product (vector).
Make a Maps > OSL > Values > Vector Value. Put 1.0 as Z value. Make sure X, Y are 0.0
Make a Maps > OSL > Scene Attribute > Normal.
Connect Outof Normal to Aof Dot product (vector).
Connect Outof Vector Value to Bof Dot product (vector).
Connect Outof Dot product (vector) to the Diffuse Color of Standard material.
What did we just do? It looks like face becomes whiter if it face more to the top. When you dot product 3 vectors, Normal and [0, 0, 1] for us. The more 2 vectors look the same direction, The result becomes closer to 1.0. If two vectors are aligned exactly and toward same( direction. the dot product becomes 1.0. If two vectors are at right angle(90 degree), the dot product becomes 0.0. If two vectors are looking at the exact opposite direction. the dot product becomes -1.0. That’s all you need to know. This is how Falloff map works under the hood.
just for the test’s sake, change the vector Z value to -1.0. As you expected, it gets whiter as the point more face down.
How about X = 1.0 and Y, X =0.0?
Got it? Then, Let’s set back to [0, 0, 1].
Now we need some house cleaning. When you dealing with normals and dot product. It is always a good idea to normalize the incoming vectors like this. this makes the incoming vector as a unit vector. If you don’t want to know what/why. just memorize and do it. It is good for you. Normal map is at Maps > OSL > Math Vector > Normalize (vector).
Another item for house cleaning is Clamp. As I mentioned above, dot product generates value from -1.0 to 1.0. You can not see the negative value in render or viewport since both only shows between 0.0 – 1.0. But, if you use negative value for other operation, it could cause issues, therefore. it is always a good idea to cut negative values with Clamp map. Clamp map limits any value outside of Minand Maxvalue as Min and Max value. The default is 0.0 and 1.0. So, any value less than 0.0 will become 0.0. Any value bigger than 1.0 will become 1.0. The map is in Maps > OSL > Math Float > Clamp.
OK. Now we have 2 map trees. One for blending by height. Another one for the direction. We want to combine both so we can have blue check only at the top of Mat’s head. For this kinds of case, we can simply multiply two masks.
Select Range/Remapper. Set Input Range Start to 3.0, Input Range End to 4.0. This should move mas above Mat’s head.
Make a Maps > OSL > Math Float > Multiply map
Connect Out of Range/Remapper to A of Multiply.
Connect Out of Clamp to B of Multiply.
I know… after all those node, what you got is not that cool. But, this is how you learn.
In this tutorial…
we learned how to get position and normal information from the scene
how to utilize normal with dot product
many of frequently used important math maps such as Range/Remapper, Clamp, Normalize, Multiply. Component.
BUT! Yes, there is always BUT!
The portion that we used to make a mask by face normal exist as one map, Falloff map. This map is basically same as the map tree we set up with a bunch of maps. It take cares Normalize and Clamp, it also have option to map ti the different range. It also allow to define each end as color which is same as Remapping the result with Gradient.
In Falloff map, you have coordinate to choose just like Normal map. You have Face and Away color for each end. Facemeans the color when dot product is 1.o. Awayis the color when dot product is 0 because Type is Perpendicular/Parallel. If you switch to Toward/Away. The Color will map between dot product 1.0 to -1.0.
has someone experienced that a rotation script controller gets broken/stops calculating properly when it was created with the timerange set e.g. 0-100f and afterwards timeline gets extended to let’s say 0-500f and you start animating with autokey the affected objects, which have the script controller?
I had the experience, too. This could happen in all procedural controllers like Script, Noise controller or Expression controller. What is the solution? One of the most Sr. 3dsMax developer Larry Minton chimed in and gave the answer.
When max creates procedural controllers, by default the controller range is set to be ignored. The setting on whether this is done is controlled by the following 3dsmax.ini setting:
[AnimationPreferences] IgnoreControllerRange = 1
This setting is exposed to maxscript via: maxops.overrideControllerRangeDefault
And is in the Preferences dialog in the Animation tab in the Controller Defaults group.
Apparently when these controllers were created this option was off. Or this is an extremely old file, this option went into max back in 2005.
You can turn this override back on for these controllers by saying: c = getclassinstances rotation_script enableORTs c false
This is the settiing. It is on by default and should be ON.
If you want to make this to be on. You can run this code as a startup script.
maxops.overrideControllerRangeDefault = true
If you already have finished the rig and even animated it. Then, you can use this code to fix for a class of controller. This code is for rotation script controller. If you want to reset all Noise position controller. Swap rotation_script to noise_position.
c = getclassinstances rotation_script
enableORTs c false
Welcome to my second OSL tutorial. Again, we will not write a single line of code in this tutorial. We will use SlateME as our OSL editor. Let me say it again, YOU DON’T NEED TO KNOW HOW TO CODE TO USE OSL IN 3dsMax.
I don’t want to spoil the ending. But, you should read til the end. 🙂
One of the advantage(or could be disadvantage for some users) of using OSL in 3dsMax is that it brings more granular and lower level of control which provide a greater flexibility. But, it also means that user need to learn and understand a new way of thinking(or workflow). Again it doesn’t mean you need to learn to code. But, you need to understand how and what kinds of data is flowing between lower level maps and how to control them. So, please try pay more attention to the explanation of “why” I’m connect port A to port B instead of memorizing map tree. 🙂
Today’s goal is randomizing textures in the tiles of Simple Tiles OSL shader so we can get infinite random tile texture from a few texture files.
Open SlateME.
Make a Simple Tiles map. Maps > OSL > Textures > Simple Tiles. This is an equivalent of Tiles legacy map. You can make a various tile or brick patterns.
Double click the thumbnail so we can have a bugger thumbnail.
Change Tiling Mode to Twist Box.
As you can see, OSL can output not only color information but also various data information. For this tutorial, we will mainly utilize Indexdata which is a integer index number for individual tiles. Let’s see that it means visually.
Make 2 OSL > Math Float > Random by Index.
Connect Indexport of Simple Tiles to Idxof both Random by Index map.
So, what’s happening here?
Random by Index map generates a random float number between Min and Max and drives the randomization with the Idxand Seedparameters.
Since Idx of Random by Index is provided by the Indexvalue of Simple Tiles, all pixels in the same tile will get the same random value.You can see that well from the thumbnail, each tile has a different shade of gray.
But, you can see both map has exactly same pattern and color. That’s because both map has same Seednumber by default. What is the Seed number? This is from the Wikipedia. “A random seed (or seed state, or just seed) is a number (or vector) used to initialize a pseudorandom number generator.”, which brings another important concept, pseudorandom.
In CG, we can not use true random number, if a number is truly random. That means every time when you render or even open file again. You will have a different number and different pattern! Therefore, all random number in CG is pseudorandom driven by Seed number. If Seed number is same you get the same ransom number just like the above image.
Select the bottom Random by Index map
Set Seed to “77”, You should get this.
OK. let’s make a bunch more maps and actually do something with these 2 random maps.
Make the following maps OSL > Math Vector > Component (Vector) OSL > UVWCoordinates > UVW Transform OSL > BitmapLookUp
Choose “C:\Program Files\Autodesk\3ds Max 2021\maps\uvwunwrap\uv_checker.png” for BitmapLookUp This is a new 4k UV template which is added in 2021.
Connect Outof the top Random by Index > Xof Component (Vector)
Connect Outof the bottom Random by Index > Y of Component (Vector)
Connect Outof the Component (Vector) > Offset of UVW Transform Do not connect anything to BitmapLookUp yet.
The 2 Random by Index we made were for the random Offsetvalue of UVW, and it is a vector value. How do I know? If you see in UI, you can ses that it is made out of 3 values. The, it is a vector value.
So, we can not directly plug 2 float values into the Offset port. We need to assemble a vector data and plug into Offset. Component (Vector) map allow to compose or decompose a vector from/to 3 floats. Since we need to use only X and Y value. you don’t have to plug anything into Z. If no map is connected to the property, OSL map will use the value in the UI which was 0.
What we got so far? As you see in the thumbnail of UVW Transform, we randomly offset UV per tile. If you see more red, that means the pixel is offset more along U. If you see more green, that means the pixel is offset more along V. Remember Slate can only show any value range from 0-1 because it is made for color. Fortunately this case out data range is also 0-1. So, we could see what’s going on as image. But, it would be be the case all the time.
Now Connect UVWof the UVW Transform > UV Coordinates of BitmapLookUp Tada! you can see your texture randomly offset by Tile ID.
Cool. Now how can I control the scale of texture? Yes, you change the Scalevalue of UVW Transform.
How can I control the size of tiles? Scalein Simple Tiles.
Let’s see what it looks like with a real texture. Remember this technique only works with seamless tileable texture. This is with the TexturesCom_RockSmooth0172_1_seamless_S.jpg from here. https://www.textures.com/. I use scale to 5.0 for UV.
How about some mid tone variation? We can use Tweak/Levels OSL map for this. We will also need another Random by Index map driven by Index.
Select one of Random by Index map and SHIFT+drag to make a copy.
Set Minas 0.75, Maxas 1.25. Seedas 131.
Add a OSL > Tweak/Levels map.
Connect Out of the new Random by Index map to MidTones of Tweak/Levels.
Connect Out(RGB) of BitmapLookUp map to the Input of Tweak/Levels.
OK, I hope you get the hang of how to wrangle data to drive values at this point. Next, let’s put the gaps in. There are unlimited ways to how to handle gaps. But, I’ll just go easiest way since the main purpose of this post is tutorial. The Bumpoutput of Simple Tiles map already give you a black gaps and white tiles. I’ll use that output to composite with Multiplymode.
Make OSL > Compositing > Composite map.
Connect Outof the Tweak/Levels > Bottom layer RGB of Composite
Connect Bumpof the Simple Tiles > Top layer RGB of Composite
Set Top layer Alpha as 0.7, BlendMode as Multiply.
OK, it is getting there. Let’s add one more randomization, the rotation. By now, you should already know what to do.Yes, you need to have another Random by Index (Float) with range 0.1 – 360 and feed into Rotateof UVW Transform. BUT, since it is a tutorial, let’s make things more complicate to learn. What if we want to rotate only at right angle like 90, 180, 270 degree?
Our goal is get only one of the 0, 90, 180. 270 per tile. How we do that? Right, we can get a random value between 0 – 3 and multiply 90.0. But, Random by Index (Float) generates float number, and we don’t have Random by Index (Integer) map. Well, don’t worry. Here comes Float-to-Int map to the rescue!
Copy one of Random by Index (Float).
Set Minas 0.0, Maxas 3.99. Seedas 666.
Make OSL > Math Float > Float-to-Int map
Set Modeas floor.
Make OSL > Math Float > Multiply map
Set Bas 90.0
Connect Outof the new Random by Index map to Inputof Float-to-Int.
Connect Out of the Float-to-Int map to A of Multiply
Connect Outof the Multiply map to Rotateof UVW Transform. You may wonder why 3.99 instead of 3.00, and what the heck is “floor”? Floor is a way to convert a float value to integer value by returning the largest whole number (integer) that is less than or equal to the number. if you had 1.24, you would get 1.o. So, it is a floor of the range 1.0-2.0. There is also “ceil” which is kinda opposite. The ceil of 1.24 would be 2.0. By setting range as 0.0-3.99 and mode as floor, we are trying to make sure all 4 numbers are getting even chance. 0.0-1;0 > 0.0. 1.0-1.99 > 1, 2.0-2.99 > 2.0. 3.0-3.99 > 3.0. Left is without the rotation randomization. Right is with the rotation randomization.
As you can see, you can randomize any parameters you want. You just need to know when to stop. Should we stop now then? No, not yet. So far, we have used only one map file and looks like getting a good result. But, what if we can use multiple map files and randomly use per file?
Here is a great news. One of the new feature of 3dsMax 2021.2 is 1-of-N(Filename) map. If we don’t have this map, we have to setup a small tree with multiple BitmapLookup , 1-of-N Switcher and Random by Index map. Now we just need 2 maps.
Add a OSL > Switchers > 1-of-N(Filename) map.
Choose all 5 maps.
Add a OSL > Switchers > Random Index by Number/Color map. BTW, such a great map, I wonder who made this? 🙂
Connect Indexof the Simple Tiles map toInput Numberof Random Index by Number/Color.
Connect Outof the Random Index by Number/Color to Filename of BitmapLookUp.
OK… This is the full tree. I guess we end up with not-so-mini-tutorial.
BUT! Yes, there is always. “BUT”.
We went through all these to learn how to work with OSL maps to build own randomization. Now I have to tell you this. Sorry, we didn’t need to go through all these if you wanted to just use it. Why? Because Zap made the awesome Bitmap Random Tiling for 3dsMax 2021.2.
This is what it looks like if you use Bitmap Random Tiling. Youjust need to plug Indexinto Seed. Make sure to turn off Randomize by UV position.
You can even randomize color, too.
If you want to use multiple map file? Then, re-use the 1-of-N(Filename). Another 2021.2 feature.
I guess it is worth to upgrade??? 🙂
If you are really lazy, here is the max file. It has the full setup and simple 2021.2 setup. I can not include texture file. So, you probably need to download some seamless tileable maps. Here is another good news. Because ,max file actually embed the source OSL code in the scene file, you can even open this file in 2019. You will see the new 2021.2 OSL shader there. Save the OSL map in a material library. Then, you can even use the new map in 2019 or 2020. Another nice thing about 3dsMax OSL implementation!
A teaser for the future article! What is the difference between the following 4 images?
The answer is… they all rendered in a different renderer. From the left, Corona, VRay, VRayGPU, Arnold. Yes, all different renderer. You can have exactly same map tree across different renderer even CPU/GPU. I can say this is the first time I ever see this is possible in CG history. I’ll have a blog post with more examples in the future.
UPDATE! Fully multi-threaded explicit normal calculation has been implemented in 3dsMax 2022.1. Now, the explicit normal version of model is deforming at 2.8fps( was 0.6 fps). That’s almost 450% improvement. BUT, please remember still the best way to make the deformation faster is not having 11 million extra normals. converting explicit normal as smoothing group will give you 17fps.
The models I have been dealing with in 3dsMax have been mostly internally made or purchased as .max file, which means I usually do not have explicit normals on my model. If you make a model in 3dsMax, you usually smoothing group instead of explicit normal.
But, most other DCCs are using explicit normal. Which means when you import fbx, obj or alembic. You will be likely to have a lot of explicit normals. I mean a lot. All this explicit normal also need to be recalculated when your object is deforming, which means it can have a great impact on your animation playback performance.
Recently I have learned the impact of normal calculation is HUGE. I mean really HUGE. Another reason why this issue surfaces more recently is that 3dsMax dev have beenputting a lot of effort to preverve explicit normal in various modifier. In the past, many modifiers had destroyed on the stack, now more explicit normals have preserved and causing slow down.
I chose the biggest one, MT_PM_Albizia_saman_01_01_H, and applied animated Bend modifier.It has 4,4mil verts and 3.8mil tris. This is what it looks like in my Ryzen 2700X(kinda old… I know). I turned off real time playback.
The native max mesh from .max file plays at around 14fps. Not bad for 4.4 million verts animation. Now I imported the fbx version of same tree. I got 0.6fps. In other wards, max mesh took less than 2 second to play 24 frames. fbx mesh took 36 second to play 24 frames. That’s almost 20 times slower! When I check the amount of explicit normal, there were 11.399 million normals! File size also jumped from 294M to 645M! This mesh has total 11,399,301 normals. 11 million! Essentially you mesh becomes almost 16 million verts instead of 4.4 million.
3dsMax native meshMesh from fbx with explicit normal
How to solve this issue
First of all, this is why it is always better if you stay in 3dsMax all the time. The native data is always the best. But, if you have to get data from outside of 3dsMax. The ultimate fix issue would be converting to smoothing group and remove all explicit normals. Unfortunately, I have not found a good way to do this for 4.4 million verts model.
So, I took a little bit of time to find a solution, and here is two work arounds.
Apply Mesh Select for Editable Poly, Smooth for Editable Mesh and set to “Off in render”
Some may think “why not Edit Normal modifier?” because it turns out that Edit Normals can not completely remove normal interface. So far the only way to completely wipe out explicit normal is applying Mesh Select modifier on Editable Poly or Smooth modifier on Editable Mesh. Then, by setting this to Off in render, you wipe out explicit normals only for viewport and get correct smoothing while rendering.
So, by doing this, I got around 9fps. That’s a lot better than 0.6fps. That’s 15 times faster.
Do not turn on Auto Smooth on 4.4 million verts model. You don’t need to smooth anything. Just applying Smooth modifier on Editable Mesh will wipe out all normals. Same for Mesh Select, just apply it and change to “Off in Render”.
Conclusion
Use always the native mesh if you can. The native mesh is always the best.
Use always Smoothing group instead of explicit normal if you can.
“Smooth” to wipe out explicit normal in Editable Mesh. “Mesh Select” to wipe out explicit normal in Editable Poly. Edit Normals modifier can not do this.
After the model is imported, always try this if the model has animation.
As you can read the below paragraph, having any explicit normal will make 3dsMax calculate something all the time. Even tho you have an explicit normal per vetex(Usually it is a lot more), it is essentially same as having one more mesh. in the above case, it had 11.4 million explicit normals, which means it is same as having 4 trees than 1 tree. On top of that, this would happen for each modifier after animated modifier. So, this tip will be always valid i n the future.
Don’t just assume 3dsMax would be slow for deforming hires mesh. If you for really low fps, always try something. It would be always case by case But, generally speaking, 3dsMax should not havce problem playing more than miilion verts around 10fps.
Technical details
One of the main 3dsMax developer, Peter Watje, game some insight about this issue. I’m sharing the full text. It is must read for any 3dsMax users who want to know the technical details. Thanks, Peter!
Mesh Normal Interface is really the correct name but basically it is an object that is attached to the mesh when you want to override the smoothing groups. It lets you describe normals by smoothing group, or by which faces they are attached to or by the user explicitly setting the value changing the normal direction. It carries around a lot of data even if you don’t have any explicit normals. So for instance if you Box and you put an Edit Normals all the normals start out as Unspecified Normals and are colored blue which means the normals are generated by smoothing groups. Then there are Specified Normals in which case the normal is still computed but the faces that are used are determined by the user. For instance if you Unify some normals they become a Specified Normals(cyan) and the normal is computed by all the faces the original normals where attached to, Finally there are Explicit Normals(green) which the changes the direction of the normal and that normal is no longer computed in anyway. All that data needs to be stored in the Mesh Normal Interface.
Reset Normals sets all the normals back to Unspecified. The Mesh Normal Interface is still there it just uses the smoothing groups to compute the normals but there is still alot of data there.
When it comes to performance it breaks down to were the normals are computed and how much data is copied to create them. With no Mesh Normal Interface the normals are created when the mesh is displayed and is actually done by a shader that takes the mesh and the smoothing groups and generates the normals directly on the display mesh. It is really fast which is why in some cases when you put certain modifiers on the stack that strip out the Mesh Normal Interface it becomes faster.
The other way performance path is thru the Mesh Normal Interface. Since it is data on an object that flows up the stack that means it may need to be copied which is a heavy weight operation. It also means that any geometry changing modifiers need to also deform the explicit normals in addition to the vertices. So when you come to the display all Specified and Unspecified Normals need to be computed if they were not already and merged with the Explicit Normals and then attached to the display geometry. So you performance is determined mainly by how heavy weight your stack was. Previously the stack was super conservative dealing with normal. It did extra copies and the deforming of normals on a single thread. We are looking at making it less conservative to get better performance but that might bring up other unforeseen issues.
A Tip in a tip
How to set modifier to work only in viewport? Right click menu of the modifier. You can set a modifier to on/off or on/off only in render or viewport.
When your cursor is hovering over an object in the viewport, you can see that a tooltip pops up and shows object name. 3dsMax 2017+ allow you to customize the viewport tooltip of the active viewport. You can not only show any data you want but also have a custom style using a subset of html tags.
This is a template code for a custom viewport tooltip.
global genTooltip
fn genTooltip = (
local obj = callbacks.notificationParam() -- Getting the objects under cursor from callback
local nodeName = obj.name
local mtlName = (if obj.material == undefined then ("undefined") else (obj.material.name))
local faceNum = try(obj.mesh.numfaces as string)catch("0")
local vertsNum = try(obj.mesh.verts.count as string)catch("0")
local tooltipText = "<u><b><font color=blue size=6>" + nodeName + "</b></font></u><br>"
tooltipText += "<font  size=4>Layer : "+ obj.layer.name + "</font><br>"
tooltipText += "<font  size=4>Material : "+ mtlName + "</font><br>"
tooltipText += "Verts Count: " + vertsNum + "<br>"
tooltipText += "Face Count: " + faceNum + ""
viewport.appendtooltip tooltipText
)
callbacks.removeScripts id:#MXSVIewportTooltip
callbacks.addScript #preViewportTooltip "genTooltip()" id:#MXSVIewportTooltip
Let’s see what’s happening here.
First, we made a global function, genTooltip , to assemble the tooltip text and add to viewport. The first line local obj = callbacks.notificationParam() is how you get the the objects under cursor from callback. It is what it is. Don’t touch it. 🙂
Then we build the text for the tooltip, As you can see, you can use a subset of html tags. The devloper mentioned to check this document. http://doc.qt.io/qt-4.8/richtext-html-subset.html
The above code will make a bold(<b></b>) big blue(<font color=blue size=6></font>) object name with underline(<u></u>). Adding <br> is like adding enter to make a new line. Then, the size 4 layer name and the material name will be added. Then, normal size verts count and face count will be added.
After you build the text to display,viewport.appendtooltip tooltipText will resister the text as tooltip.
Lastly, we call this genTooltip function as #preViewportTooltip callback. That’s the lase 2 line. If copy/paste the above code into Maxscript Editor and run this once with CTRL+E, it will last for the session.
If you are lazy like me, you can copy/paste the above code into notepad. Then, save as “customViewportTooltip.ms” in the user startup script folder. C:\Users\[username]\AppData\Local\Autodesk\3dsMax\2020 – 64bit\ENU\scripts\startup
OK. if you are lazy again, type this in the listener and press num pad Enter. getdir #userstartupscripts
Now every time when you start max, the script will run automatically for you.
Bonus tip!
If you have a looooooooooooot of objects(I mean really a lot), the hit testing to detect which object is under cursor might take a little bit of time. If you want to save a few milisecond. You can turn off viewport tooltip from here.
As you know, 3dsMax searches a few folder to find your asset or map files. I personally do not set any of these search folder. Either having assets in a correct folder or not. But, I know some users rely on this behaviors and even having 100s(!) of search folders.
When you save a max file, 3dsMax will try to resolve all this path which means it will try to search all these folders until it finds the map. As you can imagine, it could take some time if you have a lot of maps and especially a lot of user folders.
3dsMax need to resolve path for 2 reasons. First, there is the asset meta data streams. Second, there is External Dependencies file list in Properties dialog.
You can turn off this process by adding this in 3dsMax.ini. The first one will disable resolving path for properties. Second one will disable for asset metadata stream. If you want to turn on set as “1”.
Next! When 3dsMax open a max file, it will also try to revolve asset path to popup Missing External Files dialog. You can see it could take a while if you have a lot of maps with many broken or need-to-be-searched path on the network drive. Also 3dsMax will try to find every single file in IFL! One time I had a scene with many IFL sequences which total more than 20,000 images. You can imagine how painful was to load the file.
Good news! You can turn off this by setting this in 3dsMax.ini.
3dsMax 2024.1 added a way to set the custom default with right click menu. Therefore, you wouldn’t need to use this script anymore for most cases.
Updated to 1.11! 11/29/2021
3dsMax 2021.1 has been released today. There are many fixes and nice improvement. One of a new feature is the custom default parameter using Maxscript by DefaultParamInterface. Click here for details. This new feature allows you to have custom default for most areas of 3dsMax as long as it is a class.
The simplest example would be the height segment of Cylinder. The current default is 5. Id you change it, whatever that value becomes the default for the session. Now you can set your own default height segment using Maxscript DefaultParamInterface. It is not limited to object and modifiers since it is supported for all classes. You can also use this to set your own renderer default include 3rd party plugins.
The custom defaults will be saved in C:\Users\[username]\Autodesk\3ds Max 2021\User Settings\DefaultParameters.ini. Next time when you update to 3dsMax 2022. You just need to copy that file to the corresponding 3dsMax 2022 folder.
BUT, you would wonder… “why do I have to use Maxscript?”. I think setting the custom default using UI will come in the future. There was some prototype for UI in beta. But, it was removed from release because it doesn’t cover some cases.
So, that’s why I made this Custom Default Param Manager script. This script give you a UI to search a class and parameters and allow you to set default value.
Download, unzip and drag and drop the script into the viewport. It will be nder csTools > CustomDefaultParamManager. Or simply type X > CustomDefaultParamManager.
This is the UI.
On the left, you can choose a class. On the right, you can choose a parameter name. Then, you will see the spinner of checkbox to input the new default. Then, just press Set button. Persistent checkbutton is on by default. To make the default for the next session, you need to check this. So, don’t turn off. The last 3 buttons are to remove the custom default. You can clear custom default for selected parameter or restores to the factory default. You can also remove everything you set.
Additional metadata widget type “null” metadata connectable metadata worldunits
Row Packing
Custom Widgets max:ramp0 max:actionButton
Dynamic UI help of the “max:actionButton” shown above, a few helper scripts have been introduced that makes shaders dynamic – as in – the shader is actually modifying its own sourcecode! Thanks to this. Now 1-of-5 and 1-of-10 has been consolidated to 1-of-N.
Fully Custom UI via QT allows a custom layout to be provided in the form of a .ui fil You can design cool UI with QtDesigner! The following images are a few new OSL maps which is using new Qt UI.
Let me just borrow text from 3dsMax help. You guys should read manual all the time’ Three are many good in formation! I highlighted important aspect of 3dsMax OSL map for you!
Open shading language (OSL) is an open source shading language that is fairly simple to understand. It can be used in several different ways. You can use the OSL Map, which is an execution environment for OSL shaders inside of 3ds Max, and it works like any regular built-in 3ds Max map. There is also a category of pre-loaded OSL maps that you can easily use. In addition, you can use any OSL maps you download from the internet. Finally, you can creating a shader or map in OSL using our development tools. This is a much simpler method to create custom maps than developing the equivalent functionality as a 3ds Max C++ map.
OSL works in any renderersupporting the regular 3ds Max shading API (Scanline, vRay, Corona, etc.). It also works outside of renderers, anywhere in 3ds Max where a regular map is requested, such as in the Displacement modifier. It also works with renderers that support OSL natively, such as Arnold. In those cases, the execution environment inside the OSL map is not sued, instead, the OSL source code, the parameter values and shader bindings are sent to the renderer, which executes the OSL code. More renderers supporting OSL natively are appearing daily.
OSL uses “just-in-time” compilation and optimization of entire shade trees at once, as long as all the shaders in the shade tree are OSL shaders. You can mix OSL shaders and regular shaders, but the optimizations will suffer.
First of all, I really really want to make sure about this.
3dsMax OSL is seamlessly integrated just like all other C++ maps. There is ZERO difference in terms of how to use and where you can use. Also if you chain OSL map together, 3dsMax combine them the entire OSL chain and make a single shader under the hood. Essentially Slate ME is acting as an OSL node editor for you. Even better 3dsMax 2021 ships with 123 build-in shaders to start with. At these point, almost all 3dsMax legacy map could be replace with OSL. This mini tutorial is a very good example of using Slate ME as an OSL node editor.
In this tutorial, the blender guru is using a custom tool in order to randomize the uv’s rotation so we can’t see anymore the repetitive pattern on a large scale tiling texture. He says that, as far as he knows, this kind of tool doesn’t exist in any other 3d software because it involves maths tricks and vectors and nobody wants to deal with this.
Good news! you don’t need custom node for this. Master Zap let me know how to do this with built-in OSL node. I’m posting the master;s answer with my explanation so you can go further.
First, this is the graph. 4 nodes!
Let’s see one by one.
UVTransform : Tiling
This OSL map is like Coordinate rollout in other maps. It allows you to move, rotate and scale uv coordinate. I tiled uv coordinate here. So, I tilted here with Tiling parameters.
Tip! You can connect one UVTransform to many OSL maps whicn means you can control the coordinate of all those map at once.
Noise : Give random value per tile
This map generates a random 0-1 value per tile which will be used as rotation value later.
As the name says, it is an OSL version of Noise map. It has 6 types of noise in a map. We will use Cell type which makes random pixel bitmap patter.
Then, set Scale to 1.0 and Octave to 1. This makes the noise function generates one value per tile. If you increase Scale or Octave, it will essentially divide each tile.
Then, turn off Step Function to prevent blending.
Multiply : convert to degree
Multiply 360 so we can get rotation value between 0-360. As you can see, you don’t have to make a map for value B. You can just type in B parameters of the map.
UVTransform : randomize uv rot
This map rotates UV per tile. You don;t need to set any value here. Just connect UVTransform : Tiling to Input(UVW) which inherit tiling from UVTransform : Tiling map. Then, connect Multiply : convert to degree to Rotate.
Now you can connect this map to any maps UVW port.
3dsMax 2021 has been release. One of the new feature is the brand new BakingToTexture tool. This tool is written from scratch and the replacement of legacy Render to Texture tool. This is the first iteration of this tool and still in active development.
Along with this tool, now 3dsMax provide the full support of MikkT tangent space from baking to rendering , viewport and SDK.
simpleMapBaker is a simplified front-end of new BakingToTexture. It allow users to bake certain utility map with one click. Also it was used to test the maxscript exposure of BakingToTexture tool.
simpleMapBaker utilize the new override map feature to render most maps at once. Also it uses Arnold’s Curvature and AO shader. Therefore, it will save render preset of the current render.Therefore, it will switch to Arnold for all maps other than Normal map. For normal map, it will switch to Scanline renderer(This is temporary workaround until Arnold normal baking is ready). After baking, the renderer will be reverted to back.
Select objects, and just turn on the map buttons to render and press the big Bake button.
You can set up parameters for some maps and output parameters that BakingToTexture supports.
After bake, it will show all baked maps in the dropdownlist at the bottom. If you select a map there, it will use viewport override for preview baked map.
For normal map, it is using the new MikkT tangent space.
If you want to preview the previously baked maps, select object and press Reload button. It will search the maps and show preview if it finds the map.
I have been using jpg sequence for my Make Preview output. It is allways easier and more flexible to deal with image sequence than avi, mov or mp4.
The problem is Make Preview windows is the one of the old window which doesn’t have full exposure to Mmaxscript. 3dsMax dev added more argument for createPreview method in 3dsMax 2020. But, unfortunately some of option in the Make Preview dialog is still not available for Maxscript.
But, that doesn’t mean you can not set Make Preview automatically. 3dsMax has the ultimate hack(?) for controlling any UI component. UIAccessor and DialogMonitorOPS.
This allow you to emulate user interaction with UI like clicking button, choosing dropdown items and pressing Enter with Maxscript.
If you don’t want all these, Download the final template.
Skeleton code of DialogMonitorOPS
Let’s start with very simple script.
fn setMakePreview = (
local WindowHandle = DialogMonitorOPS.GetWindowHandle()
local WindowTitle =  (UIAccessor.GetWindowText WindowHandle)

if WindowTitle == "Make Preview" then (
print "Hello"
)
True
)

DialogMonitorOPS.enabled = true
DialogMonitorOPS.RegisterNotification setMakePreview id:#setMakePreview

max preview

DialogMonitorOPS.unRegisterNotification id:#setMakePreview
DialogMonitorOPS.enabled = false
DialogMonitorOPS.enabled = true
First, you need to turn on DialogMonitorOPS.so 3dsMax can monitor any UI. Of course, you don’t want to turn on this all the time. So, after our job is done, we will turn off.
Unresister setMakePreview and turn off DialogMonitorOPS
Now let’s see the setMakePreview fucntion. This function will run all the time while DialogMonitorOPS is running.
The most important thing to know is that this function need to return true at the end. I forgot why. But, you MUST do it. So, just do it.
local WindowHandle = DialogMonitorOPS.GetWindowHandle()
How would you let Maxscript know which UI you want to control? We will use window handle or hwnd which is a unique id of each UI element. The above line will give is the handle of window which DialogMonitorOPS detected.
local WindowTitle = (UIAccessor.GetWindowText WindowHandle)
Then, this above line will give us the title of dialog.
if WindowTitle == “Make Preview” then ( print “Hello” ) True
DialogMonitorOPS will check if the dialog is “Make Preview” dialog. If so, it will print Hello.
Let’s set custom output path
From now on I’ll only show setMakePreview function.
fn setMakePreview = (
local WindowHandle = DialogMonitorOPS.GetWindowHandle()
local WIndowTitle =  (UIAccessor.GetWindowText WindowHandle)

if WindowTitle == "Make Preview" then (
for i in (windows.getChildrenHWND WindowHandle) do (format "%\n" i)
UIAccessor.PressButtonByName WindowHandle "File..."
)
True
)
I removed print “Hello” and added UIAccessor.PressButtonByName WindowHandle “File…”. As you can read, this will find a button named “File…” and press it for you.
for i in (windows.getChildrenHWND WindowHandle) do (format “%\n” i)
What does this do? It just printed a bunch of things in Maxscript listener. This is how we sees what kinds of UI element is in the current dialog and fid a way to access each UI element. As I said in the begining, we use windows handle to specify UI element. This line will print out the information of all children of the dialog with given handle, Make Preview dialog. it gives us an array for each UI element. The important ones are first(hwnd of child), forth(UI type) and fifth( displayed text).
fn setMakePreview = (
local WindowHandle = DialogMonitorOPS.GetWindowHandle()
local WindowTitle =  (UIAccessor.GetWindowText WindowHandle)

if WindowTitle == "Make Preview" then (
UIAccessor.PressButtonByName WindowHandle "File..."
)
if WindowTitle == "Create Animated Sequence File..." then (
-- Set cusom output path
local edits = for i in (windows.getChildrenHWND WindowHandle) where i[4] == "Edit" collect i[1]
uiaccessor.setwindowtext edits[1] @"c:\temp\test_.jpg"
UIAccessor.PressButtonByName WindowHandle "&Save"
)
True
)
Because we pressed “File…” button. A new dialog pops up, “Create Animated Sequence File…”. In this dialog, we need to these.
Set custom output path
Set Save as Type to jpg
Press Save button
To set custom output path, we need to know hwnd of path input UI. But, if you check fifth item of array. Text input doesn’t have name! What should I do? Other information we have is type of control on fourth item. The type UI you can input text is “Edit”. So, I collected hwnd of “Edit”s. Fortunately 3dsMax seems collecting UI info in the same order from top to bottom. So, let’s try on the first one. You can use uiaccessor.setwindowtext to set value on Spinner of Edit. If you want to use own naming convention. Replace @”c:\temp\test_.jpg” with own function or variable.
Wait? why the name iis “&Save”. How do I know I need &? I also don’t know where & come from. But, I know “Save” did not work. So, I printed out all child UI elem data and checked the names.
Did it work? Maybe or Maybe not. Because 3dsmax remembers the format you used last time, if it was not jpg, Make Preview window will automatically switch to the format. So, we need to choose jpg from format dropdown. Now this is real fun!
fn setMakePreview = (
local WindowHandle = DialogMonitorOPS.GetWindowHandle()
local WindowTitle =  (UIAccessor.GetWindowText WindowHandle)

if WindowTitle == "Make Preview" then (
UIAccessor.PressButtonByName WindowHandle "File..."
)
if WindowTitle == "Create Animated Sequence File..." then (

local edits = for i in (windows.getChildrenHWND WindowHandle) where i[4] == "Edit" collect i[1]
uiaccessor.setwindowtext edits[1] @"c:\temp\reallyanothertest_.jpg"

local comboboxes = for i in (windows.getChildrenHWND WindowHandle) where i[4] == "ComboBox" collect i[1]
local filetypeHwnd = comboboxes[3]

local CB_SHOWDROPDOWN = 0x014F
local CB_SETCURSEL = 0x014E
local WM_LBUTTONDOWN = 0x0201
local WM_LBUTTONUP = 0x0202
windows.sendMessage filetypeHwnd CB_SHOWDROPDOWN 1 0 -- Open combobox dropdown
windows.sendMessage filetypeHwnd CB_SETCURSEL 7 0 -- Select 7th item
windows.sendMessage filetypeHwnd WM_LBUTTONDOWN 0 -1  -- Press left mouse button
windows.sendMessage filetypeHwnd WM_LBUTTONUP 0 -1  -- Raise left mouse button
windows.sendMessage filetypeHwnd CB_SHOWDROPDOWN 0 0    -- Close dropdown

UIAccessor.PressButtonByName WindowHandle "&Save"
)
True
)
I guess you already have figured out what this does. Yes, it collect hwnd of all comboboxes.Them 3rd one was the Save As Type dropdown.
local comboboxes = for i in (windows.getChildrenHWND WindowHandle) where i[4] == “ComboBox” collect i[1] local filetypeHwnd = comboboxes[3]
All cool. Butn thet the heck is the next lines?
windows.sendMessage Sends a Win32 message to the HWND specified in the first argument. This is how you emulate UI interaction programmatically.
I commented on the code what each lines does. But, you may think how am I suppose to know all the secret code?
CGTalk maxscript forum has a lot of answers for common operations. You can also google windows message reference like this.
Now since you set jpg as a new format, JPEG Image Control windows pops up. This one is easy. We can just press OK button like this.
if WIndowTitle == “JPEG Image Control” then ( UIAccessor.PressButtonByName WindowHandle “OK” )
How about other controls like checkbox?
Since checkbox text usually doesn’t change, we can search the string pattern of fifth item to find hwnd. This is function to get hwnd using UI name. Then you can BM_SETCHECK window message to check the checkbox. if the first argument is 1, the chebox will be checked. If it is 0, the checkbox will be unchecked.
fn getChildHwndByName parent_hwnd childUIname = (
    local child_hwnd = 0
    for i in (windows.getChildrenHWND parent_hwnd) where matchPattern i[5] pattern:childUIname do (child_hwnd = i[1])
    child_hwnd
)
local frameNumHwnd = (getChildHwndByName WindowHandle  "Frame Numbers" )
windows.sendMessage frameNumHwnd BM_SETCHECK 1 0
Runscript after Make Preview is done
If you want to automatically run image sequence player like PDPlayer or RAMPlayer or resister to Shotgun, simple add the code after max preview.
Final template code
Here is the cleaned final template code. If you don’t want to read all this, start from this.
This is made in 3dsMax 2019. Other version might not work with this if there is UI difference.
3dsMax 2020 Preview Enhancement
3dsMax 2020 has some nice improvement for Make Preview.
Much faster. 1.5 – 3x faster creation on local drives
Capture size greater than viewport dimensions supported
“Quality” setting accessible from Preview UI (Nitrous only)
Default preview filename based on current scene filename
100% output resolution on by default
MXS snippet can be executed per frame for custom strings
Filename and MXS snippet values can be specified from MXS command line of CreatePreview()
After executing the preview, the time slider is returned to the original starting frame
“Play when done” accessible from Preview UI
If running from MXS command line, avoid dialog boxes, output to listener instead
3dsMax 2020 also has the bug fix for “User defined” Per-view preset missing issue. This issue is related to the permission. If you are still on older version. Make sure to open the permission for folders under 3dsMax root to be able to choose “User Defined” Per-view preset in Make Preview. Or, upgrade to 2020.
One of the new feature of 3dsMax 2020.1 is the new Hot Key Editor plus Hot Keys and underlying system.
Hot Key Editor
The new Hot Key editor is cool. But, the more important change is the way of how the customized hot keys are stored and loaded. When you save and load hot keys in the past, 3dsMax had saved and loaded the entire hot key assignment. Because of this save/load mechanism, any newly added hot keys by 3dsMax dev would have lost when you load the hot keys from previous version. It was not possible to have a studio0wide custom hot keys since the hot keys would have gone when an artist load their own hot keys.
To solve this kinds of issues and make UI customization upgrade-safe, the new override based hot key customization engine is developed. Now 3dsMax stores only the changed hot key assignments in the file when users customize their hot keys. Then 3dsMax will override only the changed keys when the file is loaded.
This will allow users to keep the changed they made while still receiving updates from the global changes. Also you can deploy multiple level of hot key customization. For example, you can have a studio-wide hot keys on top of 3dsmax default hot key while artist still can have own hot keys if they want.
New Hot Keys
Another change is the new hot keys.Yes, some of hot keys have been changed. This new hot key assignment is the fruit of the community effort of 3dsMax and beta users. There has been many feedback and discussion for the best hot keys on the beta. Special thanks to Sergio Santos for the great contribution. 3dsMax put a nice documentation with map images to show the complete list of changes like this. Please visit HERE for all images.
But, I know there are always ones who doesn’t want to change their 20 years old hot keys. For them, here is a hot key files to go back the legacy hot keys. Download it and load in the Hotkey Editor.
If you have had customized hot key in pre-2019 version, this is the step to move to new hot key system.
1) Generate KBDX file using the maxscript command actionMan.saveKeyboardFile “C:\TEMP\LegacyDefaultUI-2019.kbdx”. If you specify a KBDX extension, it will convert the entire active hotkey set to the legacy format through the old code. If you specify HSX, it will output in the new format and only contain user customizations. Or Download this file.
2) Swap it out with the one in your UI_ln/CUI folder (rename the old one to keep a backup). This will use the new hotkey defaults as a reference point when doing the migration, and will treat every difference as a user customization, reaching the same result as if you remapped every single difference back to how it was in 2020-
One of the biggest changes was Improved MCG Package Installation Experience. Let me just norrow the words from dev.
“In previous versions of MCG, the package installation process of an .mcg file involved the automatic extraction of its contained .maxtool and .maxcompound files into the user’s 3ds Max /Max Creation Graph/Tools/Downloads directory. A consequence of this installation method was that common compounds would often conflict with each other, resulting in duplication messages.
In MCG 2018, we’ve simplified the package installation process to make it much more robust. You can now install a .mcg file by dragging it into the viewport. All installed packages now reside in the user’s 3ds Max 2018/Max Creation Graph/Packages directory, and are evaluated as standalone .mcg files. No more file extraction, no more conflicts, no more problems.”
Basically, 3dsMax will consume .mcg package file directly and use the compound in that package first to avoid compound version conflict. Now .mcg file act much like a plugin dll file.
Packaging MCG
MCG Editor > File > Package Tool Graph… will allow you to package the current tool graph and all compound in a .mcg file.
Installing MCG
It means just copying .mcg file into MCG package folder, and drag and dropping .mcg file into 3dsMax viewport will do that f or you. The MCG packages folder is in your user folder/Autodesk. 2018/2019 shares the same structure. But, 2020 MCG package folder is a slightly different. C:\Users\[username]\Autodesk\3ds Max 2018\Max Creation Graph\Packages C:\Users\[username]\Autodesk\3ds Max 2019\Max Creation Graph\Packages C:\Users\[username]\Autodesk\3ds Max 2020\User Tools\Max Creation Graph\Packages
ProceduralContent.ms
Before I tal about network deployment. I need to mention about this file first. The mCG is implemented with dotnet and Maxscript. The engine is dotnet and UI and communicaion with 3dsMax portion id Maxscript. This means we can actually see the source of many MCG functions which are in C:\Program Files\Autodesk\3ds Max 2020\scripts\Startup\ProceduralContent.ms file. If you dissect this file, you can learn a lot about how MCG is working.
Custom MCG Path
By default, 3dsMax uses the above MCG folders. But, you can also have own custom path for MCGs. RegisterCustomGraphPaths function in ProceduralContentOps struct in ProceduralContent.ms manages how to set the path.
By default, it is set to use 3dsMax.ini file, C:\Users\[username]\AppData\Local\Autodesk\3dsMax\2020 – 64bit\ENU\3dsMax.ini. You can type getMaxiniFIle() in Maxscript Listener to get your 3dsMax.ini file path
You can add MCG Compound Directories, MCG Tools Directories, MCG Package Directories sections and add path like this.
But, what if you do not want to use 3dsMax.ini. The one way of using own .ini file for MCG path would be modifying ProceduralContent.ms. Open the file,C:\Program Files\Autodesk\3ds Max 2020\scripts\Startup\ProceduralContent.ms, search “getMAXIniFile()”. Then, replace with whatever path you want.
fn RegisterCustomGraphPaths =
(
local iniFile = getMAXIniFile()
local settings = dotNetClass "Viper3dsMaxBridge.Settings"
Custom MCG path without using 3dsMax.ini #2
But, then you have to modify on all workstations and render node. That might be too much. The next methods is taking the function from ProceduralContent.ms and make own script.
If you check the code, you can see all the functionality is coming from Viper3dsMaxBridge.Main dotnet class. So, I check what kinds of methods it has with showMethods command. CompileGraphsByFolder is what we need. There are a lot more methods. But, I revmoed not to scare you.
local viperbridge = dotNetClass "Viper3dsMaxBridge.Main"
-- Just in case if Viper3dsMaxBridge.dll has not been loaded yet
if viperbridge == undefined then (
    local bridgePath = (symbolicPaths.getPathValue "$max") + @"\Viper3dsMaxBridge.dll"
    dotNet.loadAssembly bridgePath returnPassFail:true
    viperbridge = dotNetClass "Viper3dsMaxBridge.Main"
)
viperbridge.ReloadOperators()
viperbridge.CompileGraphsByFolder @"D:\myfolder1\"
viperbridge.CompileGraphsByFolder @"E:\myfolder2\
Put this in a .ms file like myMCGload.ms. Then, throw in one of your network shared plugin folder. I’m sure you probably already have a plugin folder for a free plugins. Any .ms fil in plugin folder will be automatically runs when 3dsMax start.
A few more things to know
mcg files are registered in 3dsMax file as an asset. It will show up in Asset Tracker and asset metadata stream.
If you use BackBurner and use Include Maps, .mcg filw will be submiited with the job like maps.
When 3dsMax starts in slave mode, it will automatically evaulate all .mcg file in the folder where the max files are. Therefore, if you use 3rd party render farm, all you need to do is put .mcgs in the same folder as max file. You don’t need to set any path.
3dsMax developer has changed their delivery model to continuous delivery. Instead of delivering a feature at one release, now a feature will be delivered continuously until all the planned feature is finished. The automatic OSL > HLSL conversion for viewport was the one of them. It has been improved in every PU since tisinception. Now almost all OSL shader will be automatically converted to HLSL including 3rd party OSL shaders.
Also, the viewport playback performance of animated OSL map has been greatly improved.
This is the viewport playback of the sample file for my OSL shader pack1 in 3dsMax 2019/2020.
Since I posted the Alembic improvement of 3dsMax 2019 release, each PU has been added more and more improvements continuously. Let’s check what has been added.
Per object metadata with .userProperties and .arbGeomParams
3dsMax 2019 introduced the export of per object propery. But, it was only compatible between 3dsMax. With the PU3 update, you can export/import per object properties via .userProperties and .arbGeomParams. This allows a greater compatibility between 3dsMax and Maya/Houdini.
Here is an example of Alembic file exported to Maya.
Here is some details.
Import
It will read from both .arbGeomParams(Maya default) and .userProperties
It supports integer, float, boolean, string.
It supports animated value.
If Extra Attribute is on shape node, it will be in Alembic Geom Parameters rollout(alembic_geom_attributes). If Extra Attribute is on transform node, it will be in Alembic XformParameters rollout(alembic_xform_attributes)
Export
The custom attributes on the top modifier and base object will be exported.
3dsMax will use .userProperties for export and store data on transform node by default.
If you use the same custom attribute name alembic_geom_attributes and alembic_xform_attributes which 3dsMax alembic importer uses. You can even have control over where your custom attribute export goes. To store data on shape node, you need to make the alembic_geom_attributes on the baseObject.
If you have duplicated name custom attributes on an object, none of custom attributes will be exported. You will see the warning in Maxscript elistener.
Layer name will be on transform node.
Material name and Object ID will be shape node.
3dsMax will import Layer name/Material name/Object ID as custom attribut on the respective rollout, too
Alembic Inspector
This is added in PU1. This allows to browse the content of the alembic object even without opening the alembic file. Now PU3 allow you to open the Alembic Inspector for the already imported alembic files. Use the Alembic Inspector button in the Alembic container object(the root Alembic object with Alembic logo icon),
Alembic Inspector is also accessible via Maxscript. Link.
Maya compatble Multi UV and Vertex Color
Maya is very picky about reading the multi UV and vertex color in Alembic file. To send multi UV(UV channel 2+) to Maya, you need to choose UV for Extra Channels type. Also vertex color data from Maya will be imported as a proper vertex color channel. Before PU3, the vertex color channel was imported as an UV 2+ channel.
Instancing Support
Support for instances allows files to be much smaller while maintaining complexity and can dramatically improve export speed. PU2.
Since it is introduced in 3dsMax 2019, OSL Map has been comtinuously improved in every release. There has been many updated on performance, OSL editor useability and viewport display. The most important improvement among all is the viewport display.
Now 3dsMax viewpot can display almost all shippinig OSL and many 3rd party OSL shaders properly even as 3D procedural map. How canit even support random 3rd party OSL shader? The 3dsMax rendering team has developed automatic OSL > HLSL converter instead of making HLSL shader for each OSL shader.
The OSL shaders in the following images are all 3rd party OSL as 3D procedural map. It is oddly satisfying to see all the 3D shaderes in the viewport exactly as renders.
And,,, a little bird told me even more stuff might come in the future. 🙂
3dsMax 2019.1 has been release with many improved features.
Many new features has been added to Alembic/OSL/Fluid/Arnold. Python and Project got some improvement. Plus 94 fixes.
One of the item among “Bringing your ideas to life in 3ds Max 2019.1 Update” was “Attaching large amounts of meshes is up to 7 times faster”.
So, I decided to test if it is true. The enhancement was done for Collapse utility. I think 3dsMax dev choose to enhance this because this is the only attach which keeps explicit normals.
I test total 4 files. I open the file and attach all geometries. The result is… drum roll…
One of the hidden gem of the new 3dsMax 2019 feature is the Custom Scene File Data Streams. This allows uses attach custom strings to your max and access from outside of 3dsmax. It is not only eliminate the need of companion external file for such data but also opens up accesing of .max file related data to any program or language.
To show the power of this feature, I made a sample implementation of this feature. csMergeBy script. It allows users to merge object from other .max file by Layer, SelectionSet, ObjectID and Material name.
There are 2 files in the zip file. The first one is csMergeBySave.ms which registers post save callback to save the scene data as xml and write to Custom Scene File Data Stream. You need to drop this into your startup script folder or one of plugins folder to run this script automatically everytime when you launch 3dsMax. For exmaple, C:\Users\[username]\AppData\Local\Autodesk\3dsMax\2018 – 64bit\ENU\scripts\startup
This script would increase file saving a littlt bit. When I tested it, it took 0.1 sec for for 1,000 objects. BUT, I also have an extreme case of 29,769 objects which add 4.5 sec for saving. Considering the file saving itself would take some time, It was not noticable. But, I still want to give you heads up for the possible saving time increase.
The second file is csMergeBy.ms. This is actually a macro script. Just drag and drop this file into iewport. It will make csTools > csMergeBy action. This is the merge dialog.
How to use is simple.
Select a max file which you want to merge from using the top button
2. Choose “Merge By” method from dropdownlist. You can use… Layer – with hierarchy Layer – no hierarchy SelectionSet ObjectID Material name
3. Choose items in the left list. You can CTRL+click to select multiple items. CTRL+click also deselect item.
As you choose item in the left list. Preview object list will be updated. By default, all objects in the preview will be selected. But, you can only select the objects you want.
If you have a lot of objects(1000+), it might take a while to update the object list. Then you cah turn off Preview object names chekbox to not to show the object list. Then all objects in the selected items will be merged.
4. Then press Merge.
5. All megered object will be in “JustMerged” selection set for your convinience.
You don’t need to download this shaders anymore. 3dsMax 2020 has a better version of all these shaders built-in.
While I was beta testing 3dsMax 2019, I made a few OSL maps. Nothing spectacular. Most of them are just “artist-friendly” pre-made setups to save some nodes.
This is a renderable version of my superClayMode script. Plug into the UVW slot of Bitmap Lookup.
Value > Color by Colorspace
You can conver to a vector value of other color space to RGB.
Math\Color > RGB to Other(Color)
You can convert a color from RGB to other color space. Output value is vector. after you process it, you can convert back to RGB with Color By Colorspace
Switchers > Random Index by Number/Color
It generates random integer index by number or color input. When you need to randomize something by Object ID, Materaal ID, Node Name and Node Handle, this map will be very handy. Of course you can also do the same thing by assembing a few other maps. I just made as one map for your convinience.
Math\Float > Sine wave function of frames
You can generate sine wave of time. It supports amplitude, period, phase value and square wave option. Check my sample animation. This map is very handy when you need to make some cyclic map animation.
!!! You DON”T need to connect Frame Number input. It already has float expression controller assigned. !!!
Scene > Normal
You can get normal value of pixel in various spaces.
Falloff
Falloff map OSL version. It supports Perpendicular/Parallel and Towards/Away.
BlendModel
Legacy Composite map OSL version. It supports all bklending mode in legacy Composite map. I was trying to support all Photoshop mode. But, I gave up on Vivid Light and Linear Light.
Here is a QC image that shows this map and legacy Composite map are producing the same result.
How to Install
1. Make “OSL” subfolder in any plugin folder 2. Unzip and copy *.osl files into the folder
A sample max file
Here is the shader tree for the animation. I used the distance from local center and random sin wave as the light intensity. No keyframes al all. The max file is included in the shader pack .zip file.
Alembic has been added to 3dsMax 2016 and developed continuously since then. I’ll go over Alembic improvement of 3dsMax 2018 first and show what has been added for each previous versions.
But, before we jump on the improvement list.Allow me go over how 3dsMax implementation works first. 3dsMax Alembic works more like referencing system. Each object in Alembic file is imported as separate object which has two component, AlembicObject for geometry data and AlembicXform Controller for transform animation data. This allows users to edit anything after it is imported. You can apply any modifiers, edit geometry, change controller setup and delete any objects. Imported Alembic object is just like any other object. In a way, it almost like ObjectXref.
Other way of using alembic is treating the entire alembic object as one object like VRayProxy or Arnold Procedural object.This makes overall workflow simpler and easy to manage. But, you lose granular control. I think It is good to have both workflow inside of 3dsMax.The more choice is always better.
3dsMax 2019
Per object metadata export
3dsMax Alembic supported faceset(material ID) and per vertex arbirary channel from the beginning. But, it never had support for per object metadata. Now you can export per object meta data using Custom Attribute and some export options in Export dialog.
You can choose to export the following data from Alembic Export Option dialog.
Layer Name
Material Name
Object ID
Custom Attribute export supprts most data types like float, integer, string and boolean. It even support animated values.
BUT, Please keep in mid, Alembic format specification doesn’t have amy standard on this matter. Because 3dsMax write these data into Alembic file, it doesn’t mean that other DCC will magically read this data. User must figure out how to load this data in other DCC.
To know, how 3dsMax exporter stores these information, You can export a test Alembic file with HDF5 format and use the great tool called HDFView. This tool will show the entire structure of the Alembic file. Here is a sample screen grab.
As of now, the 3dsMax importer doesn’t support these data yet. I hope we would see the support for these meta data import soon.
UV/Extra Channel and FaceSet(MaterialID) name parsing
Since 3dsMax is rely on ID number for UV and Material ID. It was very challenging to get consistent UV channel or material ID number when you import and update alembic file. At least, 3dsMax 2017 added a way to keeping uv channel and material ID number consistent between 3dsMax. Therefore, if you export from 3dsMax and import into 3dsMax, all uv channel IDs and material IDs are preserved. But, when you import an alembic from other DCC. You didn’t have any controls. It just came in the order of channel order in the Alembic file.
Now alembic importer will check the face set and extra channel name, and if the name is end with number, the number will be used as Material ID or uv channel number. For example, if you name face group name as “group_7” in Houdini, the faces will get material id 7 when it is imported. THIS IS A SMPLE YET VERY IMPORTANT UPDATE!
Also when you export/import between 3dsMax, the data about the original uv channel and material ID is explicitly stored in the Alembic file instead of relying on naming convention. This makes the ID preservation between 3dsMax even more solid and allow the export the UV channel you set in 3dsMax. For eample, if you name your uv channel 2 as “the second UV“. the exported Alembic channel will have the name, “Max Map Channel the second UV”
Option to choose what to export/Import
Now you can choose which channels to export and import. In the previous version, 3dsMax import/export everything it supported. The following image is the new import and export dialog.
Ont thing you need to know is that, there is a hidden ExtraChannels Maxscript option for both import and export. What is ExtraChennels? For export, ExtraChannel means UV channel other than 1. For import, it is arbirary per vertex data other than UV. By default, it is on for both export and import.
This new options are also very important for troubleshooting. Alembic from a different DCC can easily have problematic data. At work, I found out that most of the crash while importing Alembic file turned out to be a bad data in the Alembic file(Especially normal and extra channel). Without this options, it was very hard to troubleshoot because you have to try to a data and export again iover and over again. Usually the normal and uv data caused the problem. Now with this option, I can just exclude some data to see whats causing problem. I can also decide not to import the problematic data instead od waiting for re-export.
Of course, this also allow to get better performance by removing unnecessary data.
Velocity Channel
Velocity channel in 3dsMax is a long story. It requires its own long post. In a nutshell, 3dsMax itself never has had the concept of velocity vertex channel at all. When you don’t even have the concept, it is abvious that the imported Alembic can not handle vertex velocity.
Finally 3dsMax dev added the vertex velocity channel support in the SDK. If the Alembic file has standard velocity(or v) channel, 3dsMax import the channel as vertex velocity channel. If you have been re-routing the v channel to extra channel. You don’t need to do that anymore.
But, this doesn’t mean that all renderers will magically start to see vertgex velocity channel. Each rednerer need to support the new velocity channel to utilize this data.
Vertex Color
Now you can export and import vertex color channel(uv chennel 0)
Subsampling
You can export Alembic file with subsampleing in the previous version of 3dsmax 2019. Butm the worklow was confusing. To export subsamples. You need to set 2 things.
Set Every Nth Frame less than 1.0. IF you set 0.5, you will get 2 subsamples per frame.
Then, you must be in tick mode. You need to set Time Display in Time Configuration dialog either FRAMETICKS ir MM:SS:TICKS
Now you dont need to turn on tick mode anymore. Also the Every Nth Frame option has been changed to Samples per Frame.
Option for Exporting Hidden Geo
In the previous version, 3dsMax Alembic Exporter export geometry data only for unhidden object. If your object is hidden, only transfom animator was exported. THis might make sense for some. But, it also make some users scratch their head for sure.
Now there is a Maxscript property to control this. In AlembicExport interface, .Hidden property controls this hehavior.
Here is a tip. You can utilize this behavior as a way to export only transform animation. If you want to export transform animation only without any geometry data. Turn off this option and hide all object and export.
Graceful warning/exit for import/export malfunction
Sometimes bad geometry causes crash when you export/import Alembic file. 3dsMax 2019 will pop-up an explanatory Alembic Export Malfunction message box and abort when the Alembic Export plug-in encounters an unexpected issue while exporting instead of crashing.
Generally 3dsMax 2019 handles geometry import a lot more stable than the previous versions. In many cases, 3dsmax importer will try to fix the problem and give you a best possible result. If Alembic library itself errors, 3dsMax will relay the error message.
Export Selected will grab only needed hierarchy.
Since alembic is designed to keep hierarchy, 3dsMax exporter is grabbing other necessary object when you Export Selected object. The problem in the previous version was that it is grabbing too much(the entire hierarchy tree). This is changed now. 3dsMax will grab only the immediate ancestors of selected object.
Better duplicated object name handling
If you have duplicated name object while exporingAlembic file, it can cause problems. In ideal world, user should check if they have the duplicated name objects before export. But, since that’s not ganna happen most time, 3dsMax will check the duplicated name and suffix nodel handle to make all object name unique.
Respect Maxscript #noPrompt option for duplicated name object handling for import
When an Alembic file is imported, you get a duplicated warning pop-up if there is already the same name object. When you use importFIle with #noPrompt option, this dialog will not pop up as it should be.
Alembic Container Object Icon
Alembic log shape icon insteaf of dummy for AlembicContainer object.
Remember dialog setting
The export and import will remmeber the last used settings.
Extra Channel UV Data Animation Fix
In the previous version, the Extra channel(UV 2+) animation was not imported if the channel has UV data(vertex data + face indice). It is fixed. Please do not confuse this with per vertex channel data which never has been a problem.
The Performance Mode in AlembicContainer has been stablized a lot. This feature is probably the most underrated feature of 3dsMax considering how poerful it is. I’ll mpost about this feature someday.
3dsMax 2018
Visibility Support
Visibility track support is added including visibility animation.
.ShapeSuffixMaxscript Option for Maya
Our little precious Maya could not handle the geometry name from Alembic file properly. Therefore, 3dsMax dev had to add a solution for them. If you tuen on this option, yout geometry name will get “Shape” suffix.
3dsMax 2017
Preserving UV Channel and Material ID number
When you export and import an Alembic file between 3dsMax, the UV channel ID and Material ID number will be preserved.
Extra Channel Import Support integer, float, vector, color
3dsMax 2016 only supported color and vector.
Proper Deformation Export for Object with Spacewrap
In the previous version, 3dsMax exported the object with SpaceWarp in World coordinate. If the object is not at the root level, the object will get double transform since the deformation animation already include the animation.
Alembic Performance Mode for Any Object
Alembic Performance Mode cab be used for any 3dsMax geometry. In the previous version, only AlembicObject without any modifier was supported.
More Stable UV Loading
In the previous release, UV data loading was unstable. Sometimes UV data corrupt after user scrub time slider. User need to use Channel Info dialog to copy UV channel data and paste back to the same channel to lock the UV data right after they import thr Alembic file. This is fixed.
Full Maxscript Exposure for Alembic Export
All Alembic Export funcions are exposed to Maxscript.
Preserving Object Name
3dsMax 2016 suffix “_mesh” for geometry. Now object will be exported with unchanged name,
The most noticable feature is the OSL(Open Shading Language) map. You should watch Mads video to see what it can do. Obviously this is a god send for technical minded users. It is like MCG for maps. You can make anything. Your imagination is the limit.
But, what does it brings to the artist who doesn’t/can’t/doesn’t want to code?
3dsMzx 2019 is shipped with 101 OSL maps from bitmap loading to procedural noise, color correction and utilities. Thisbrings some interesting features and workflows. Let’s see what we can do with them.
Random By Index
You can randomize any vaule type that OSL supports by index number. For example, You can randomize gain value(float) or UVW offset(vector) or diffuse color. Anything!
Object property access
Even better, OSL map allows to access various object data such as Material ID, Object ID, Wire(frame) Color, Node Handle(a unique id per object), Node(Object) name and User properties(!). If you combine these maps with Rendom By Index map, you can randomize almost every map/material paramateres per object. Here is an exmaple. All object have the same material with single bitmap texture.
Switcher
Finally the switcher map has been arrived. This map allow you choose a map among the multiple children map. You have 1-of-10 and 1-of-5. But, you can cascade them to support more than 10.
Independent UVW control
It is like Coordinate rollout is a seperate map, and you can plugin the UVW into multiple maps. Yes, now you can instance UVW across multiple maps. Also you can also randomize UV by using the above maps. Do you want to distort UV? then apply a noise map to UVW map.
Randomized Bitmap
“Randomly place (and alpha blend) a set of bitmaps on top of something else”. Just try it. So much fun!
Shuffling channel
You can easily shuffle channels around. Find Compoments(Color) map and connect from where you want get to where you want to put.
.tx /.dpx format loading
OSL uses OIIO for image IO. Therefore, the image formats which supported by OIIO will be supported in OSL map. But, you can read .tx and .dpx directly.
Filename as a map
When you have a single file which is needed be used in multiple map. You can use Filename map and feed to the path to multiple Bitmap Lookup maps(OSL version of bitmap map).
Gamma checkbox in the map
You don’t need to use file dialog anymore for gamma settings. Gamma setting is in the paramaters rollout! It also has AutoGanna option which will set gamma value depends on the file format.
Samplerinfo
OSL gives you access to various scene data such as position/normal/uv. You can get this data in various space. You can use local object position or world normal vector as map. Do you want to render out UV as texture? Just plug UVW to diffuse color.
Math, Math, Math
You can do all kinds of math you want to do. Many math functions are exposed as maps. You don’t have to “code” for simple math operations. Do you want to have a black and white mask for your mountain? Let world position value and remap to 0-1. Simple.
Granular color correction
Of course, you can use any math maps to do whatever you want. But, 3dsMax 2019 also has 2 OSL maps you can use for color correction, Lift/Gamma/Gain and Tweak. This should cover all features of legacy Color Correction map.
Procedural map that renders exactly same across renderer
Many renderers support 3dsMax noise map. But, the result of the noise map could be different for the renderer which doesn’t use 3dsMax map api because they have own implementation of noise map. In this case, your rendered noise mapptern would not match with other portion of 3dsMax such as Displace modifier. If you use OSL procedurals, the render result would be exactly same regardless of renderers. This is HUGE. OSL allow to have a foundation of unified map workflow across renderers. Check out these renders. The left one is rendered with VRay. The right one is rendered with Arnold.
3dsMax 2019 come with new noise map with the follwing 6 types of new noise. perlin/uperlin/simplex/cell/hash/gabor
New pattern maps
It also has a few interesting new pattern maps. Checker(3D), Candy, Mandelbrot, Revets, Digits
Unified and portable map tree
The biggest chanllenge of moving shader around between renderer is the complicated map tree. One incompatible map in the middle of shader tree will break the shader tree from that point. Even thiough there are enough matching maps. It is almost impossible to reuse shader tree and produce exactly the same result. With OSL, you can. As long as you stay in OSL, the result map tree will always be same just like procedurals.
Possibility of rendering on Linux
You already can convert mesh data to a renderer scene file format like vrscene or ass, rib file for rendering. But, the nature of 3dsMax renderer integretion always requires 3dsMax to evaulate map tree unless you only uses the renderer native maps. This is the main obstacle to render max scene on linux. Now with OSL, the renderer scene file format could include all map tree in the file and render. It opens a posibility of rendering 3dsMax scene on Linux.
This MCG modifier allows you generate multiple camera projected UV with independant resolition per camera. It is essentially a MCG version of CameraMapGemini. 3dsMax 2018+
Compare to the built-in Camera Map modifier, Camera Map Mult provide the following additional features.
Multiple camera support up to 8 cameras
Resolution per camera
Animated camera support
How to use is very simple. Select a camera with Select Camera button. Then, set the resolution and the frame to project. If you just want to project from the current camera animation, turn on Animated. Then the Framevalue will be lock to the current frame. The Frame value is animatable so you can have more control than just matching to the current frame. The last option to set is which UV channelyou want to use. For your convinience, there are also Get resolution and Set resolutionbutton to get/set reslution from Render Setup dialog.
I know it CemeraMapSemini had also a companion map. But, making a map plugin is beyond my capacbility. But, who knows someday I might. Let’s cross fingers. 🙂
It is free as always.
A special thanks to Kelvin Zelt at Autodesk for helping me to solve the last piece of puzzle.
3dsMax 2018.4 has been released today. https://area.autodesk.com/blogs/the-3ds-max-blog/meet-3ds-max-2018-4/
One of the feature is the full BiFrost channel support for PRT export. You can export all BiFrost channels even with custom channel names.
As of now, export channel setup is only exposed to Maxscript. So, I made a UI for that.
You can turn on/off channels and rename channels.
Installation is simple. Download the zip file and drag and drop to your viewport. You can find the script in csTools > MaxFluidsPRTExportChannelSetup. It is a macroscript so you can make button, menu or shortcut. It will also show up in Global Search(X)
I mainly focused on Maxscript operator samples for this pack. I also try some UI element samples from Clovis Gay‘s UI Toolkit.
Some of files are 2018 only becuase the file need the some of bug fixes which are included in 3dsMax 2018. If file name has 2017, it works for 2017/2018. If not, the file only works for 3dsmax 2018.
I also used Clone MCG for the some of the samples to keep everything procedural. The MCG is included in the following zip file. Please install before load the sample files.
It takes a lot more time than I expected to make this MCG. Personally it was a great learning experience for mesh structures in 3dsMax. A big thanks to Kelvin and Martin at Autodesk for the new operators in 3dsMax 2018. Without the operators, it was impossible to make this.
———————————————————————————————————————
This MCG allows you to reorder vertex IDs using the proximity of the position to the vertex position of the reference object.
Your model might look exactly same as other model. But, the internal data structure could have been changed because you export/imported the model or deleted some verts/faces and rebuilt it.
If that happens, you will have a problem when you try to use them as morph targets.
In 3dsMax or most DCC application, there is no way to “reorder” verts. What this MCG is actually doing is building a new mesh with the vertex IDs we wants.
This MCG provide 3 ways to find a matching vert.
Object space verts pos
World space verts pos
UV
If the pivot of both meshes are at the same place, you can use Object space verts pos. Then you don’t need to align object together. The MCG will use the position from the pivot point.
One thing you must remember is that you must ResetXform first if you adjusted the pivot of the mesh. It is because MCG returns the vertex position without offset transform applied.
If you used ResetXform or exported mesh as object when object was not at the origin, your pivot point would have been changed. In this case, you can align two meshes and use World space verts pos option.
Or… you can use UV to find a matching verts, if you have an UV information. This option is also useful for the case which you changed the shape of mesh.
The last option is Copy Topology. When this option is on, the MCG will try to match not only verts ID but also face ID and the verts indices for faces. You would need this option if you need to copy/paste UV from the fixed mesh to the original mesh. This is a little bit experimental feature. It will fail if there is a big different between the topology of two meshes.
Obviously this modifier is supposed to work with 2 meshes with same number of verts. But, I didn’t put the limitation to force that. If this MCG works as you wanted even though the number of verts are different, then good for you! If not, then that’s what it is.
Lastly, this MCG is not that fast especially with Copy Topology On. So, be patient. 😉
This MCG uses some of the new operator which is included in 2018. Therfore, it will only work for 3dsMax 2018+
3dsMax 2018 MCG has many fundamental core changes which make MCG easier to use/make for users. The MCG guru at 3dsMax dev team Martin has the introduction post of 3dsMax 2018 MCG on Area with awesome new sample packs. I’ll try to go over some of these changes here. Today let me talk about Easy Map / Live Types / Undo.
Easy Map
When you try to learn MCG, the first obstacle would be the understanding Map and Combine. Map/Combine is equivalent to for in other programming languages. It allows you to iterate a function through an array(or arrays).in 2018, Map operator actually renamed as For Each. Considering the most typical MCG task is doing something over a vertex/face array. This is probably the most important function in MCG world.
The problem was that how Map/Combine was presented in MCG editor was not that intuitive. You can not directly connect your input array to the connector of the function. You must leave the input connector open and draw the imaginary line in your mind to know which input goes where.
In 3dMax 2018 , you don’t need to use Map or Combine anymore for most cases. You can just directly connect input array to a function operator. Check out the following image. This is a simplified version of my ExtractDelta MCG modifier. I removed all error checking and stuff to make it easy/clear to see the core functions.
What this modifier does is that, it read 2 objects and calculate the difference of vertex position between them and put that difference(delta) into the curent mesh.
Look at the calculate Detals. group. in 2017 graph. you need to use Combine to iterate over two vertex position arrays and subtract vectors from one array to another.
In 2017 graph(top). you need to use Combine to iterate over two vertex position arrays and subtract vectors from one array to another. The open connector of value1 is invisibly connected to the mesh vertices array of corrective shape. The open connector of value2 is invisibly connected to the mesh vertices array of original geometry.
in 2018 graph(bottom), you can see that you can just plug the two mesh vertice arrays into Subtract operator input.
The 2018 graph is more intuitive and a lot easier to understand what’s happening in the graph.
Next look at Add deltas to mesh group. After we got the deltas array, we want to multiply Amount input to the deltas and add the result to the vertex position of our current mesh.
In 2018, you can just directly plug delta array and Amount value to the Multiply Vector operator and plug the connection to Add operator. You don’t need to use Combine operator at all.
You can still use Map/Combine if you want to make your MCG backward compatible to the older version. If you use Easy Map method, your graph will be compatible with older version.
Live Type
Let me borrow the explanation from Martin’s blog.
One of the major challenges in previous versions of MCG was keeping track of all the types flowing through your nodes. If a problem crept up, you only knew about it when you tried to evaluate your graph, and that often meant doing some detective work based on an error message as your only clue.
In 2018, the types flowing through your nodes are updated as you wire them, so you know exactly where you’re going. If two types don’t match up, a red wire will indicate that the connection is incompatible or that the graph is incomplete.
So… what does this actually means in MCG graph? Let’s check out the above image again. If you see the output connector of Mesh Vertices operator and the input connector of Subtract operator in calculate Detals. group, 2017 graph connector label just shows as value(IArray). It doesn’t show what kinds of array this is. 2018 graph display the same thing as Array[vector3] to give more clear information. This labels will be dynamically updated as you update the connection. If you make a wrong connection,
Also If you make a wrong connection, for example trying to connect vector array and integer array for Add operator, the connection line color will be changed to red to show the input is wrong.
Undo
Finally you can undo your mistake in MCG editor! Ctrl+Z and Ctrl+Y.
DataChannel modifier is very cool and fun. This is a kind of sub-object modifier or stack in the stack. I’m sharing some sample file I made while I’m beta testing. I hope this files are helpful for you to understand DataChannel modifier.
I didn’t include DeltaMush file since the model is not mine. The video also doesn’t have ChangsooEun_DC_GeoQuantize in action. But, the image on this page was made with the same setup.
Some background information about the new viewport override
3dsMax 2017 introduced the new viewport material override. As you cans see from viewport menu, there are three override modes.
UV Checker
This mode uses self illuminated Standard material with UV Checker map. This material is defined by uvchecker_override_material.ms script. This files is in [maxroot]\scripts\Startup\ folder. Usually C:\Autodesk\3ds Max 2017\scripts\Startup\uvchecker_override_material.ms In that file, you can see the script is using [maxroot]\maps\uvwunwrap\UV_Checker.png. Therefore, if you want to change the texture of the default UV Checker, you can 1)edit startup script or 2)replace the default bitmat file.
Fast Shader
This a specially designed build-in shader for faster viewport display. “Performance” mode preset is using this shader overide.
Rendering Setting
This is a mode for custom override shader. You can use any material for viewport override by using this maxscript.
SuperClayMode is a script which mimics built-in clay mode with custom matcap texture by utilzing this Rendering Setting mode.
This script makes a ShaderFX shader with matcap uv on the fly and assign the material as override material and turn on Rendering Setting mode. It is designed as a toggle mode. Therefore, you should make button or assign shortcut for this script.
If you want to know more about matcap. Check the following links.
This MCG shape allows you generate smoothly connected spline between two objects with sagging option. You can animate start/end object. Tubo will dynamically connect two objects while trying to keep the overall length of spline.
The core engine of this MCG is hermite interpolation. This is an way to interpolate between two point using the position and vector of each point. MCG provide Hermite node by default. So I just needed to make an way to defined those 4 numbers.
Using this MCG is very easy. Just create this MCG(Create panel > Shapes > Max Creation Graph > Tubo). Then assign start and end object. Num of Vertices will determine how many verts will be created.
This MCG will try to keep overall length same. But, it doesn’t have any mathematical function to ensure the same length. Most of time, it will look OK. But, if you are seeing too much of length change, you can animate Lengthvalue to compensate.
You can choose which axis would be the direction of tube. Check Flipcheckbox if you want flip the axis. You can also offset the start/end point with Start Offset/End Offset. If you check Create Offset Segment. the segment between original point and offset point will be created.
If you increase Start Tension/End Tension value, the spline from the point will look more rigid. This value is actually the multiplier for incoming/outgoing vector for hermite interpolation.
If you want to add sagging effect, increase Sag Amount value. I originally tried to use caterary curve. But, it didn’t look good since our spline is not free hang. So I used built-in affect region function which you use for soft selection control. That’s why there are Bubble/Pinch values. Even though I expose this parameters, I don’t recommend to change
By default, the sagging direction is set to world -Z. But, you can use any direction by using Gravity Ref. Object.
This MCG object let you combine multiple object as one mesh while keeping animated transformation and deformation.
You have two methods to choose the object to combine. I’ll call it, Source Objects.
The first method is selecting Source Obj Tree Root. If you choose an object, all descendant of selected objects will be used as source objects. You can have non-mesh object in the hierarchy. The MCG will filter out non mesh automatically.
!!! This methods doesn’t support deforming mesh !!!
The second method is manually selecting objects by Add Item/Remove Selected button.
You can use both methods at the same time. Any object chose by either methods will be used.
Another feature of this MCG is that you can define local space origin and orientation with Local Space Ref.Obj. What? I know it sounds confusing. Let me explain.
If you don’t choose any object as Local Space Ref.Obj, the position of this MCG object becomes the world origin for combined object, and the orientation of this MCG object will defined the world axis of combined object. Therefore, If you make this MCG object at world origin without any orientation, the combined object will be exactly overlapped with source objects. If you transform this MCG object, the combined object will be offset as much as this MCG transform.
But, if you choose an object as Local Space Ref.Obj, the transform of the object will defined the origin position and axis orientation. In the vimeo video, you can see what happens if you choose the point helper which is projected from Bip001 object to ground as Local Space Ref.Obj, The combined mesh animation is happening around the helper object.
The last option is Use Src Obj Tree Rool. If you check this checkbox, the object which is used for Source Obj Tree Root will be used as Local Space Ref.Obj, too.
This is a collection of macro script relate to construction plane. It started as an implementation of Modo’s work plane. It includes the following four scripts.
First of all, Special thanks to Fausto De Martini for all great feedback.
LockWorkPlaneToView
It is similar to LockWorkPlaneToOrigin except this aligns construction plane to view.
Place Grid
autoAutogrid renamed as Place Grid
csWorkPlaneUI
a small floating dialog for csWorkPlane funtions. It is dockable. To undock, just rightclick any button.
PlaceGrid(autoAutogrid)
It allow you create a grid object. After the grid is made, the grid will be automatically activated, and all transform coordinates will be set to Grid.
The core functionality of this script has been in 3ds Max for long time. AutoGrid, Grid object, Grid coordinate. I just make more streamlined workflow.
If you want to go back to the default coordinate, Run this script again while pressing SHIFT.
LockWorkPlaneToOrigin
If you turn on this mode, the plane which face to camera will automatically become the construction plane.
If you want to go back to the default coordinate, Run this script again while pressing SHIFT.
AlignWorkplaneToFaceSelection
1) Select an object
2) Select face(s)
3)Run this script.
This script will make a grid object at the center of face and activate it. The ZAxis will be aligned to face normal.”
RemoveWorkPlane
Turn off workplane by deleting the workplane from the scene. It is same as SHIFT+LockWorkPlaneToOrigin
How to install
1) Unzip!
2) Just drag and drop csWorkPlane_1_52.ms into viewport.
3) Make button or shortcut. This script will show up in “csTools” category.
A lot of peoples seems to think QuadScatter as just fancy “Greeble”. But, it does more than that. You can make wire fence, woven fabric, brick walls, bullet belts and etc. The newly added option will be useful for those things.
Follow Normal – this option will use original vertex normal when this MCG deforms object. If you want to weld togrther the cloned objects, turn on this option.
Place Guide ID – You can defined which portion of mesh would be aligned to quad. If you turn off this option, the bounding box of the source objects will confom to quad. Therefore, the entire object will be always inside of quad. If you need to have certain parts at the outside of quad, use this option. The faces which has defined ID will be use as guide to conform to quad.
Delete Place Guide – if you don’t need to keep the guide faces, turn on this option.
Basically you can read any image/video that FFmpeg supports directly in 3ds Max as background or map. For example, mp4, dpxand jpeg2000. Yes, finally you can read dpx!
More importantly, 2016 and 2017 version supports image cache option. You can play image sequence in real time. I tested with HD(1920×1080) resolution dpx sequence on my PC, i7-2600K with GTX 960. When cache was off, I got 6.4fps. When cache is on. I got 31.2fps!
Qinming included a detailed readme file.Therefore, I would not repeat how to install and things here.
Here is a few important things to remember.
Only FFVideo Plugin supports image cache. If you want to cache image sequence. You have to use IFL2 format. IFL2 is exactly same as IFL. Qinming just uses this extension to show a different setup dialog.
IFL2 also give us a very important benefit. IFL2 allow user read other natively supported format like jpg through this plugin. Why is this important? Let’s say you want to cache jpg sequence for your background. 3ds Max will try to read jpg using native jpg reader/writer. If you remove the jpg reader/writer bmi, you can make this plugin load jpg, But then you can’t write jpg since this plugin only read image files. So… if you want cache jpg sequence. just make IFL2 of jpg image sequence. Then this plugin will be used to read the jpg sequence instead of max native jpg reader.
The easiest way to make IFL2 file would be just making IFL as usual with Sequence checkbox and rename it.
Set Display Performance resolution same as image size. If you put smaller number, 3ds Max will try to rescale image which slows down play back.
If you turn on Gamma in 2016, the playback will be slower. 2017 is OK. The Gamma problem is fixed in 2017 by Qinming.
In 3ds Max 2017, there are a lot of performance improvements in may area. I think It is the fastest 3ds Max ever.
Viewport is faster than ever in many cases. Selecting and manipulating sub-object is also a lot faster.
UV Editor is totally rebuilt with DirectX which is a lot faster and can handle bigger mesh.
TrackView also perform better and stable.
Now you can use alembic performance mode for any object and have an option for force cache.
Many unnecessary evaluation problem is fixed. For example, if object is hidden/frozen/display as box, the applied material would not be evaluated.
Here is some benchmarks numbers to show how much 3ds Max is faster than the previous versions.
2012
2014
2016
2017
Deforming Mesh
6.9
32.0
45.4
95.3
HiRes Transform Anim
25.0
17.9
20.0
27.7
Static Many Object
3.8
3.9
3.7
14.8
Production Scene
1.0
3.1
3.2
5.1
All numbers are fps. The fps number is measured by script. It is not from viewport statistics.
Deforming Mesh
This scene has 4 point cached characters. 4objs / 142k verts / 283k Faces. Thanks to the brand new GPU mesh builder in 2017, 2017 is 1,300% faster than 2012.
HiRes Transform Animation
This scene has an animated hires rigged rigid mesh robot. 800 obj / 9.1mil verts / 18mil faces.
Many Static Objects
I made a 10+ buildings with Building Generator script. It has more than 20,000 low-res statics objects. 20,000 obj / 2.2mil verts / 3.2mil faces You can see 400% performance improvement
Production Scene
One of sample scene file from Blur which is included in Brandon Young’s DVD. Four point cached hires character and baked transforms. 106 obj / 407k verts / 791k faces You can see 500% performance improvement compare to 2012.
This MCG modifier allow you scatter object on quad polygons.
“Quad polygon” is determined by QuadThresholdvalue. For each polygon, this MCG will remove the vertex if the angle between two edges of the vertex is small than QuadThreshold value(degree). After that, if a polygon has 4 vertices, that is “quad polygon” to use.
As you can see in UI, this MCG has 3 set of the same controls. You can use 3 different source objects for each Material ID. IF you need more, you can apply this MCG multiple times. OR.. you can modify this MCG and add more sets which is actually not that hard to do.
When you assign object, if the object has any descendants, this MCG will choose the one of them randomly. If you want to change the randomness, change the Seed number.
Delete Original Faces will decide what to do with quad polygon. If your scattered object is cover quad entirely, you can use this checkbox to delete the original faces.
Rotateallow you rotate the scattered object. You can only rotate 90x degree. 1 = 90, 2 = 180, 3 = 270. If you check Random, this MCG will rotate scattered object randomly.
You can also adjust height with Heightspinner. 1.0 means original height. If you want to randomize height, use Var. spinner. This is an offset value. So… if your Heightis 3 and Var. is 1, you will get height between 2(3-1) ~ 4(3+1).
By default, the height/width ratio of scattered object is preserved. This means the height of each scattered object will be different. If you want to make all scattered object’s height. Turn on Constant Height.
The last option, Dir.Guide UV is the UV channel ID which is used for determining scttered object direction. IF you turn on this option, U direction will be used to guide X axis of the scattered object.
This MCG is still WIP. I haven’t done any optimization, and I have a few more features to add.
I hope you enjoy it!
For the scatter source, check this Greeble Packs from Wayne Joes (jedilaw)
This SP also brings us two big MCG performance improvement.
Mesh related MCG oerformance is 300%-800% better. Here is a small benchmark number in fps. Thanks to Denis, I have cloneOnVerts maxscript vertion, too. The maxscript version runs at 4.4fps
2016
SP3
%
Verts
Faces
LimitedPush.max
1.12
3.43
306.2
92,708
185,408
cloneOnVerts.max
1.20
7.03
585.8
153,458
296,512
extractDeltas.max
5.22
18.43
353.3
30,603
60,000
spherify.max
1.70
5.43
319.8
60,002
120,000
twist.max
1.80
6.56
363.9
60,002
120,000
voxelizer.max
1.30
3.73
288.1
64,000
96,000
MCG now only evaluates the graph when there is a change. This bug fix bring a big performance boost for static MCGs. My MatID_Swap modifier test on 120, 000 faces runs at 91.2fps instead of 1.8fps.
** I found a error for cloneOnVerts and corrected it.
Trajectory Constraint causes an object’s orientation to follow the trajectory(velocity vector) of a target object. For example. when you animate a car, the rotation of car would be defined my the direction of car movement.
Many of you probably know how to rig this with Script Controller and Look At Constraint. I just took the idea and implemented as MCG.
How to use this constraint is simple. Just assign as an rotation controller and pick Motion Target object.
When you assign Motion Target, this MCG will ask you if you want also constraint position to the Motion Target. You will probably need to say yes unless somehow you only need to have orientation.
This MCG also shows a good example of a benefit/advantage of MCG. This MCG is actually just a modified version of the new MCG_LookAt Constraint. I just replaced multi target list with a pick button and added a simple velocity calculation from Motion Target nodes. I did not need to reinvent all the parameter for upload. MCG allows you to easily modify/enhance someone’s MCG for your need. This is a big benefit.
One thing you need to know is that when you assign Motion Target node MCG will do the following things. 1) Assign Motion Target node as upnode 2) Turn off Worldfrom Upnode Settings 3) Set Upload Control as Axis Alignment. 4) Source Axis and Axis Aligned to Upnode as Z
What is does is letting you define up axis with the Z axis of Motion Target node. Usually users uses just World Z as up axis. But, this can cause problem(flipping) when your object is moving vertically very close to World Z axis. To prevent flipping, you need to manage up ax, and I think this option is the best for that.
But, if you need to use other setting, then you can always change later.
This MCG and Msxscript combo will allow you to collapse/pointcache object with spacewarp(s) while preserving pivot and hierarchy.
The main calculation engine is CollapseSWMCG object. This MCG object converts vertex position from world space to local space.
Accompanying Maxscript calculate a new mesh using this MCG object and either replace original object with the collapse object or generate point cache and apply to the original object.
This MCG shows a few benefits of MCG.
1) The node based nature of MCG and the large amount of built in functions and Auto UI generation allow fast development. It took less than 5 minute for me to make this MCG object.
2) All MCG parameters are automatically exposed to Maxscript.
CollapseSW macroscript
To provide a complete workflow, I made CollapseSW macroscript. It is easier to make script than trying to explain in English for me.
The parameters are self-explanatory.
1) Select objects to collapse/pointcache. you can select multiple objects.
2) Choose what to do with Collapse/PointCache.
3) If you want to collapse, you don’t need to set anything. If you want to point cache, you need to set parameters for point cache and assign out file name.
4) If you select multiple objects and point cache, this script will only use the path portion and use object name as point cache name. If you check Make SubDir Per Obj, it will create a sub folder for each object automatically. If you choose to use One File Per Frame, you probably want to check this.
* Currently MCG mesh building is a little slow for high polycount mesh. It might take a while to point cache.
How to Install
CollapseSW.zip includes two files.
CollapseSW.mcg is the MCG package.Install this package through Scripting menu > Install MCG package..
csTools-CollapseSW.mcr is macroscript. Just drag and drop to a viewport. Then you will see Collapse/PoinrCache SWin csTools category.
It assigns 3 different planar UV onto object using the bounding box of assigned objects. Use Select boxmap gizmo mesh button to select a gizmo object.
Currently you can only use an object which can be converted to mesh.
To prevent an accidental render of gizmo object, this modifier will turn off the object’s renderable property and apply Lattice modifier for your convenience.
If no object is assigned as gizmo, this modifier will use the object’s own bounding box as gizmo.
Since this modifier projects 3 planar UV from each axis, it will generate 3 UV channel. You can set the channel ID for each axis in UV group.
I also added the Use userdefined size checkbox so you can keep the texture scale across multiple objects.
If you check this option, a cubic bounding box with the size of the below Size spinner will be created and used as gizmo.
Randomize Gizmo option allow you randomize the local bounding box gizmo center and/or rotation.
Amount(%)is a percentage of gizmo X size or 180 degrees. Currently this option uses the distance between the first vertex and local origin as a seed to generate ransom numbers. Therefore, if two objects are exactly same, they will get the same result unfortunately.
This modifier has an option to generate blending mask as vertex color.
If you turn on Generate blend mask VC checkbox, X/Y/X bleding mask will be generate as R/G/B vertex color.
If a vertex normal is parallel to projection axis, it will get 1.0. If a vertex normal is perpendicular to projection axis, it will get 0.0.
You can also limit the blending area with min/max value. Then the blending will happen between min/max instead of 0.0/1.0.
The last button isGenerate TemplateMtlbutton. If you click the button, a Composite map with 3 bitmap and 3 vertex color map will be created at active material editor slot.
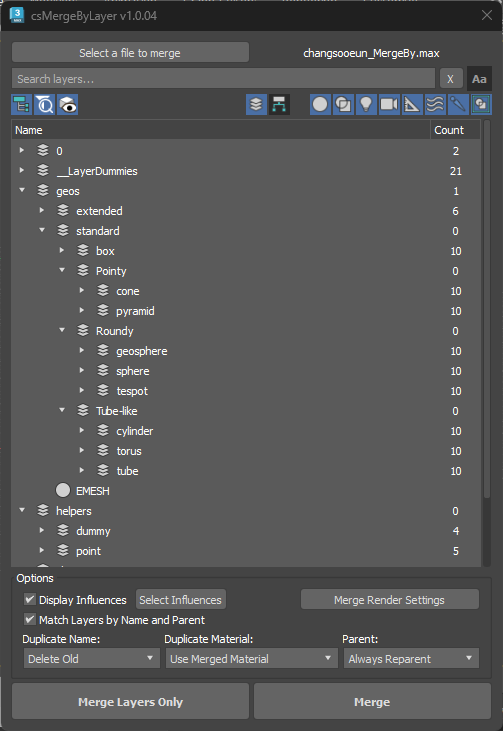

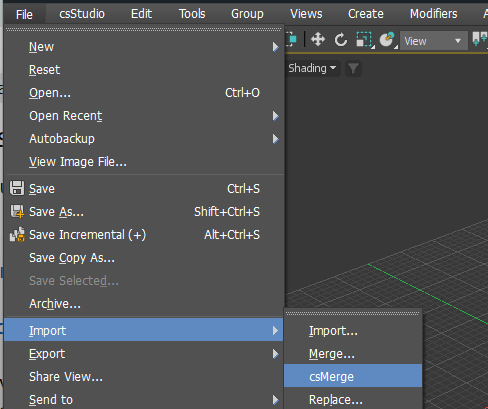

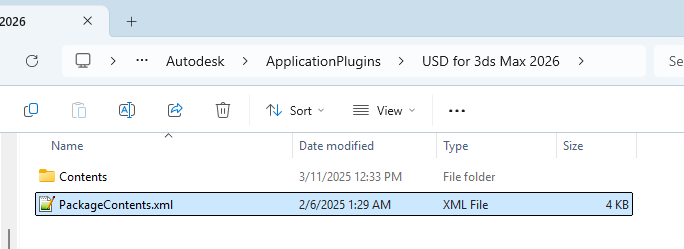

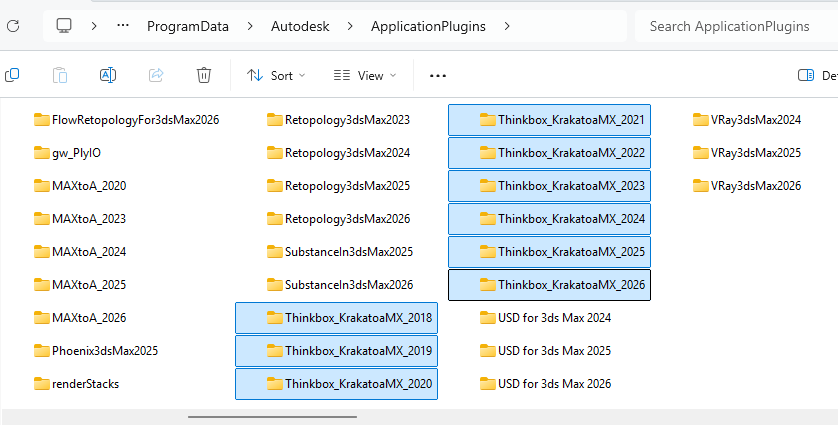
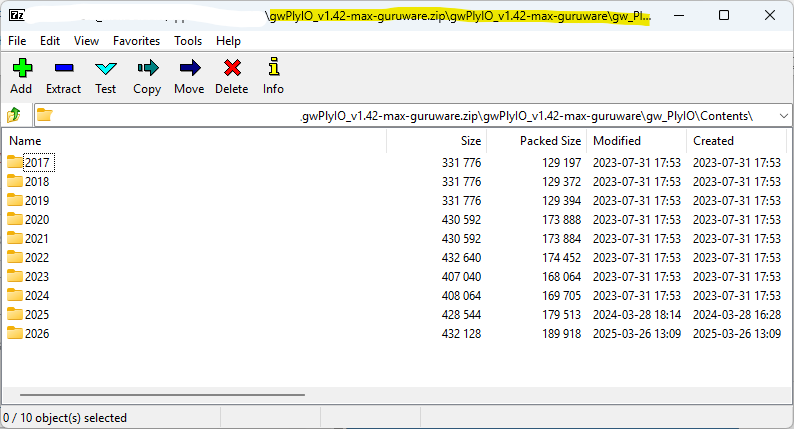
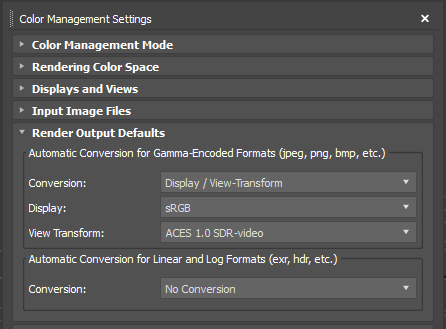

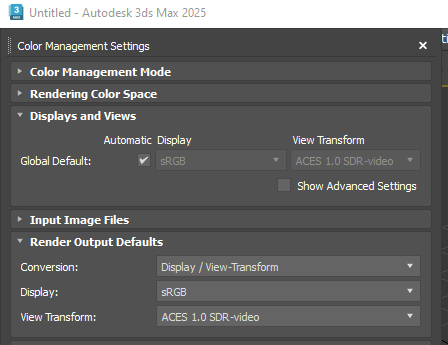


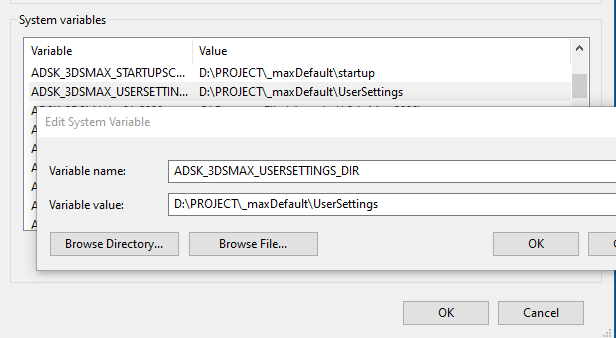


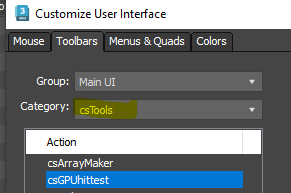

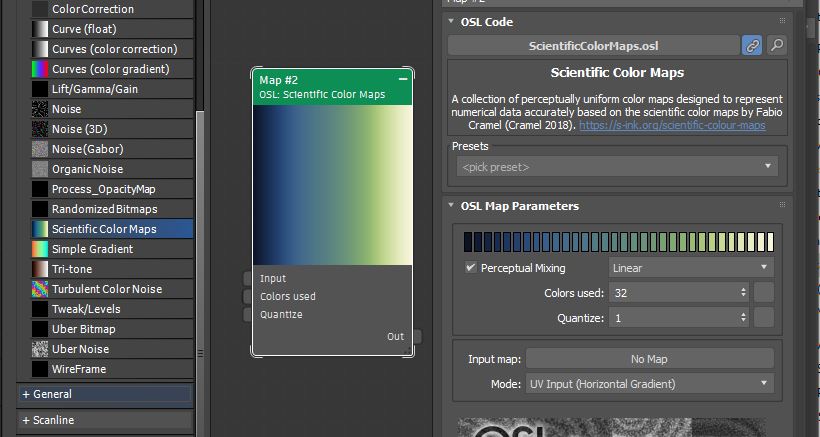
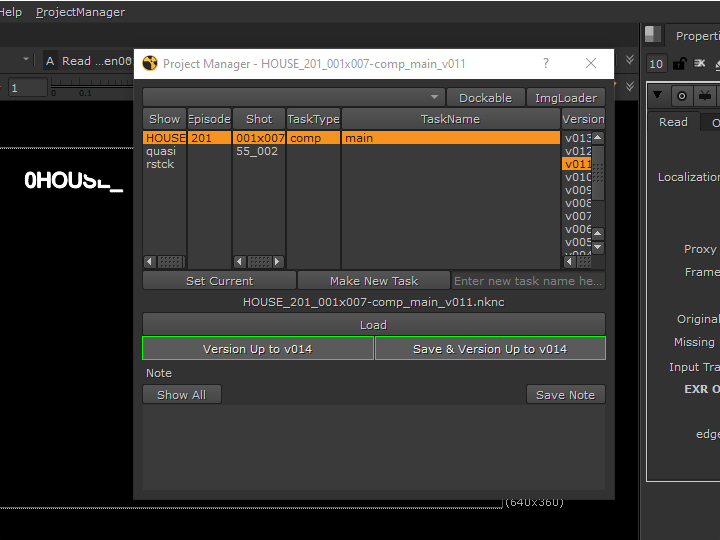
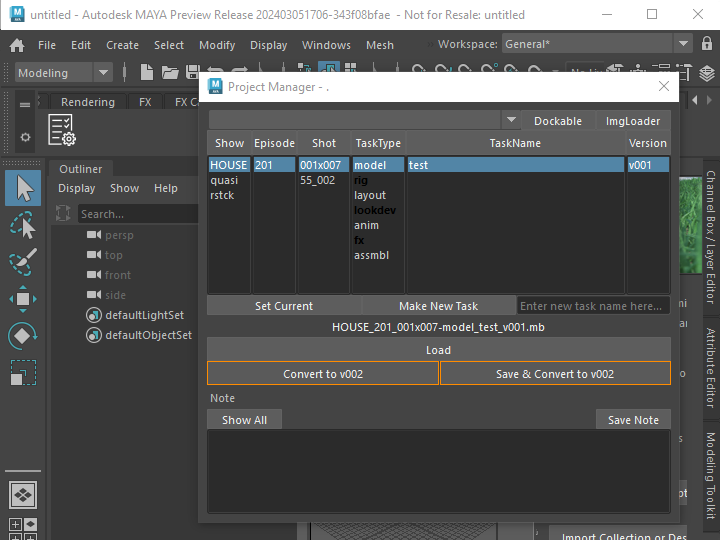
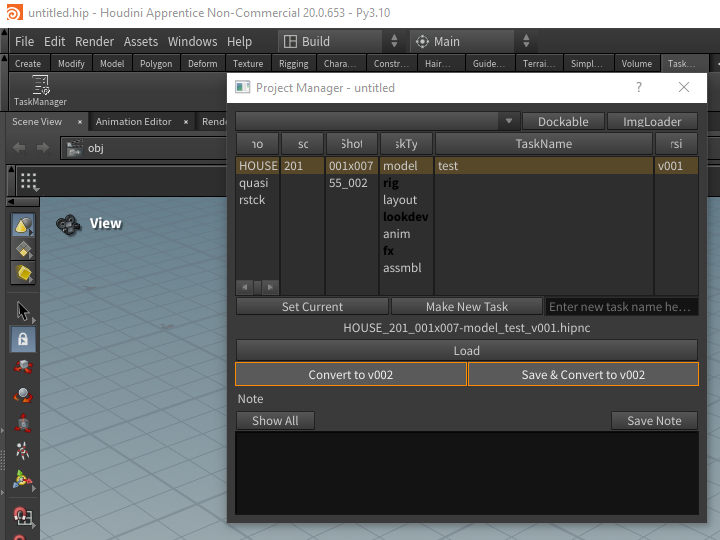


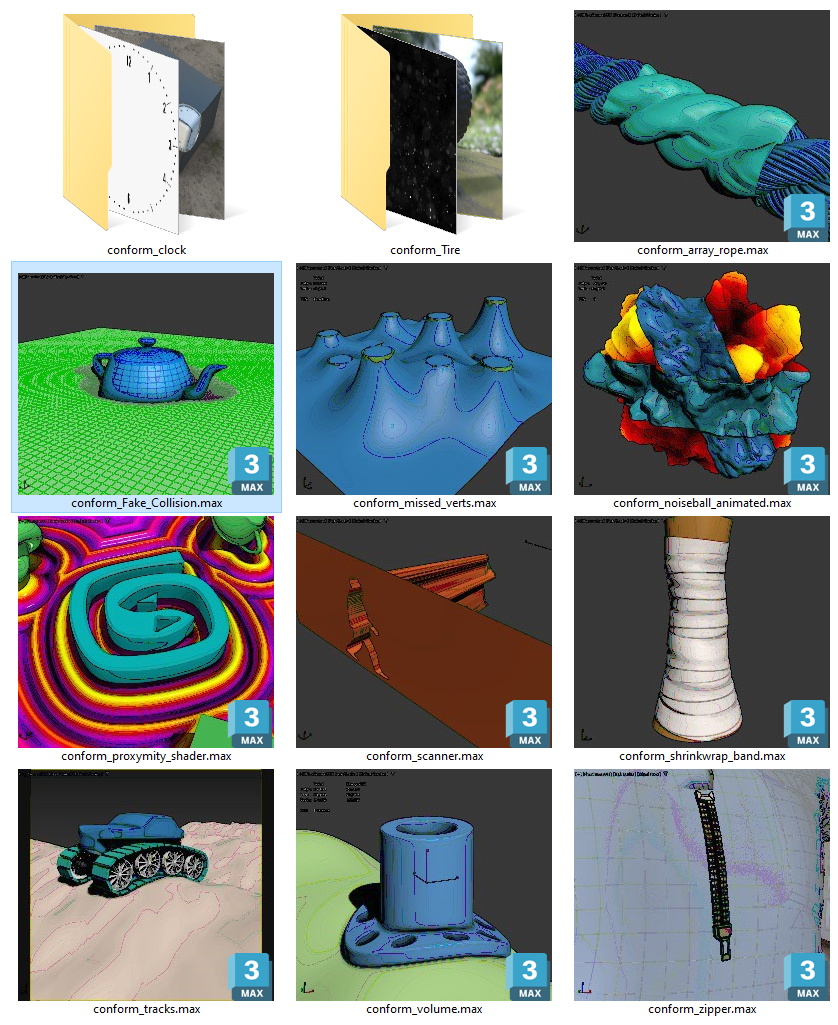
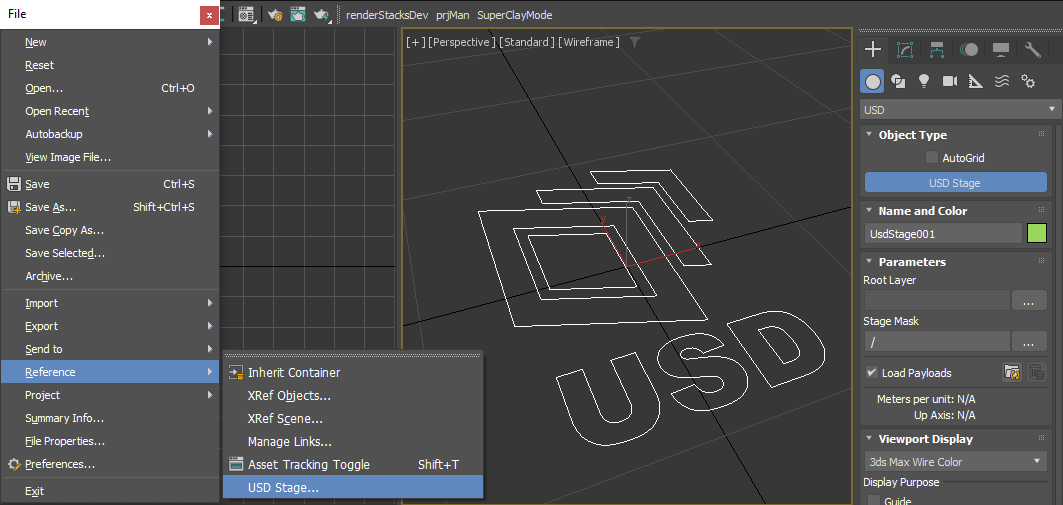

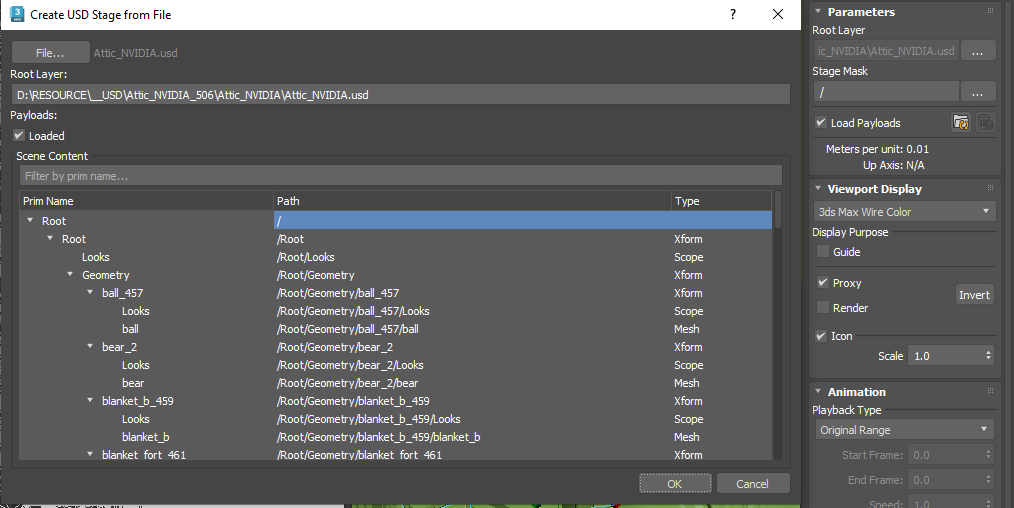
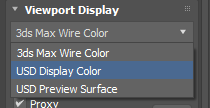
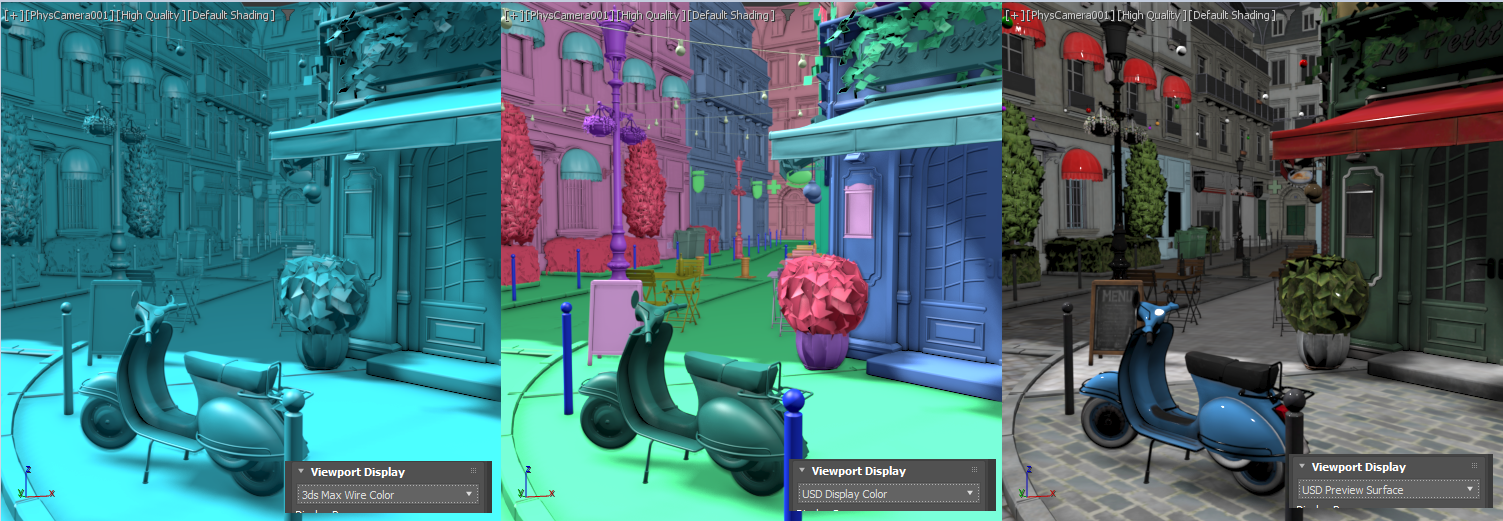
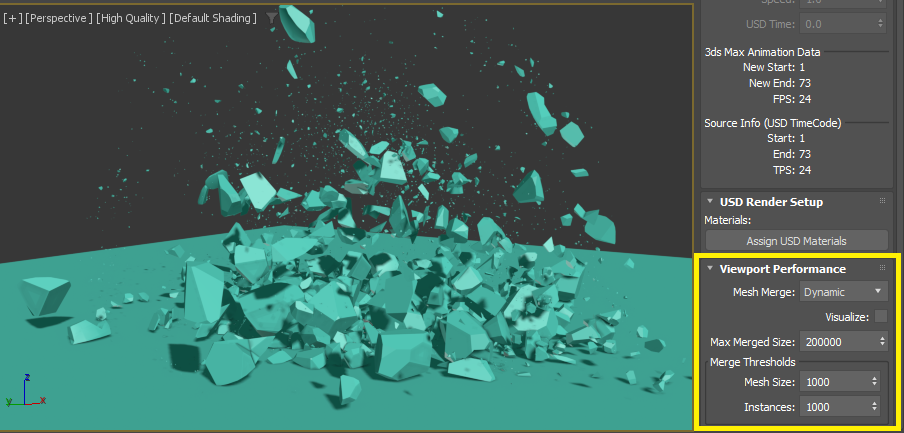


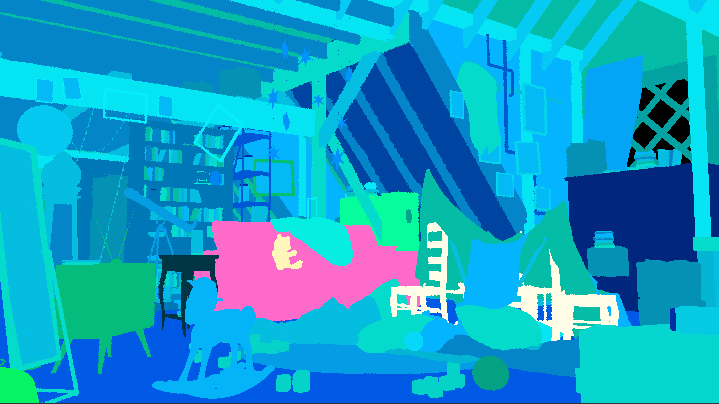
 You can also mix USD Stage with Max native object in the same scene. Again,it is just like using vrscene or Arnold Procedurals. In the following image, I added a VRayLight and Teapot and rendered it with Pixar’s Kitchen USD file. You can see the GI, shadow and reflection between 3dsMax teapot and USD prims intersect each other seamlessly.
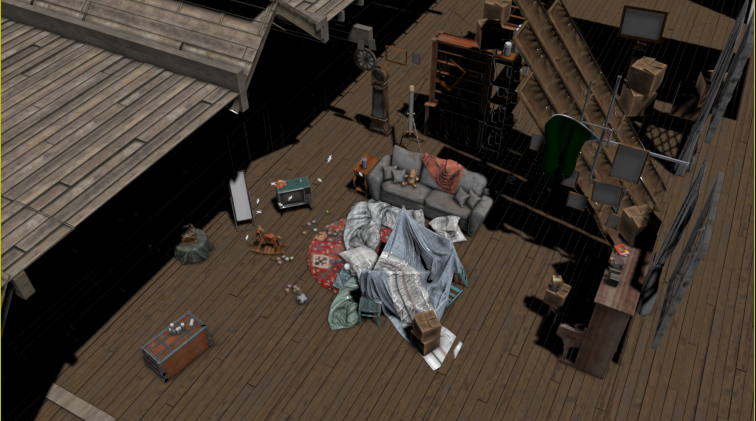


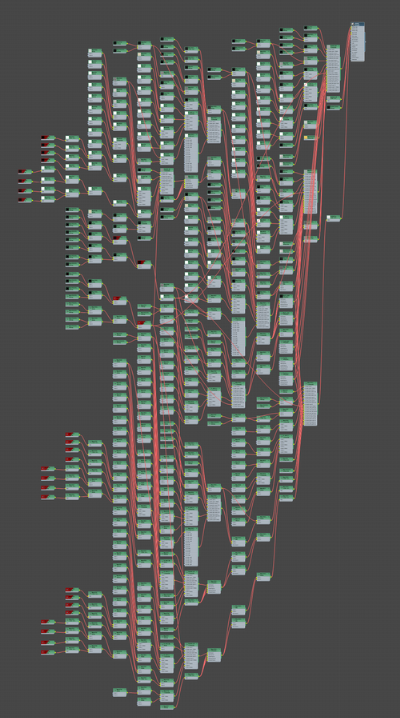 Now imagine you have a checker map in the middle of somewhere here. Having a different value or missing a parameter could produce a completely different render. To get the exact same render result, you must have every single node in the image for VRay and Arnold, and all of the maps must calculates value exactly in the same way. That sounds very impossible.

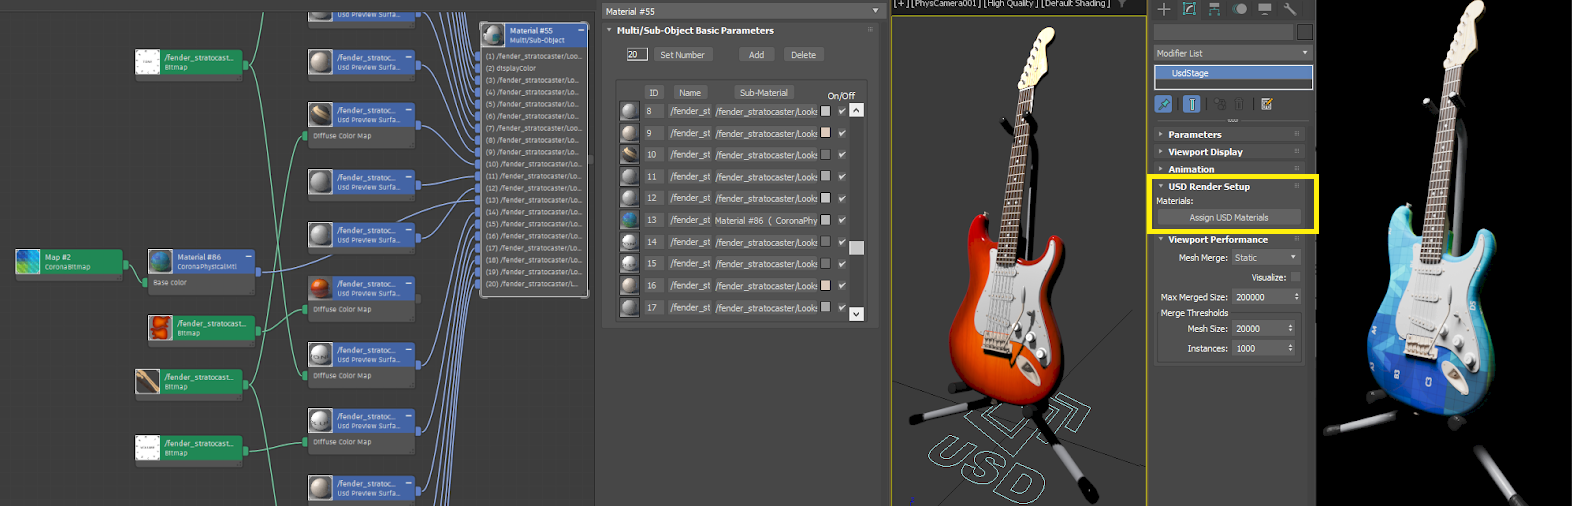

 As a container which support animated cache, USD Stage also has controls for animation playback. The options are similar with Alembic playback options. But, USD has my favorite new option, Custom Start & Speed.
 USD is a scene assembler, so we gonna have some data to assemble, right? USD actually can read some existing file formats such as Alembic and Obj. But, even Alembic is not enough to store all the data that USD need to store. Also, it wouldn’t be 100% efficient for new framework to use legacy formats since they were developed before USD developed. Therefore, USD also provides a very comprehensive data exchange format.


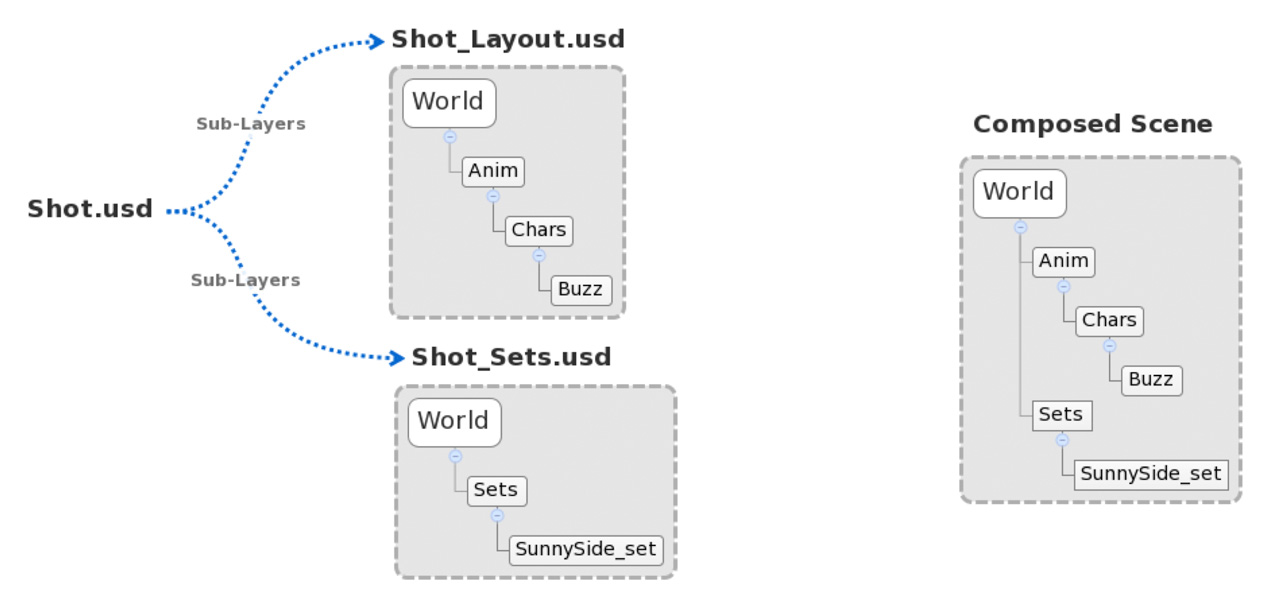
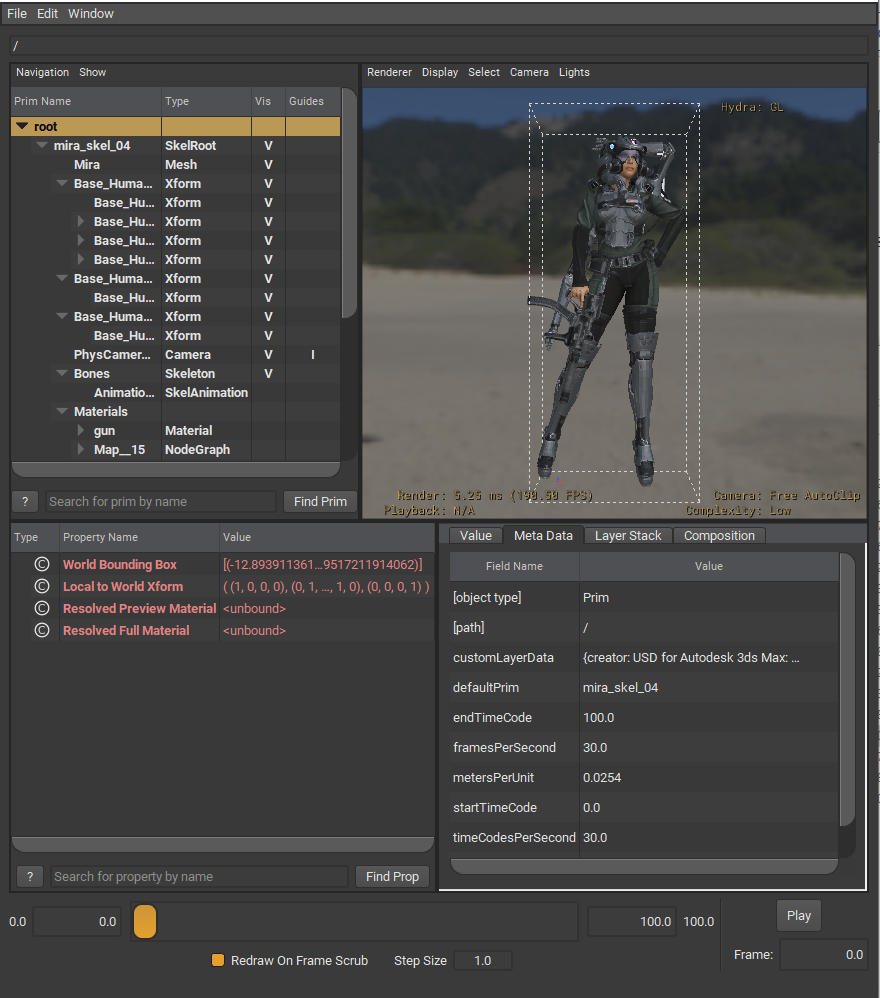
 MaterialX
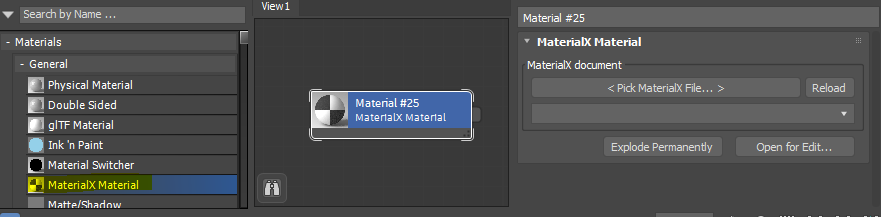
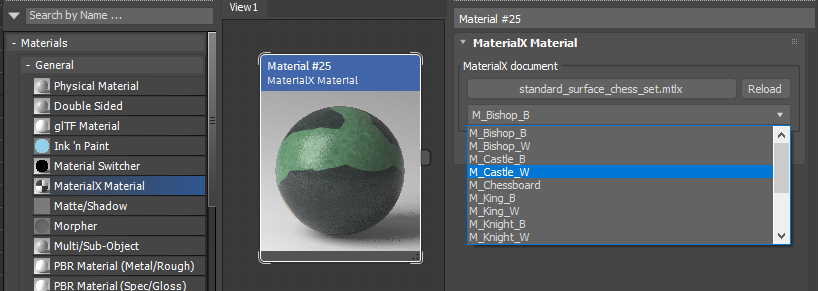
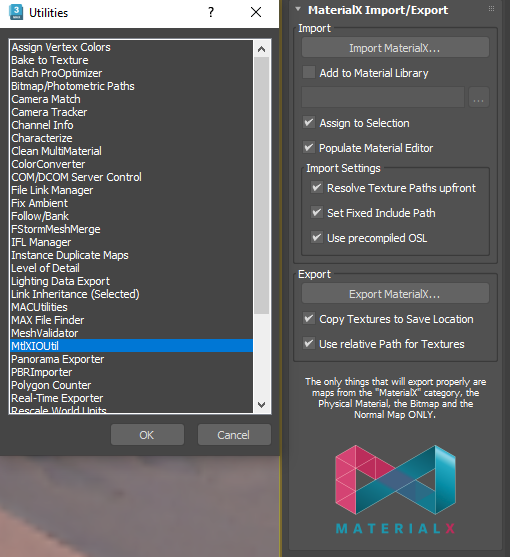
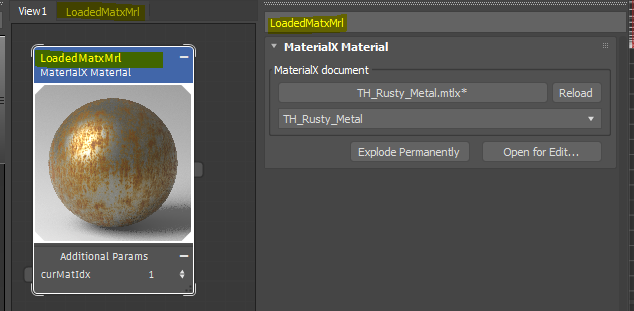
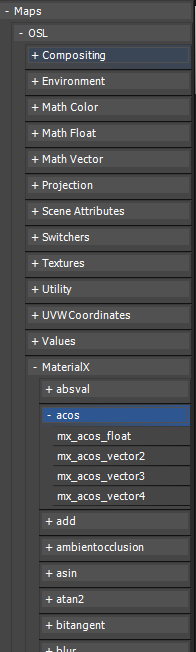
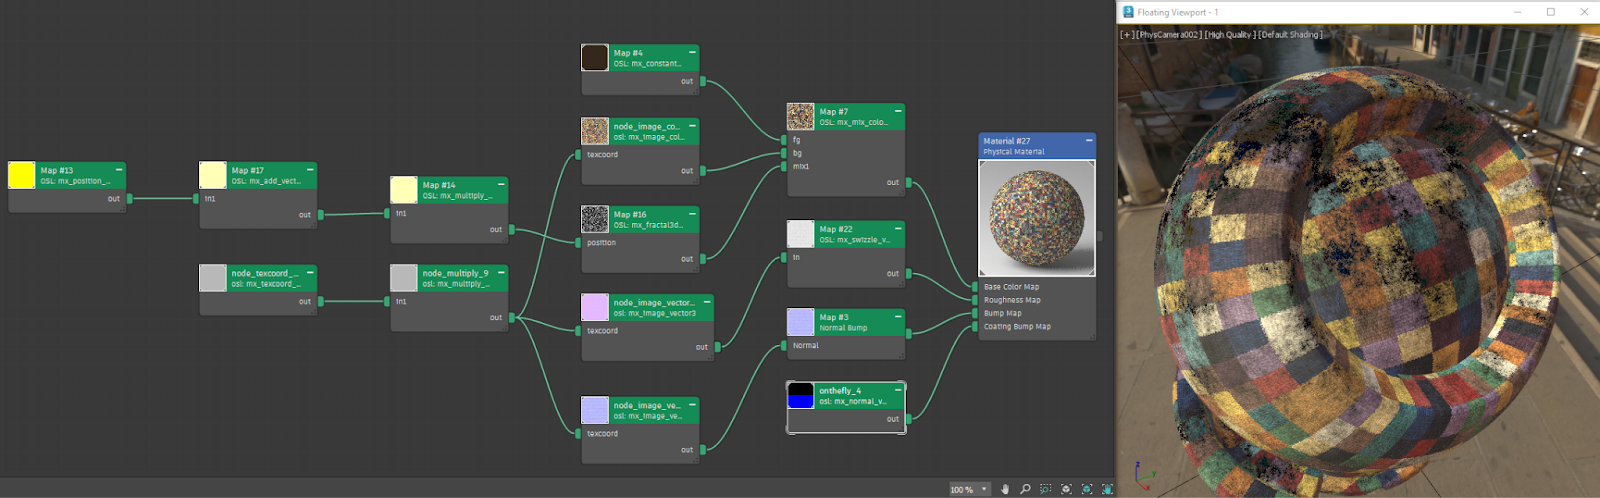
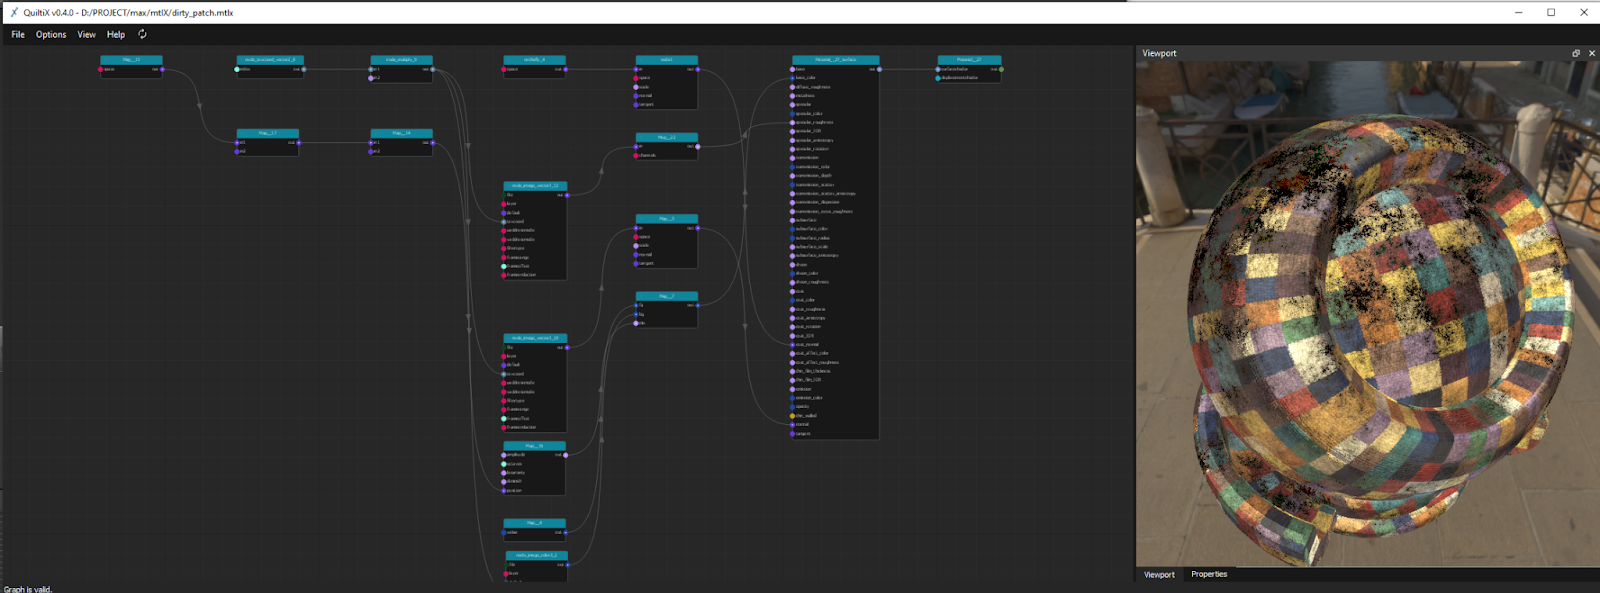


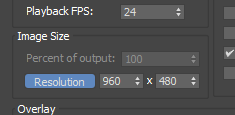
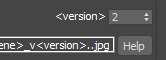


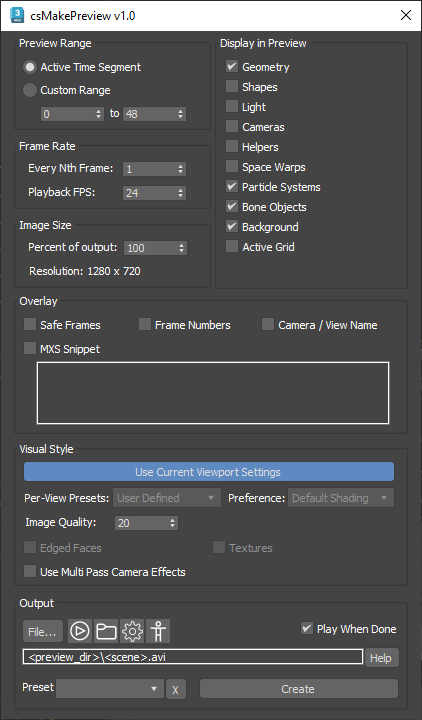

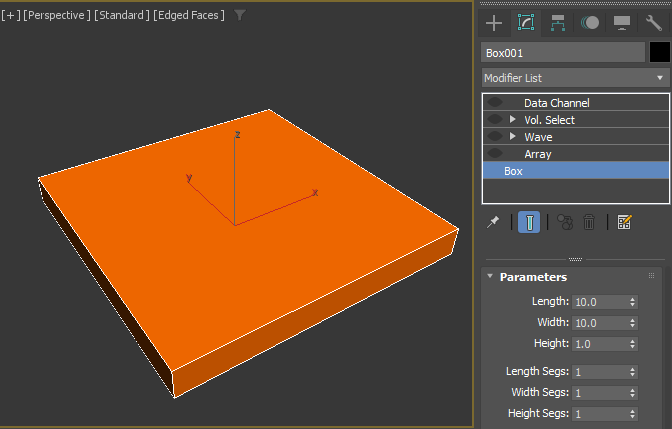
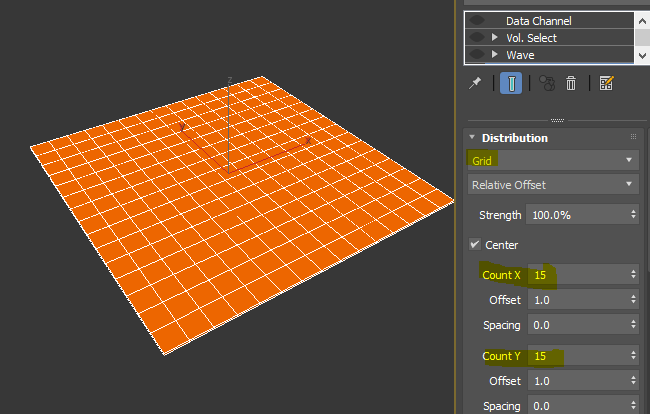

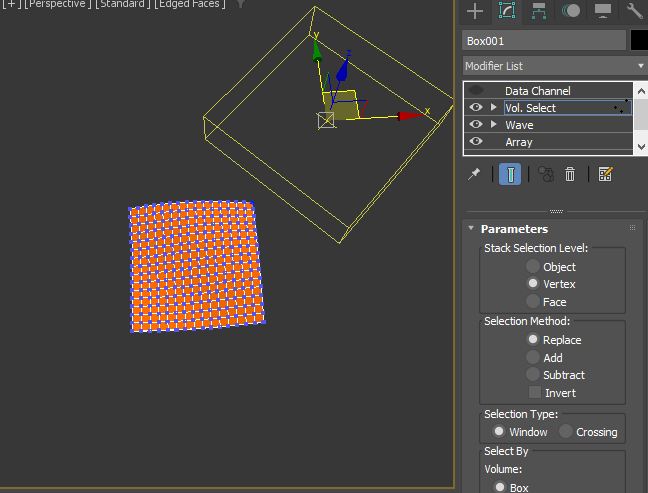
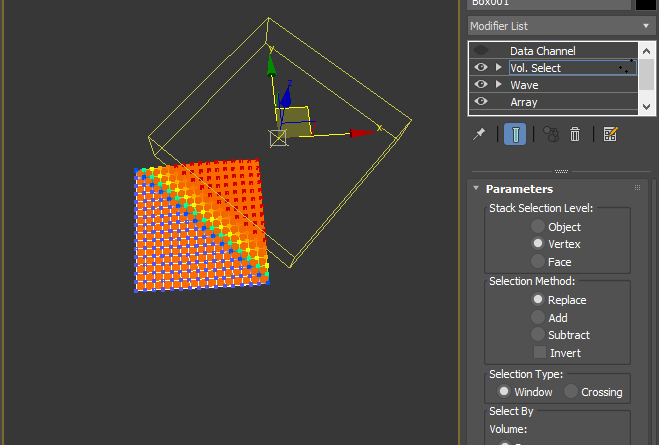
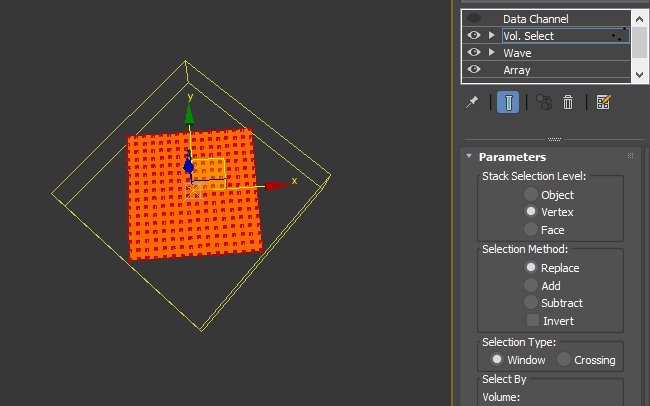


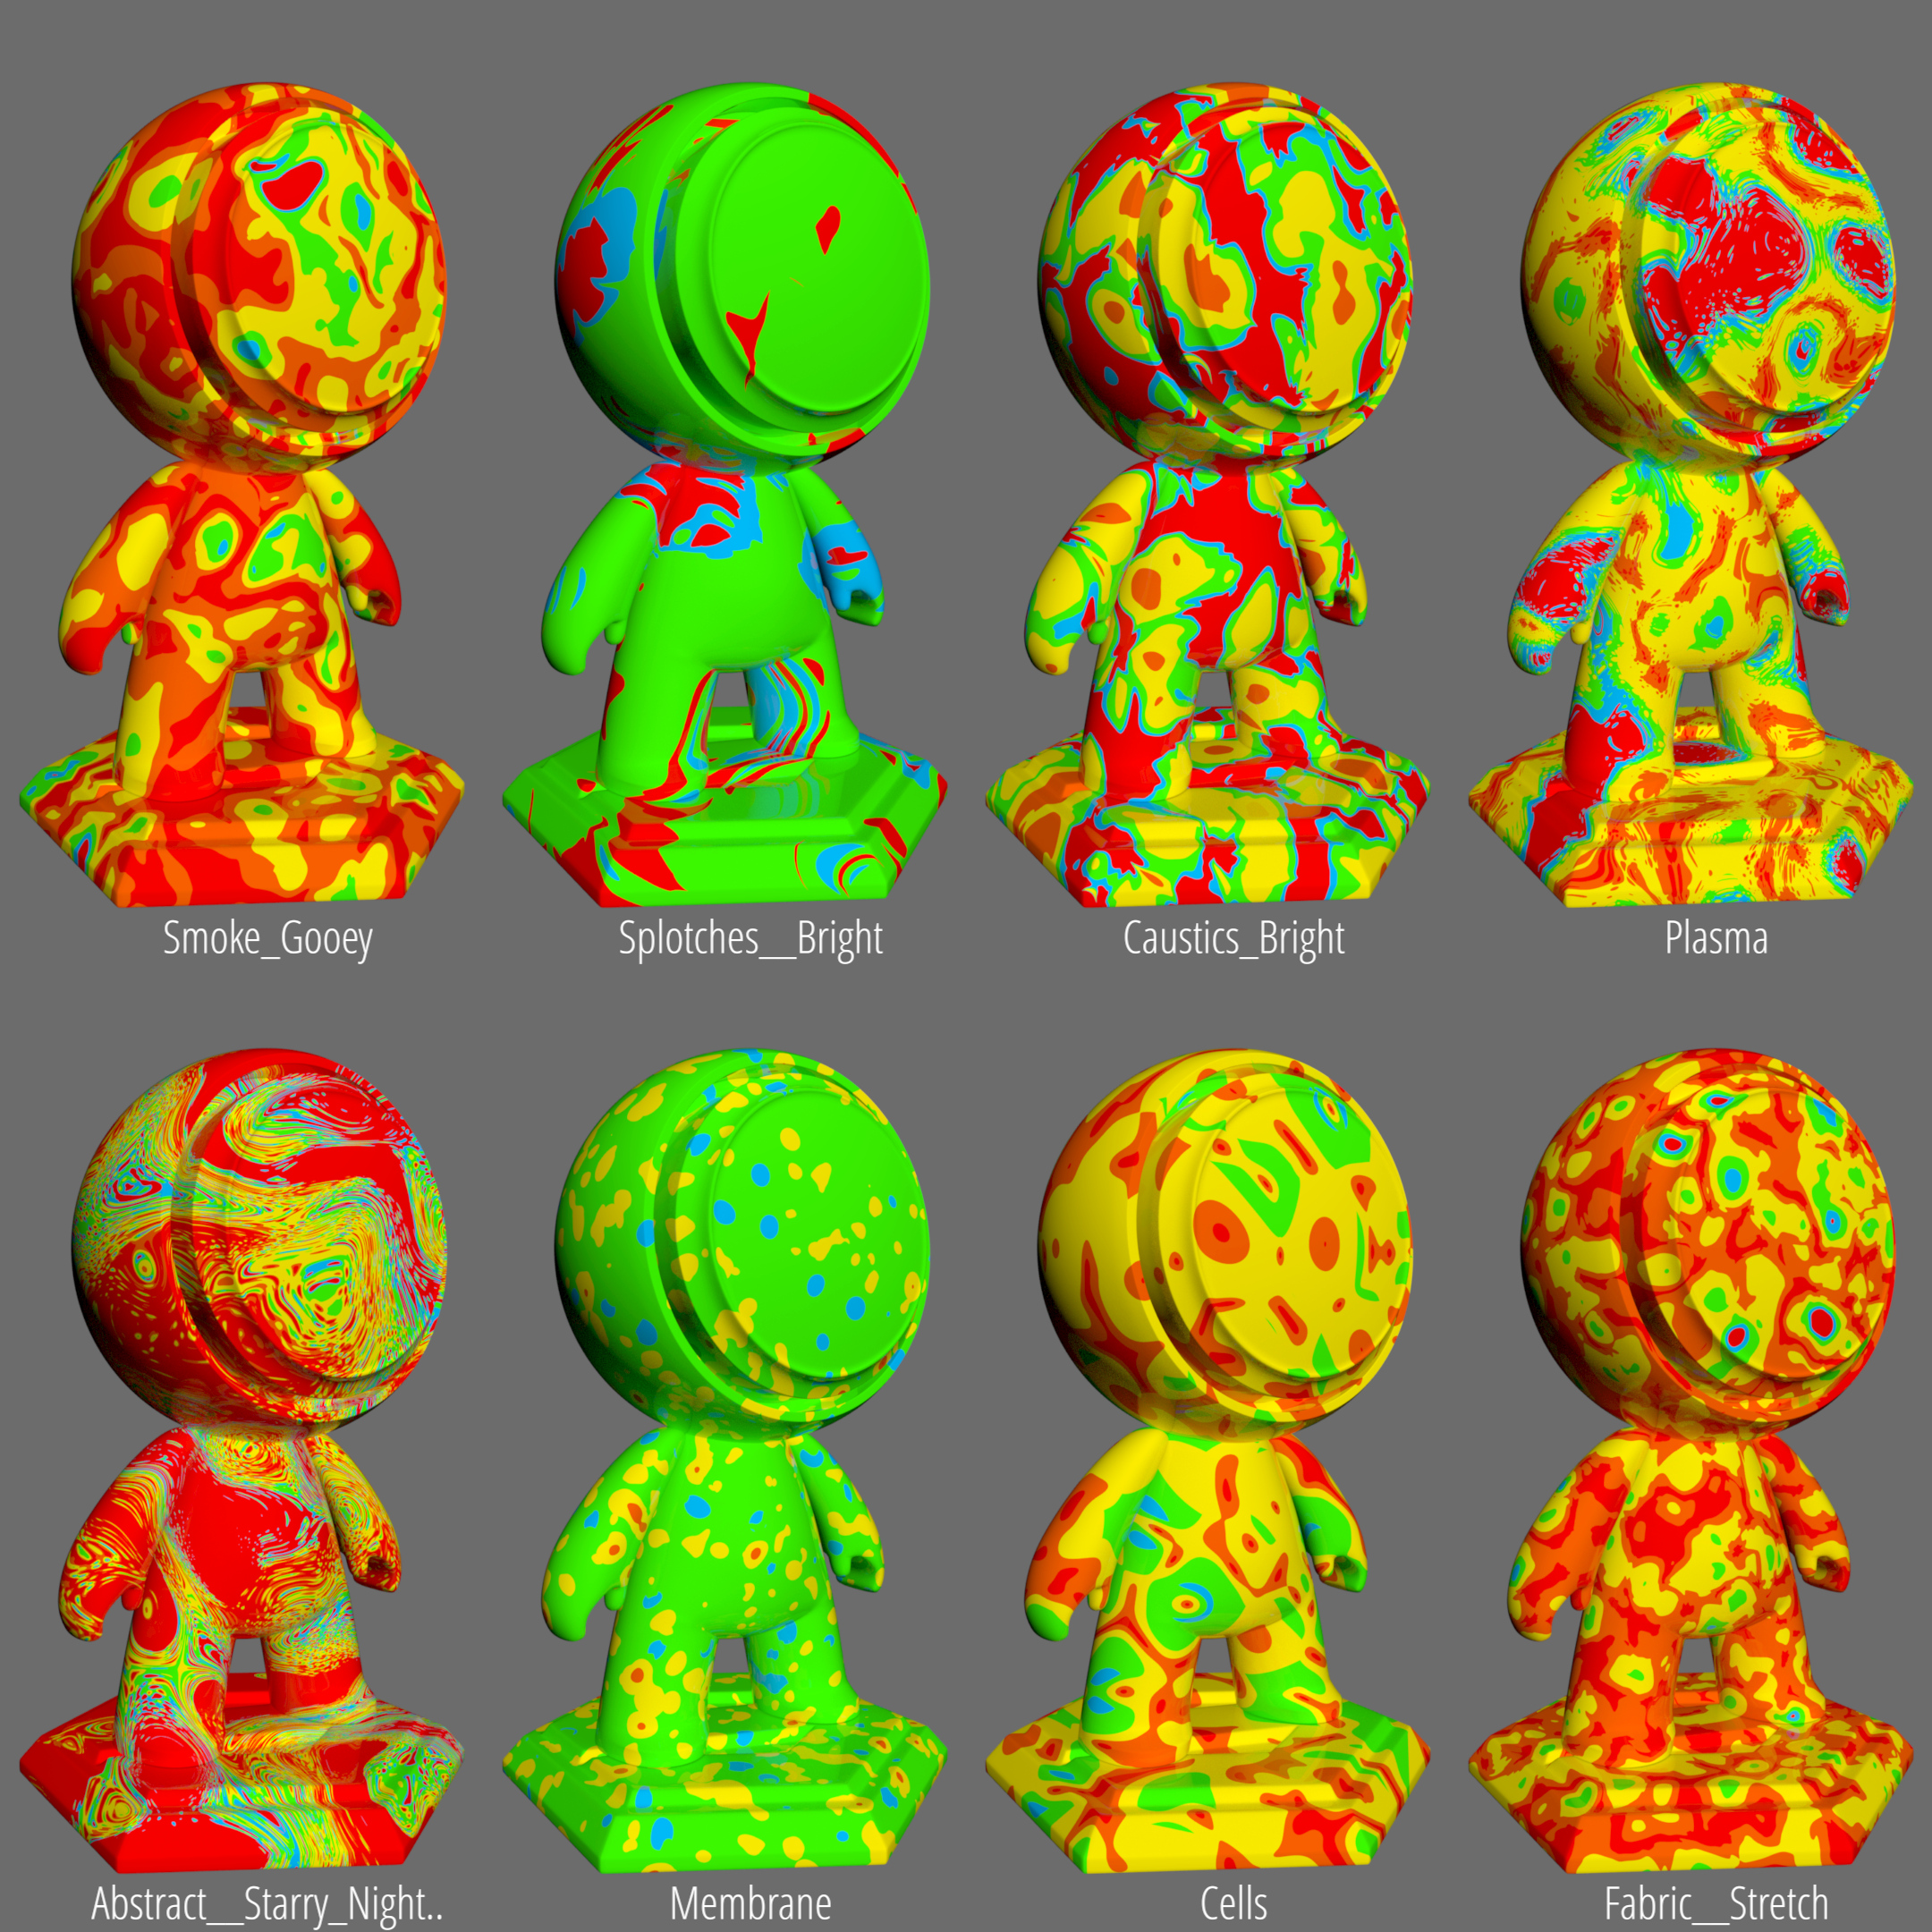


 Preprocess/Remesh
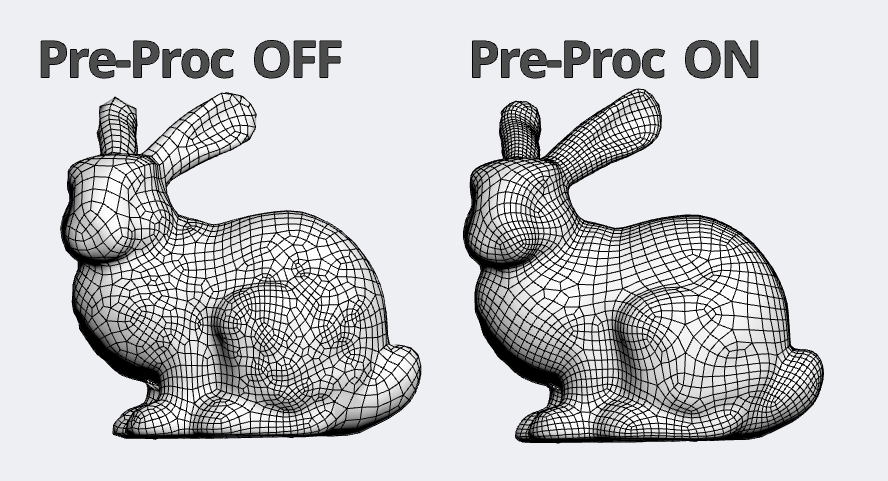

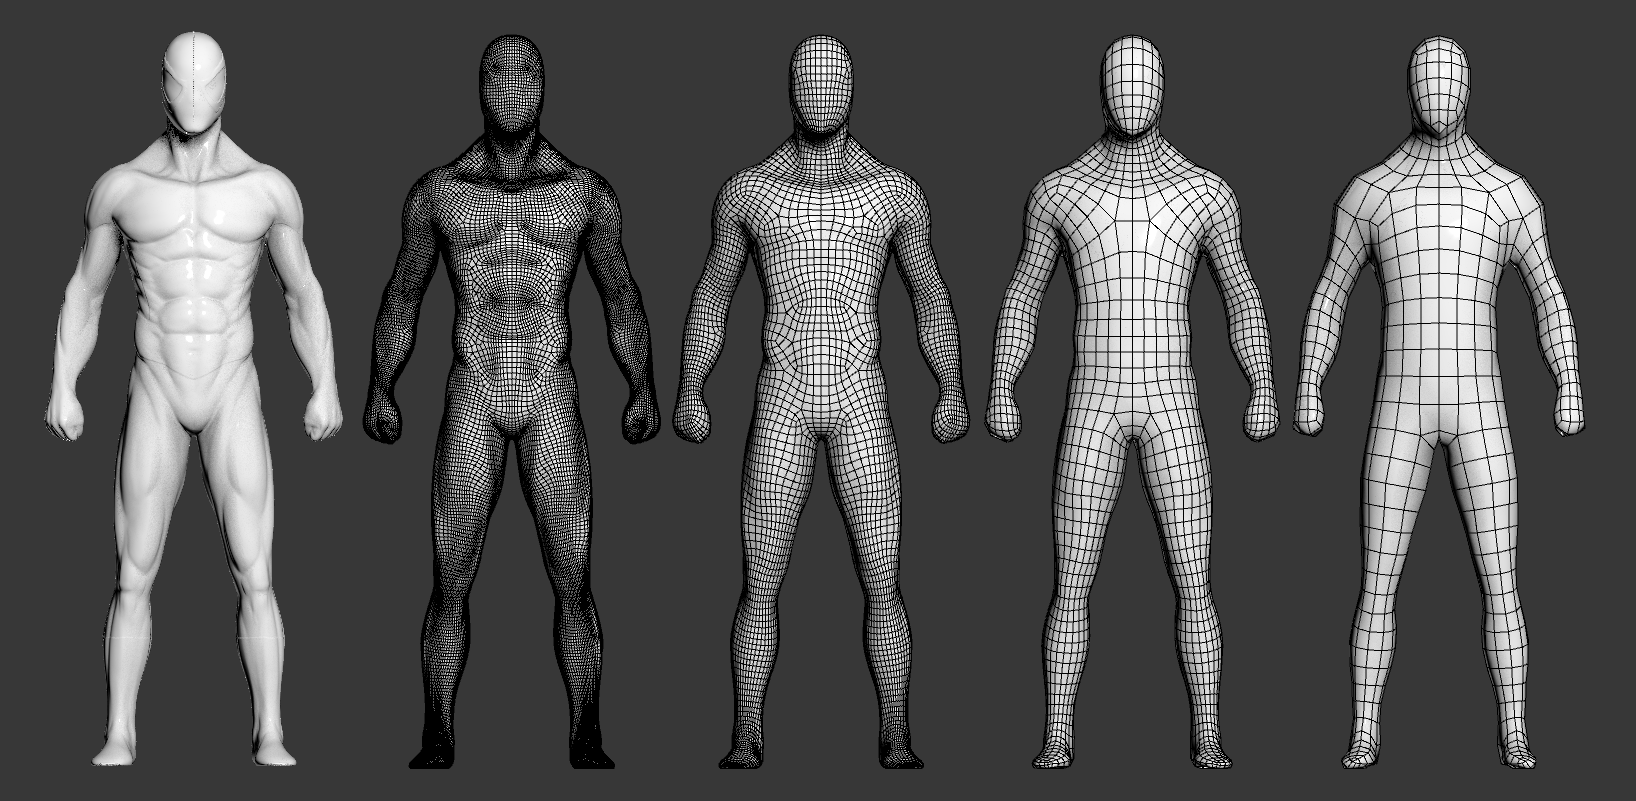


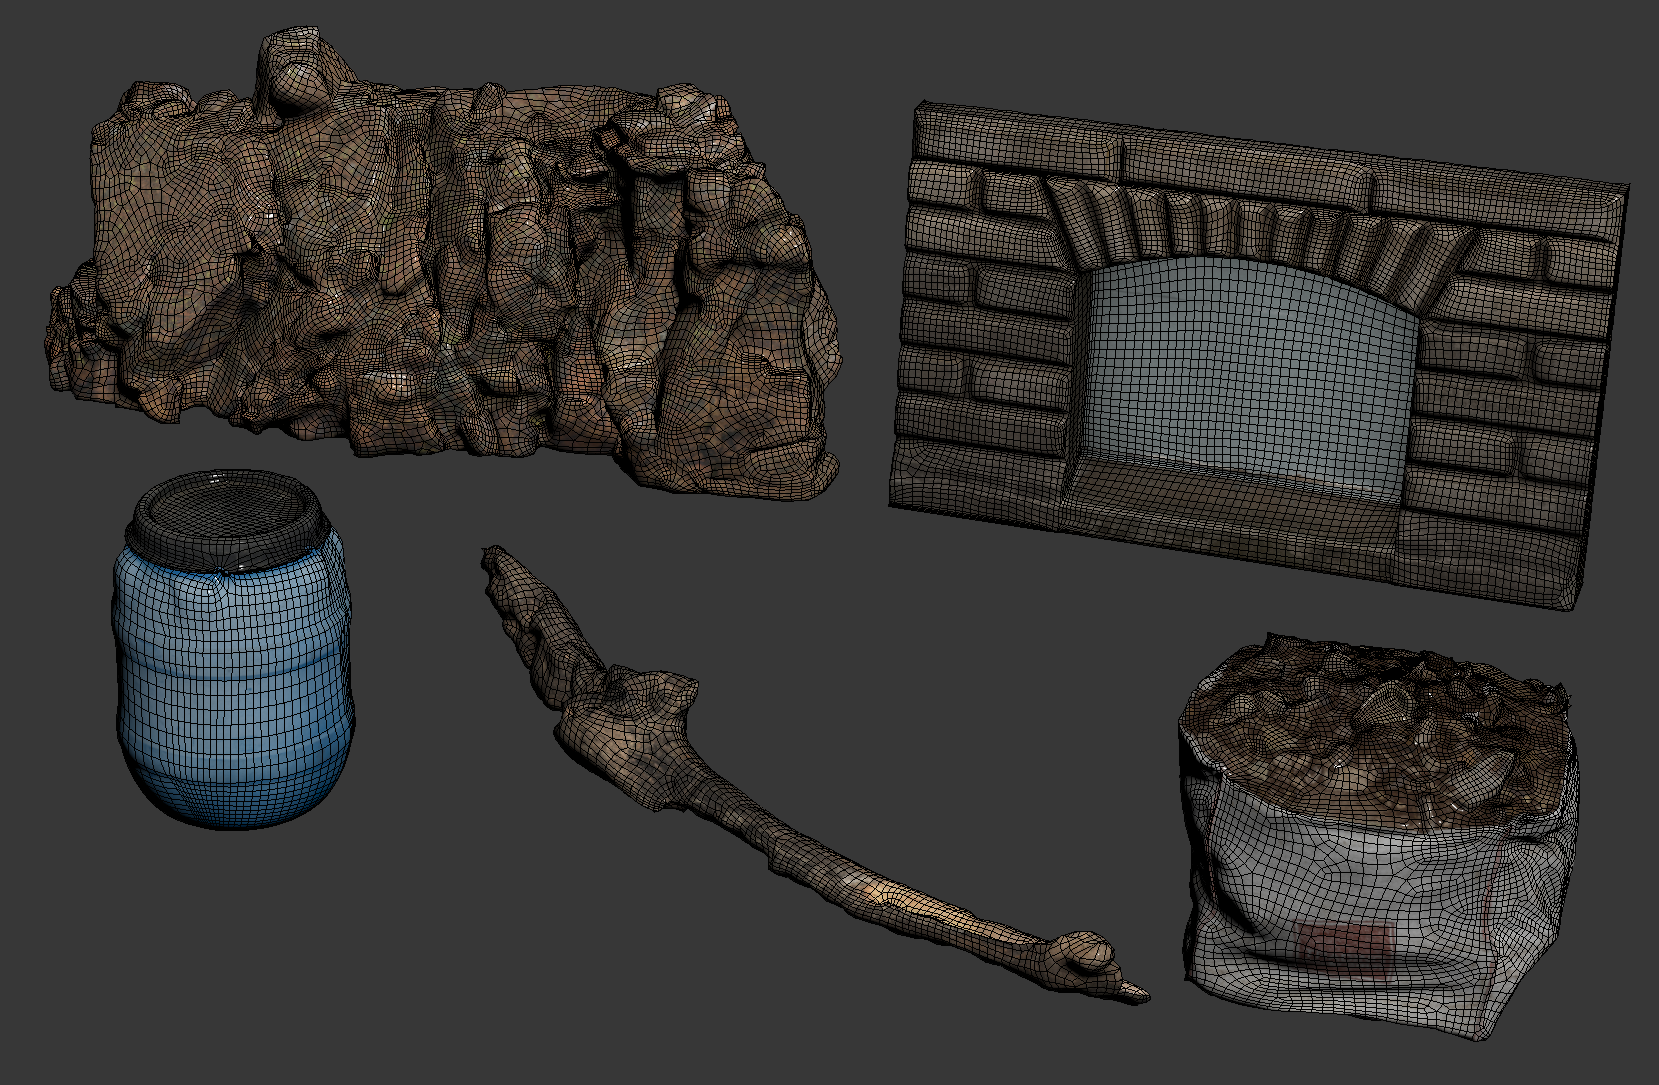
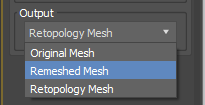 Now you can choose to output either Retopology mesh or Remeshed Mesh(Preprocessed mesh) to the stack.
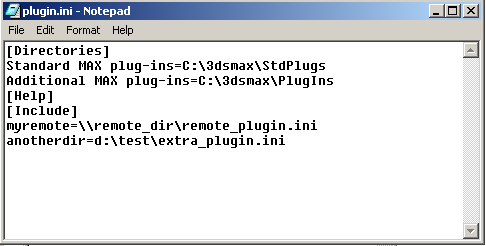


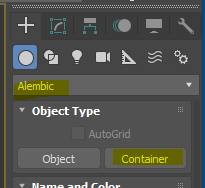

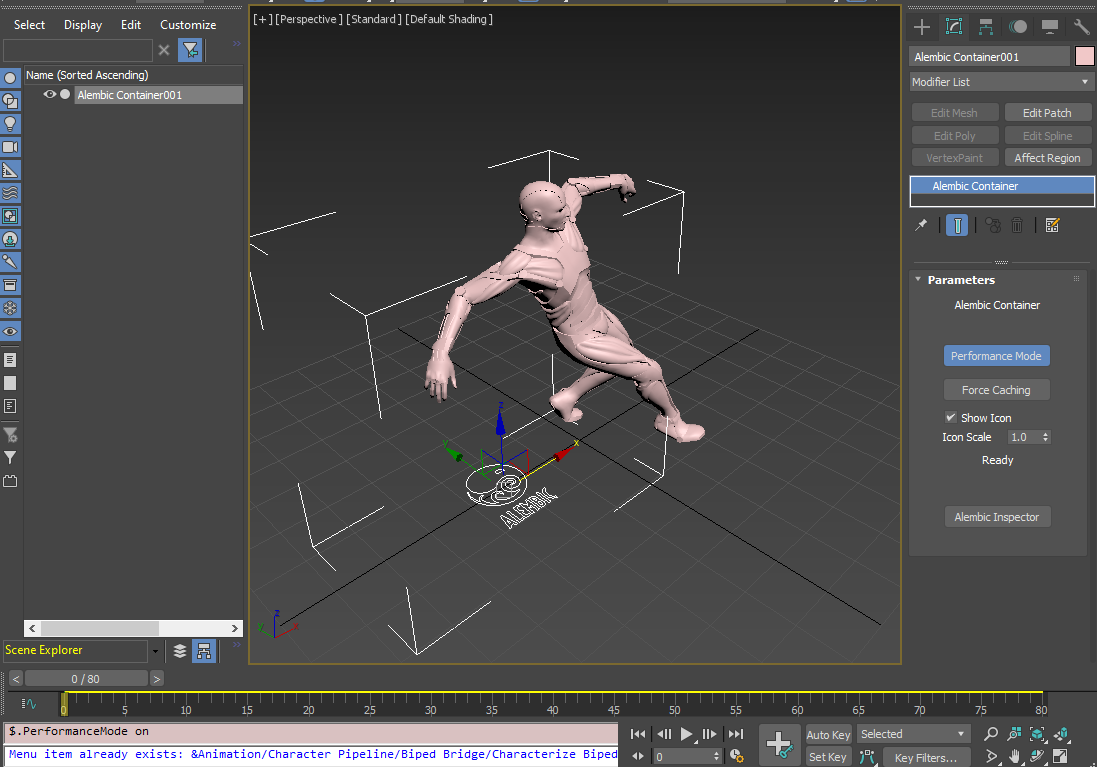
 Now if you go to any frames, that frame will be cached or play animation while turn off Real time playback to make sure for max to evaluate every frame.
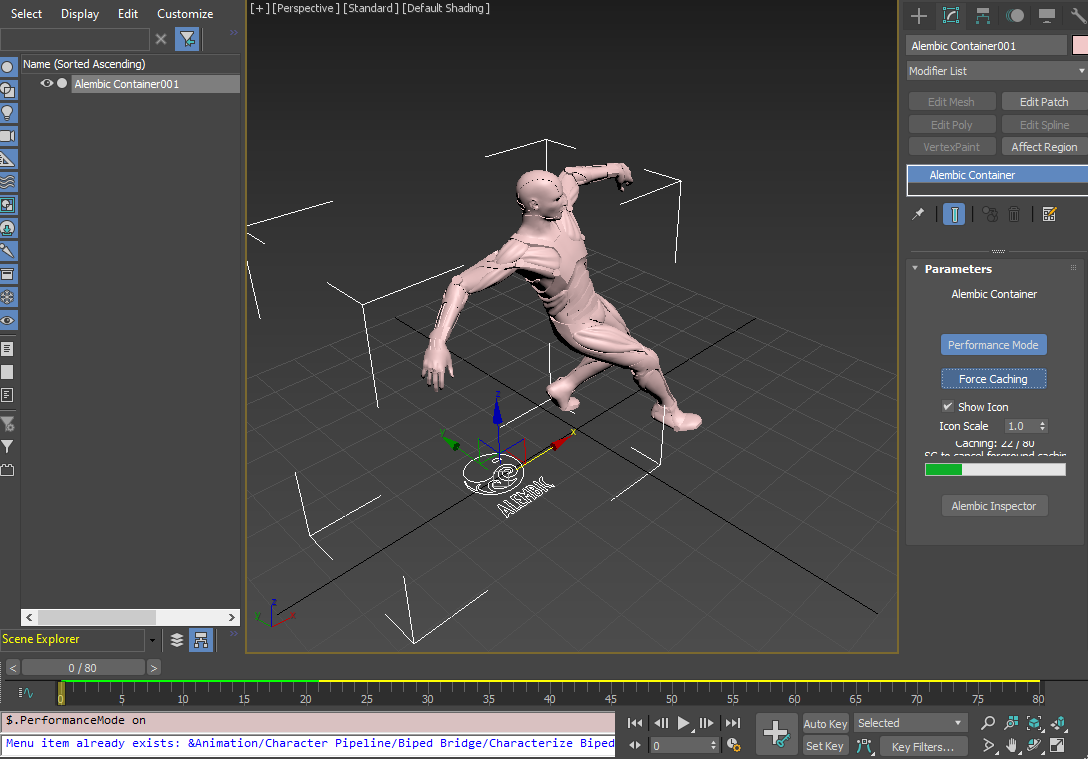
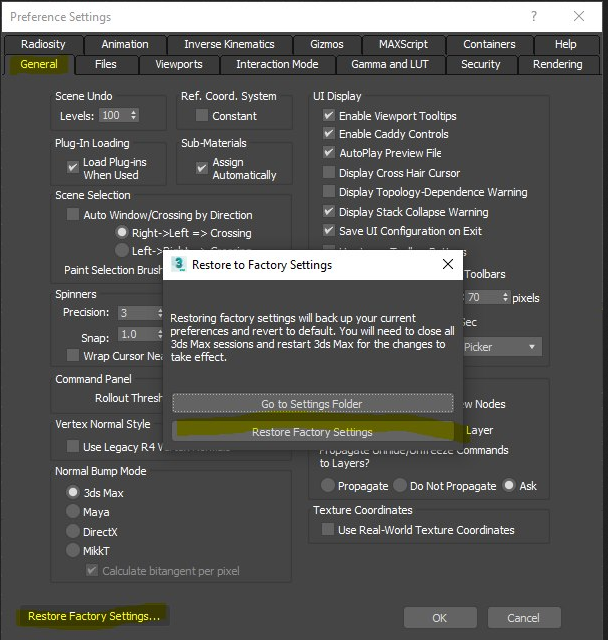

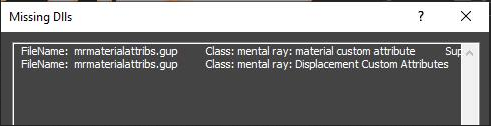
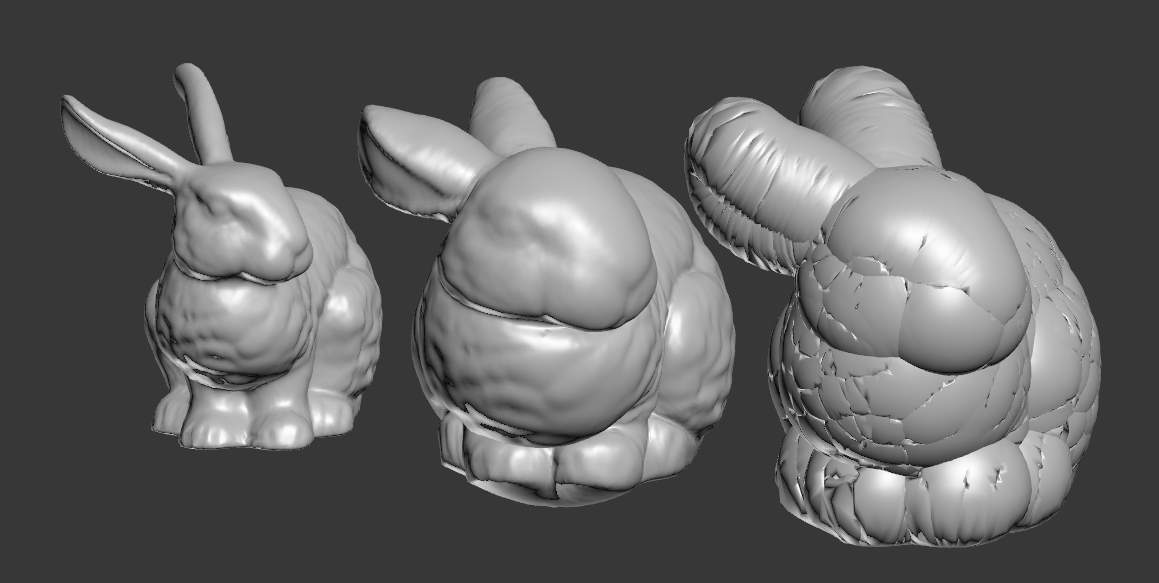
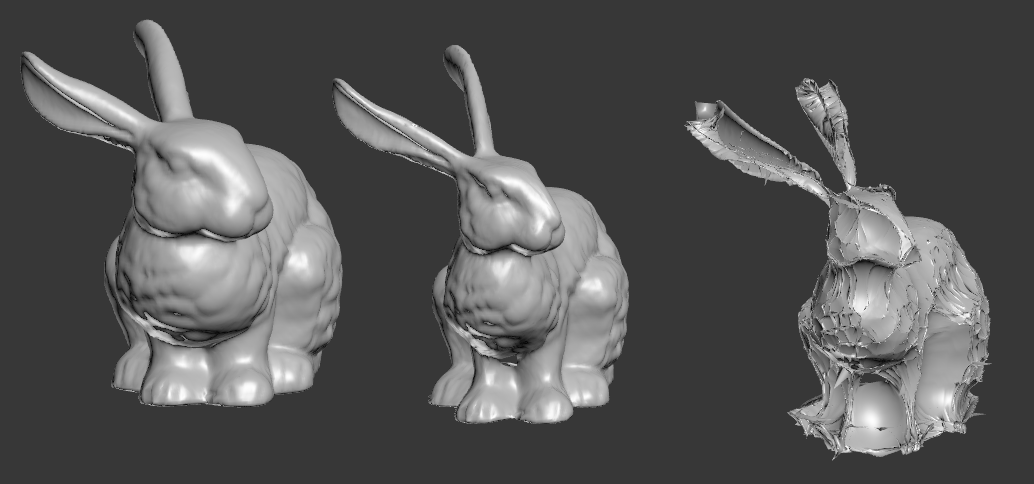
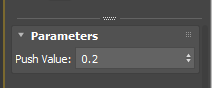 How Push modifier works is really really simple. It moves each verts along the its normal by the given amount. As you can see, Push modifier only has one parameter which is the distance the verts are moved along normals.
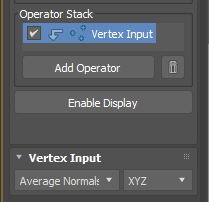
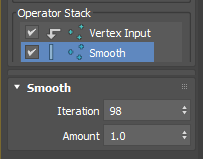
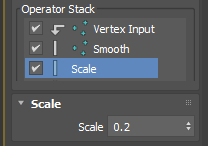
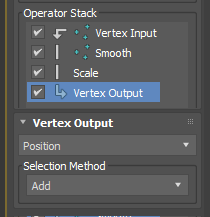
 When you use SkinWrap, your driver object need to be Mesh object. If it is not, it will convert to poly under the hood. The mesh <> poly conversion price is very high.When I tested this originally in 3dsMax 2014. The test result was 9.75fps vs 17.89fps. I retested other file in 2021.3. The difference was 10.8fps vs 13.1 fps. So, I guess there has been some progress. It is still taxing 30%.
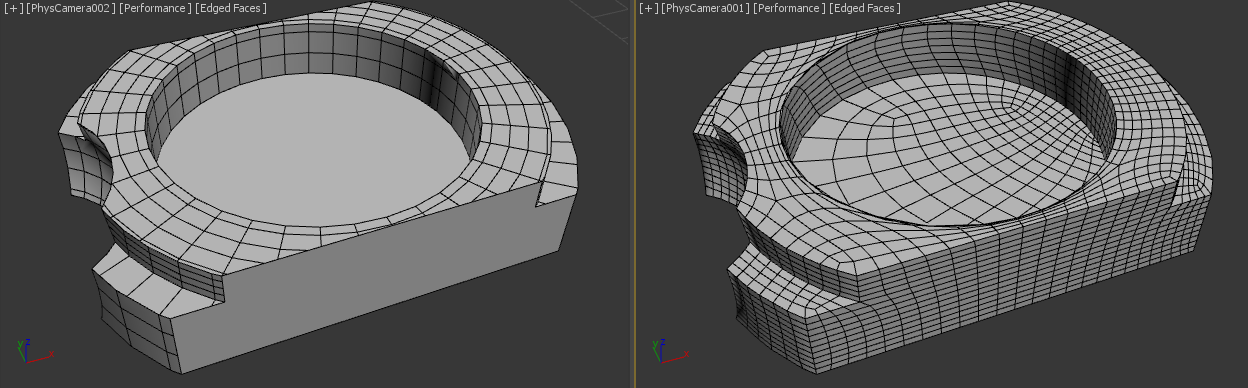
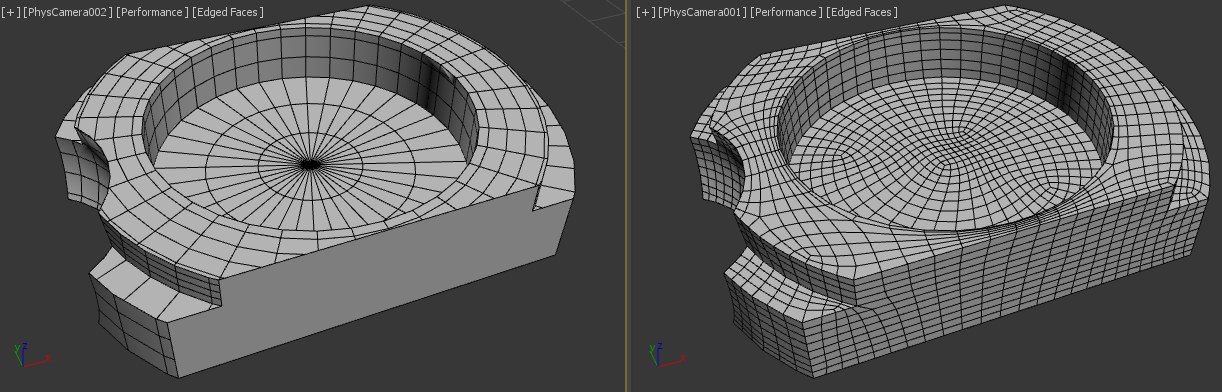


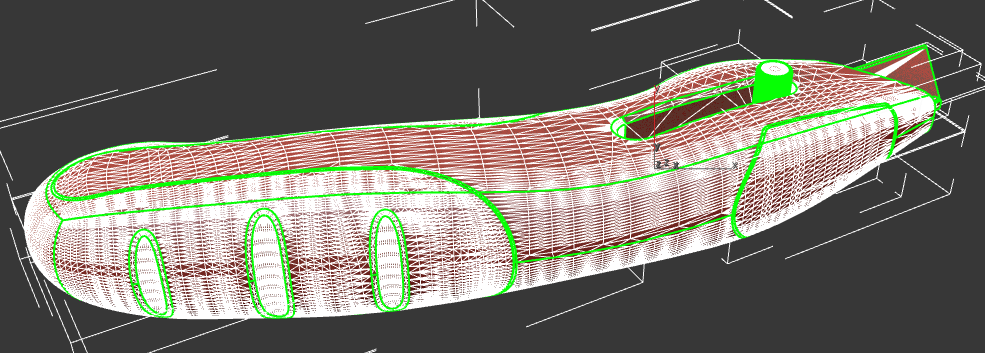

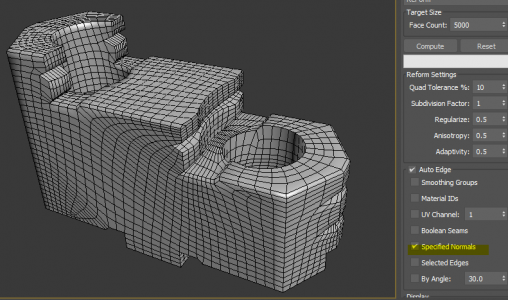

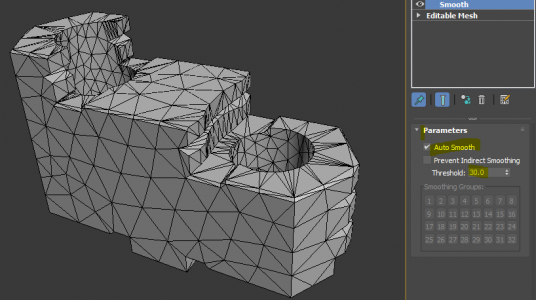
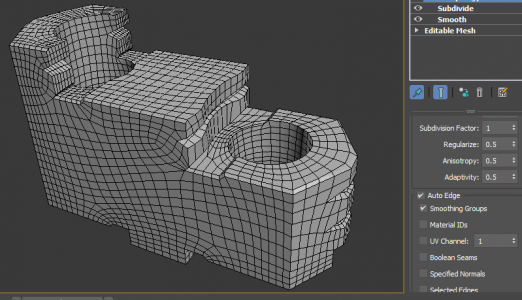
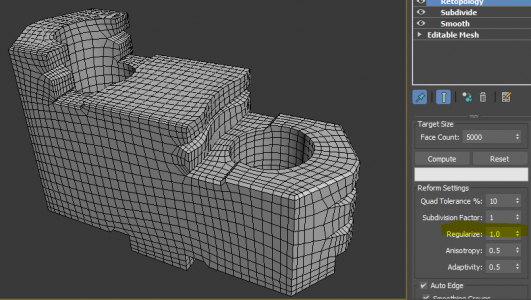
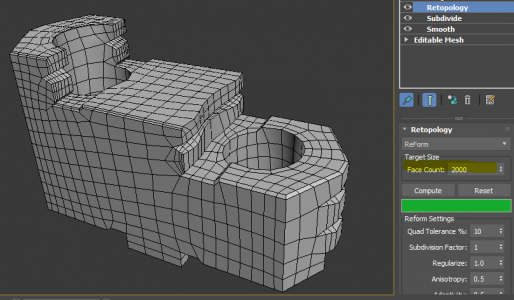
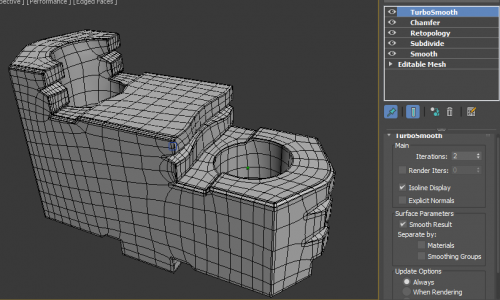

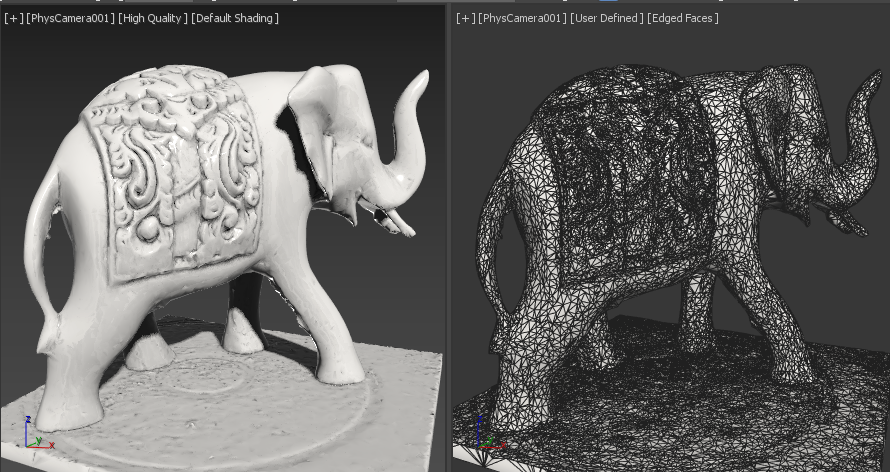
 Then, I had a hiccup. This big lowres place at the bottom was throwing a wrench. I could subdivide this. But, I simply delete it. You don’t see anyway. Also I can recap later.
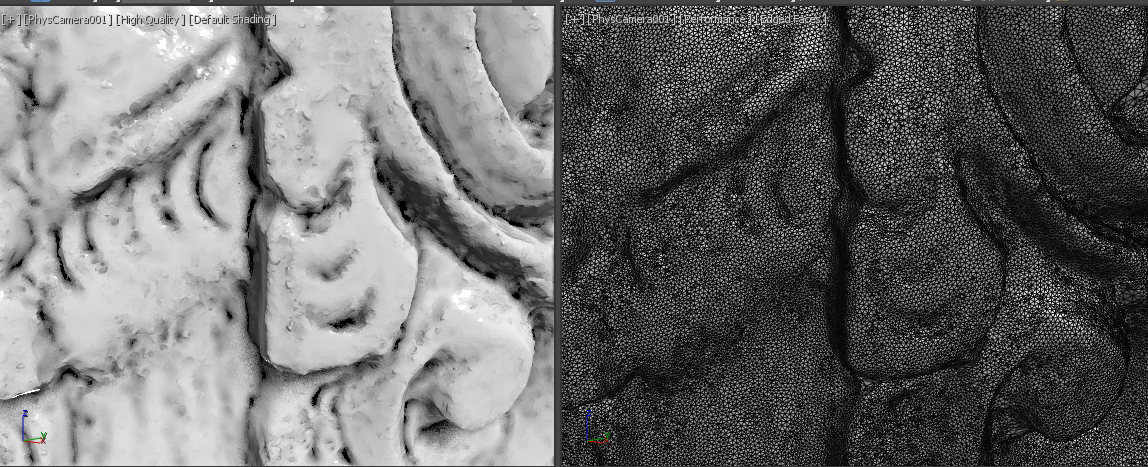
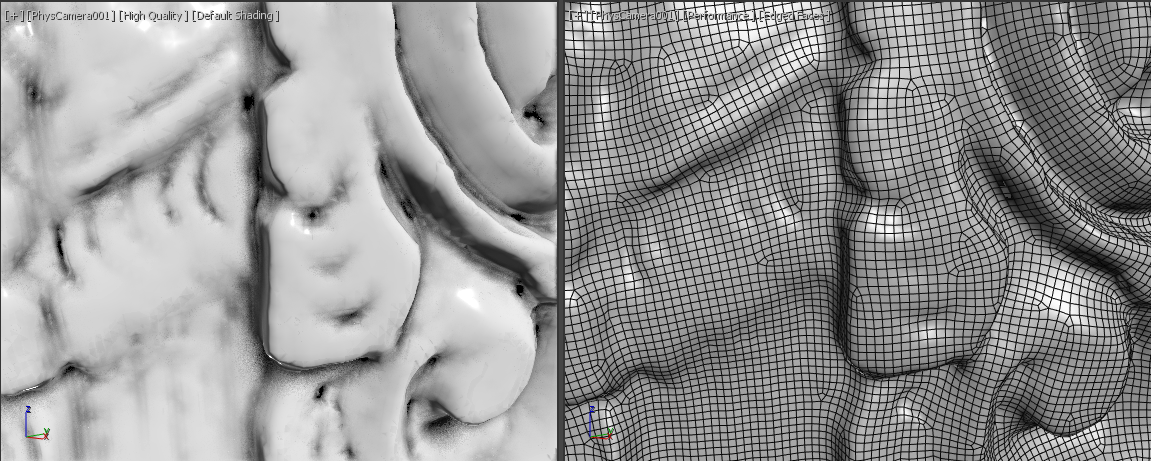
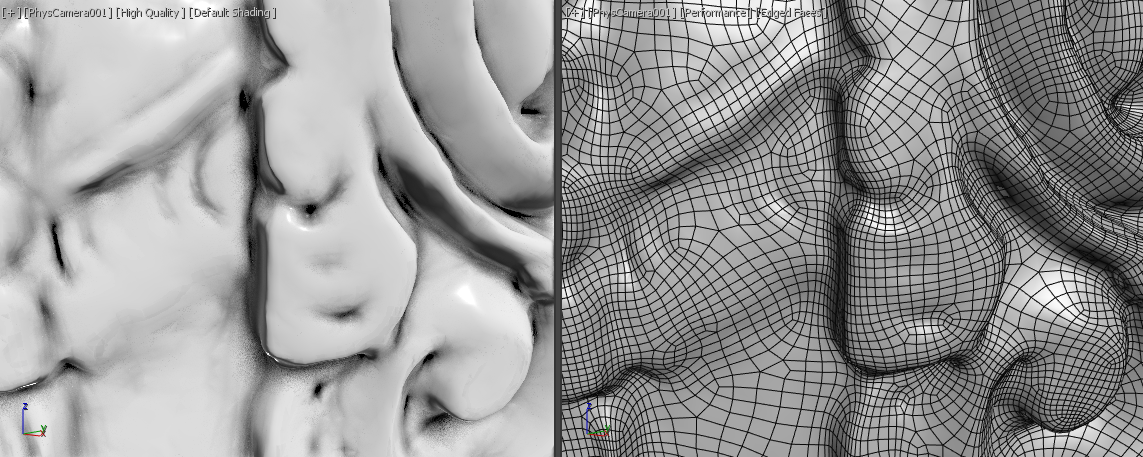
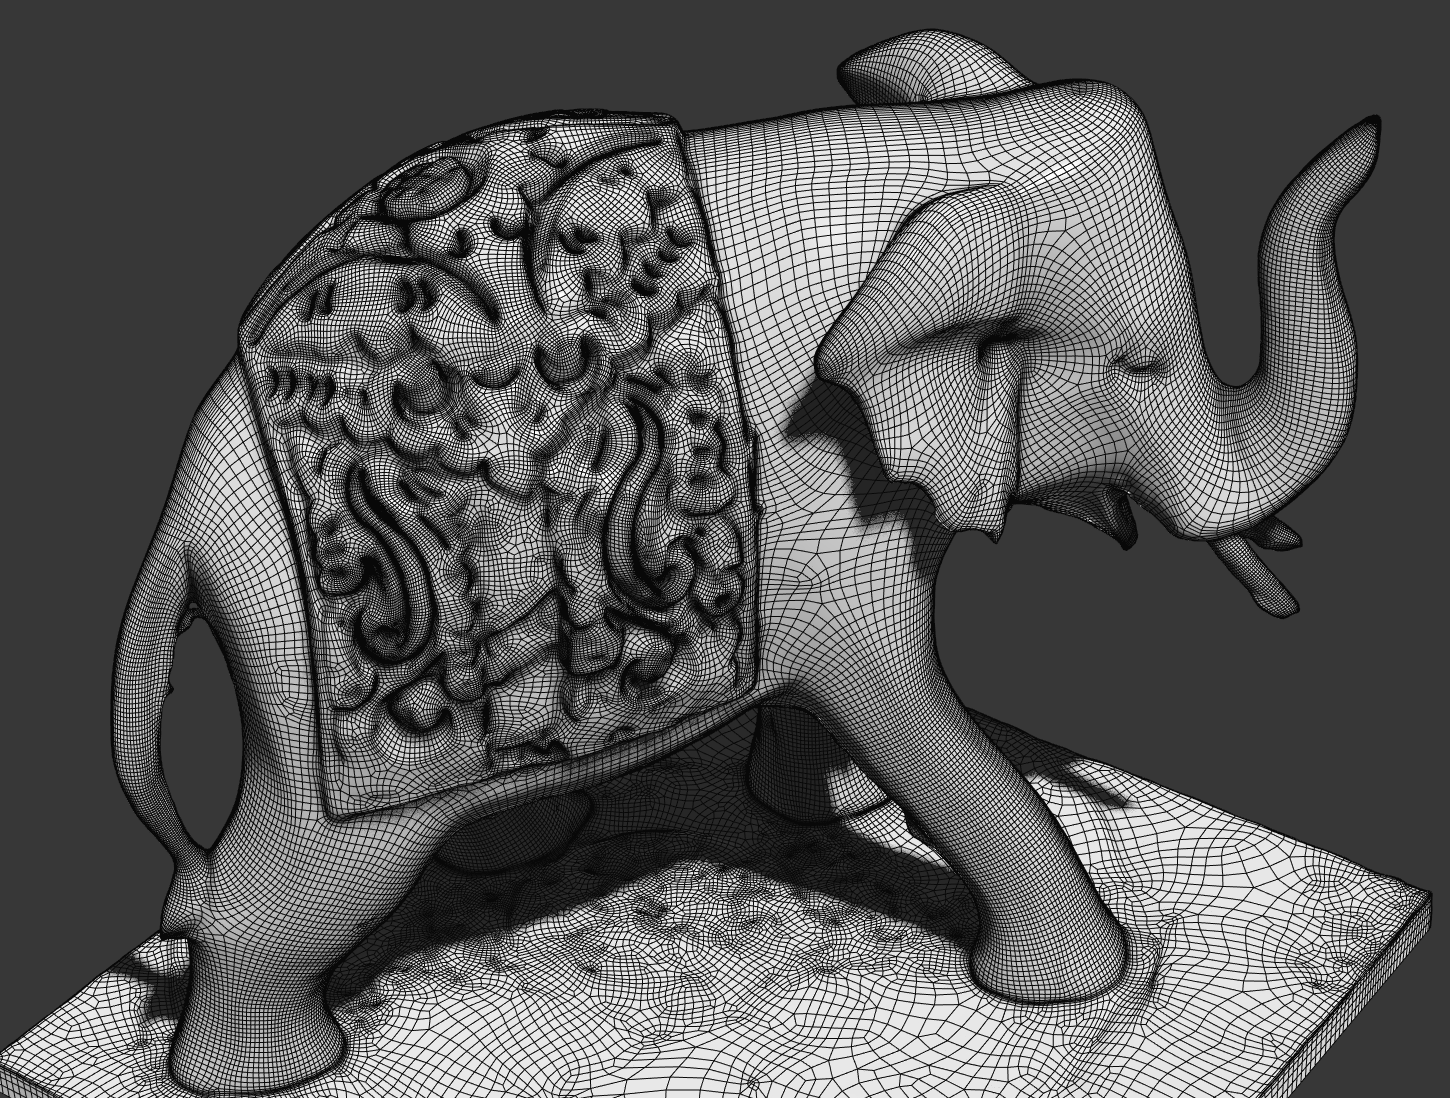
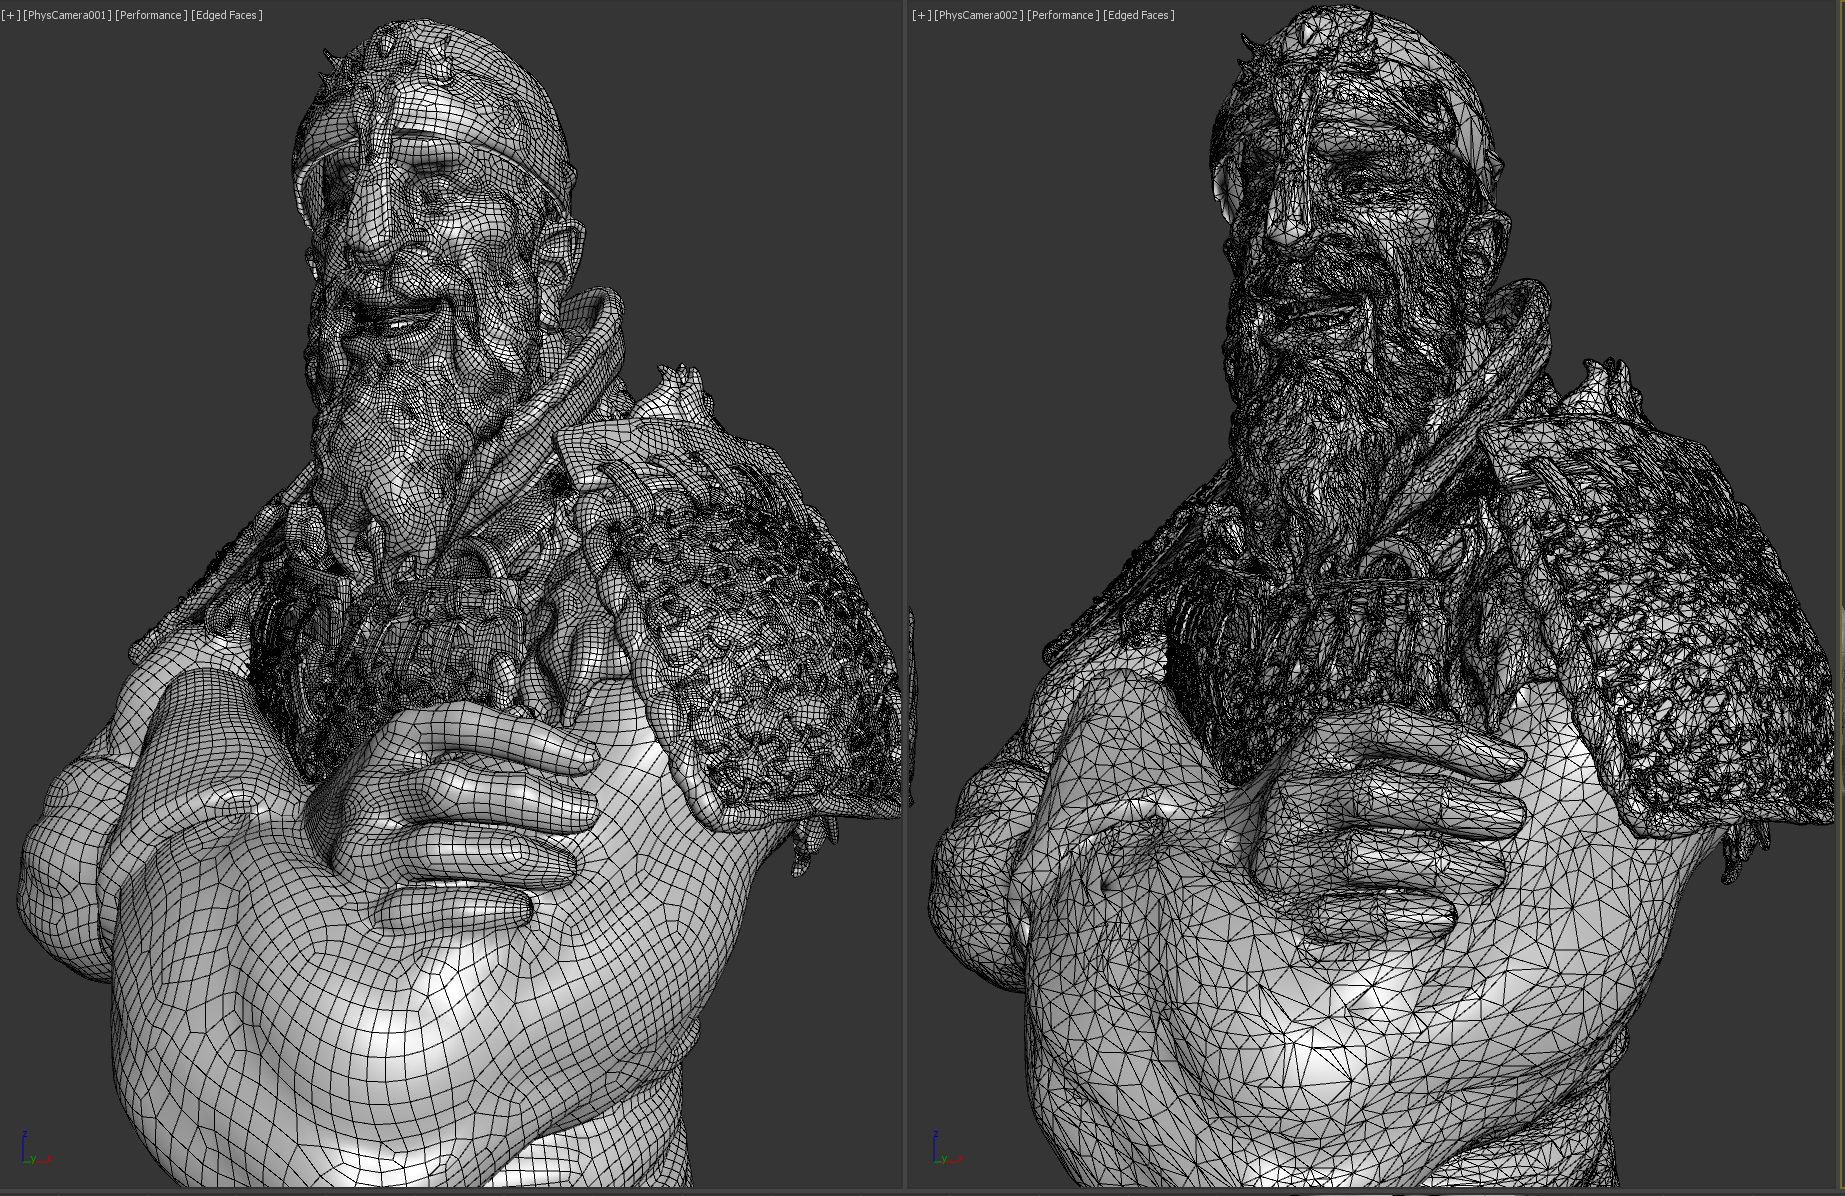


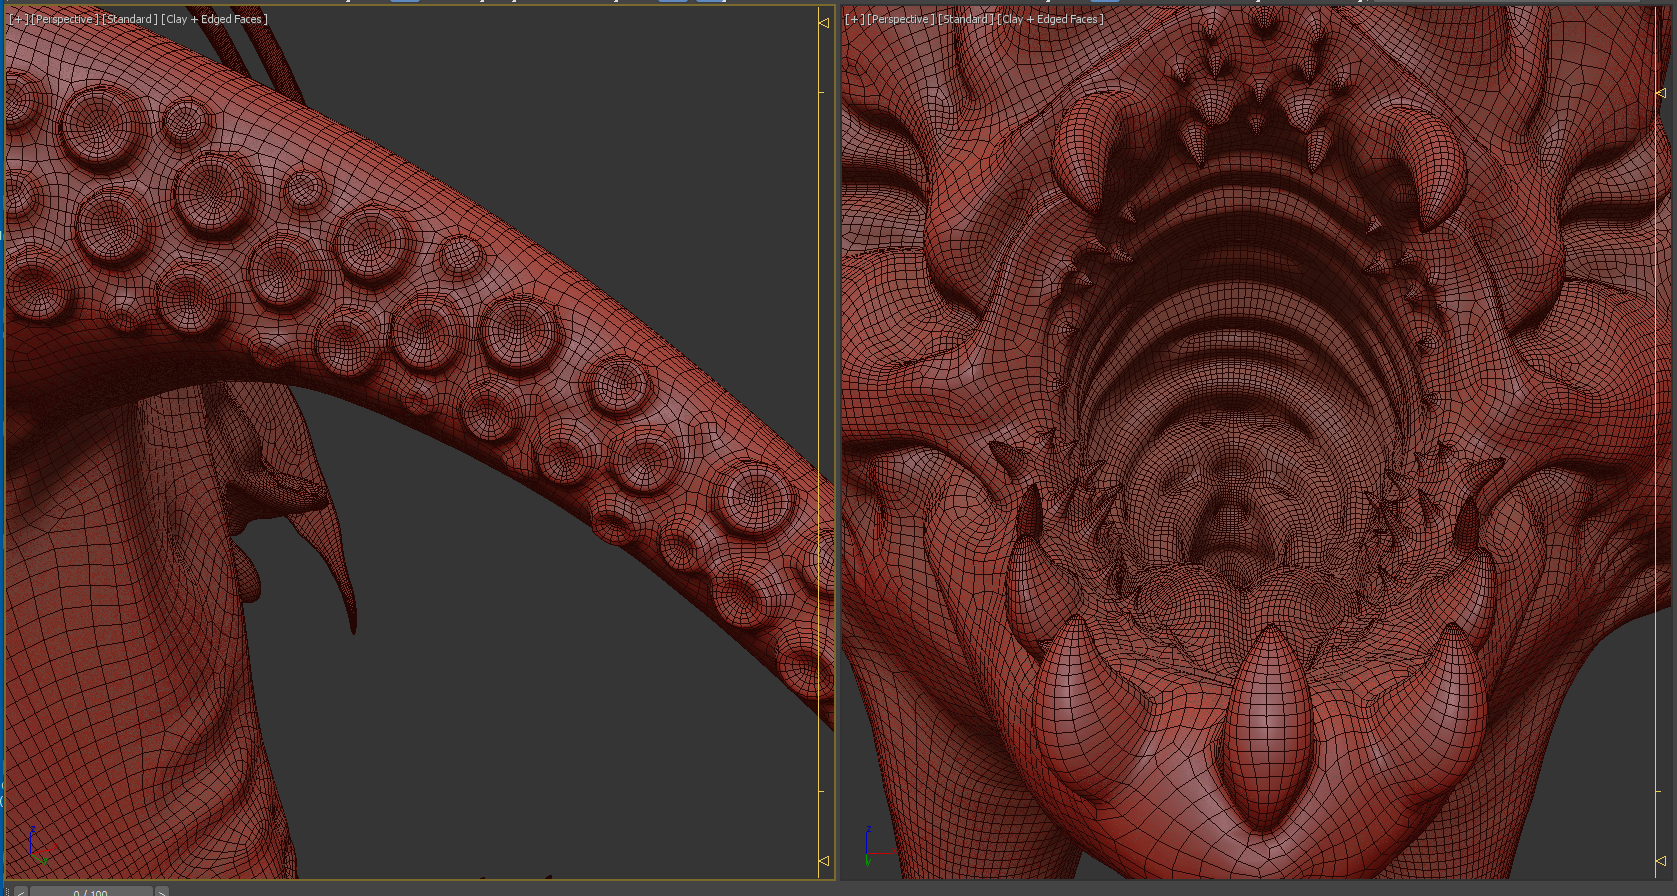


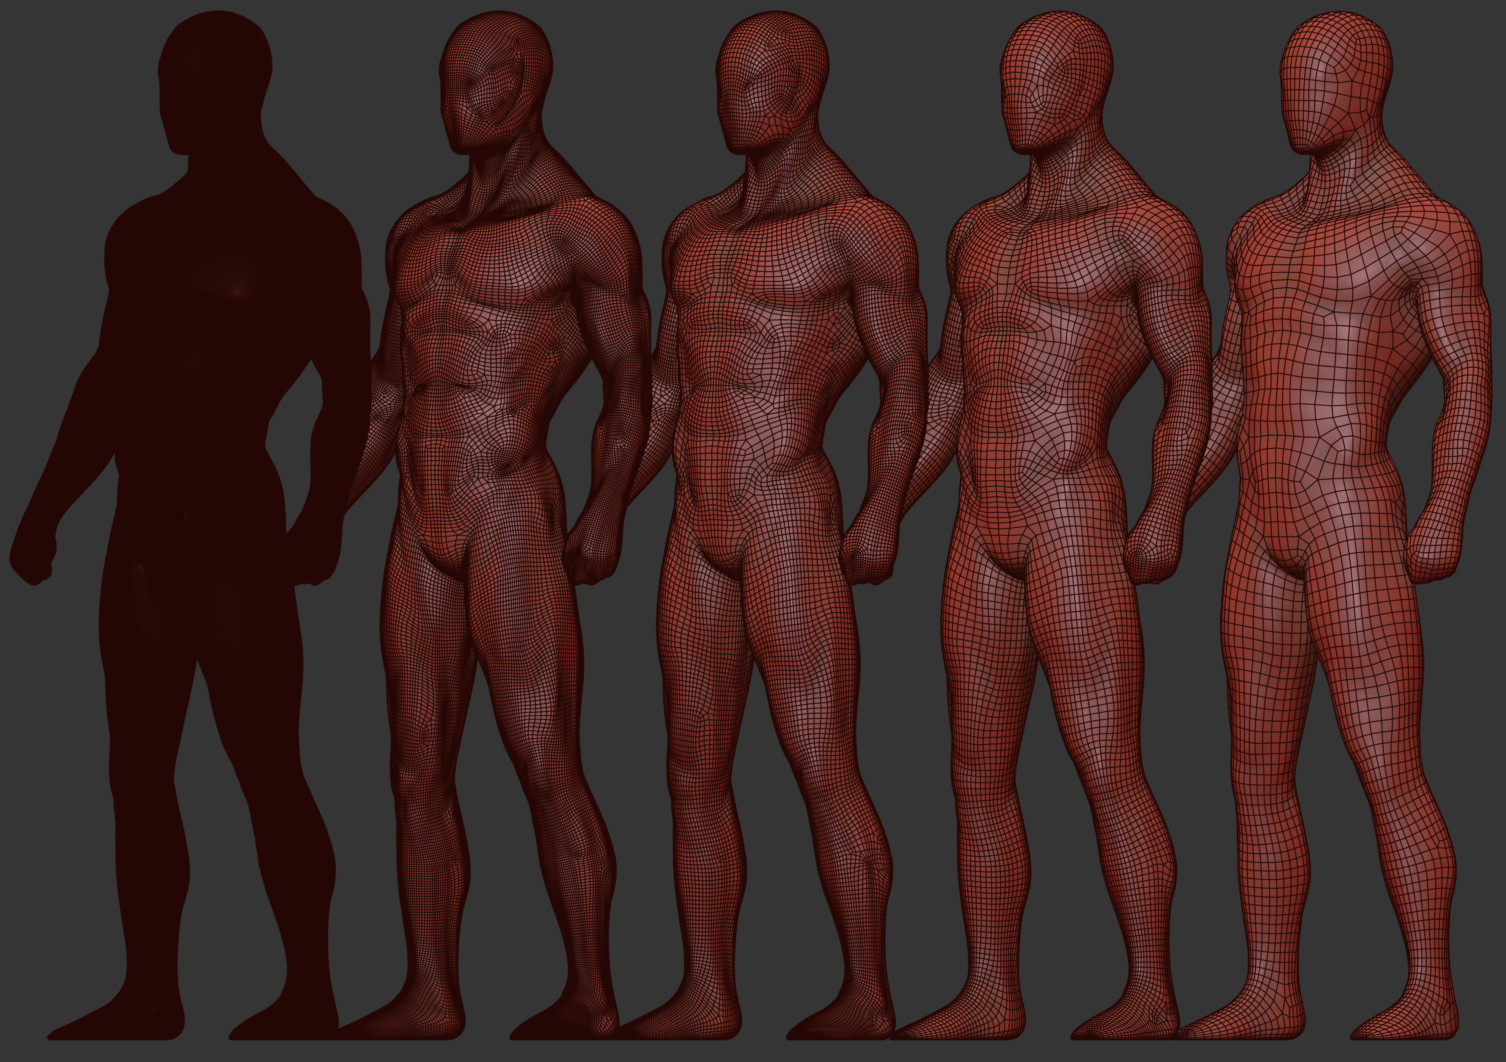


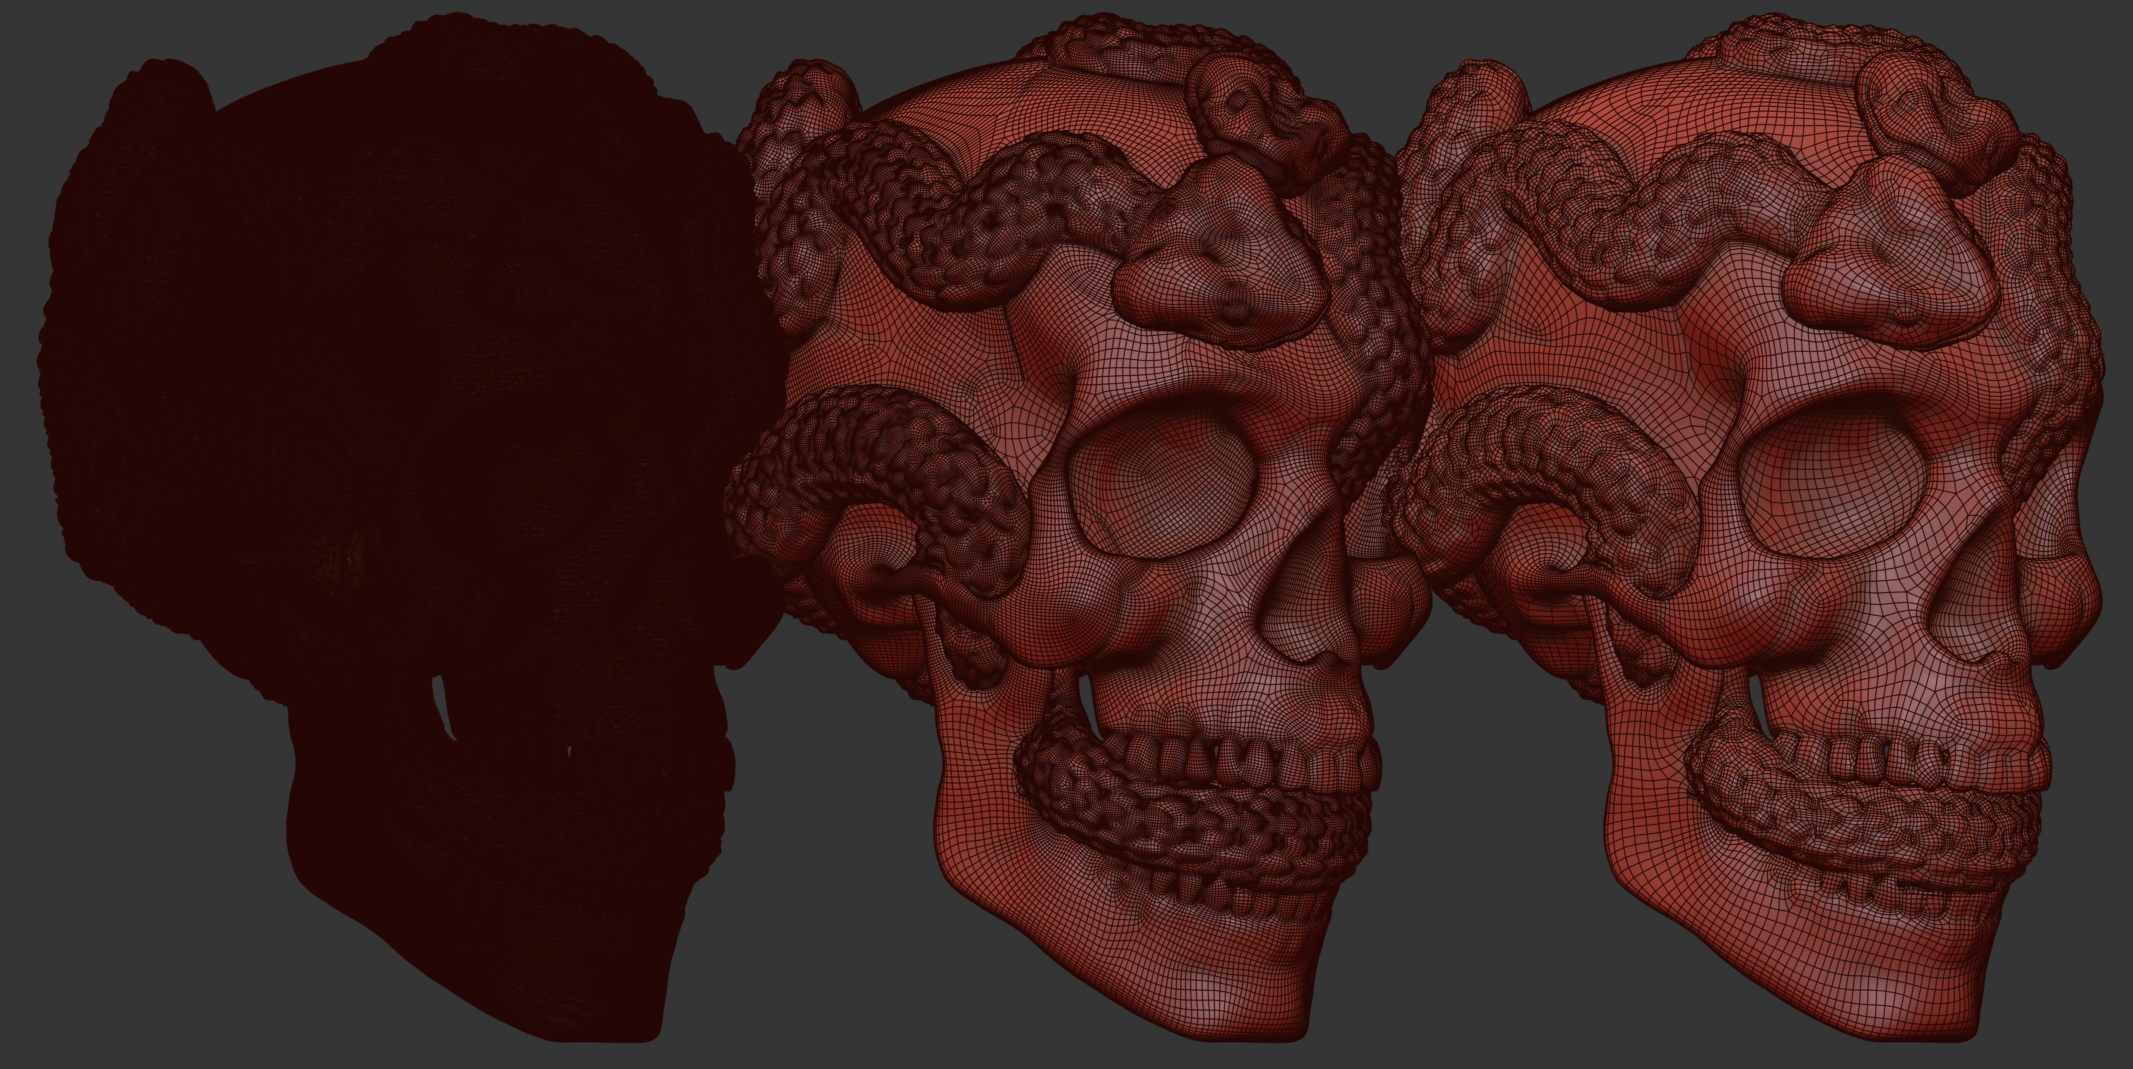

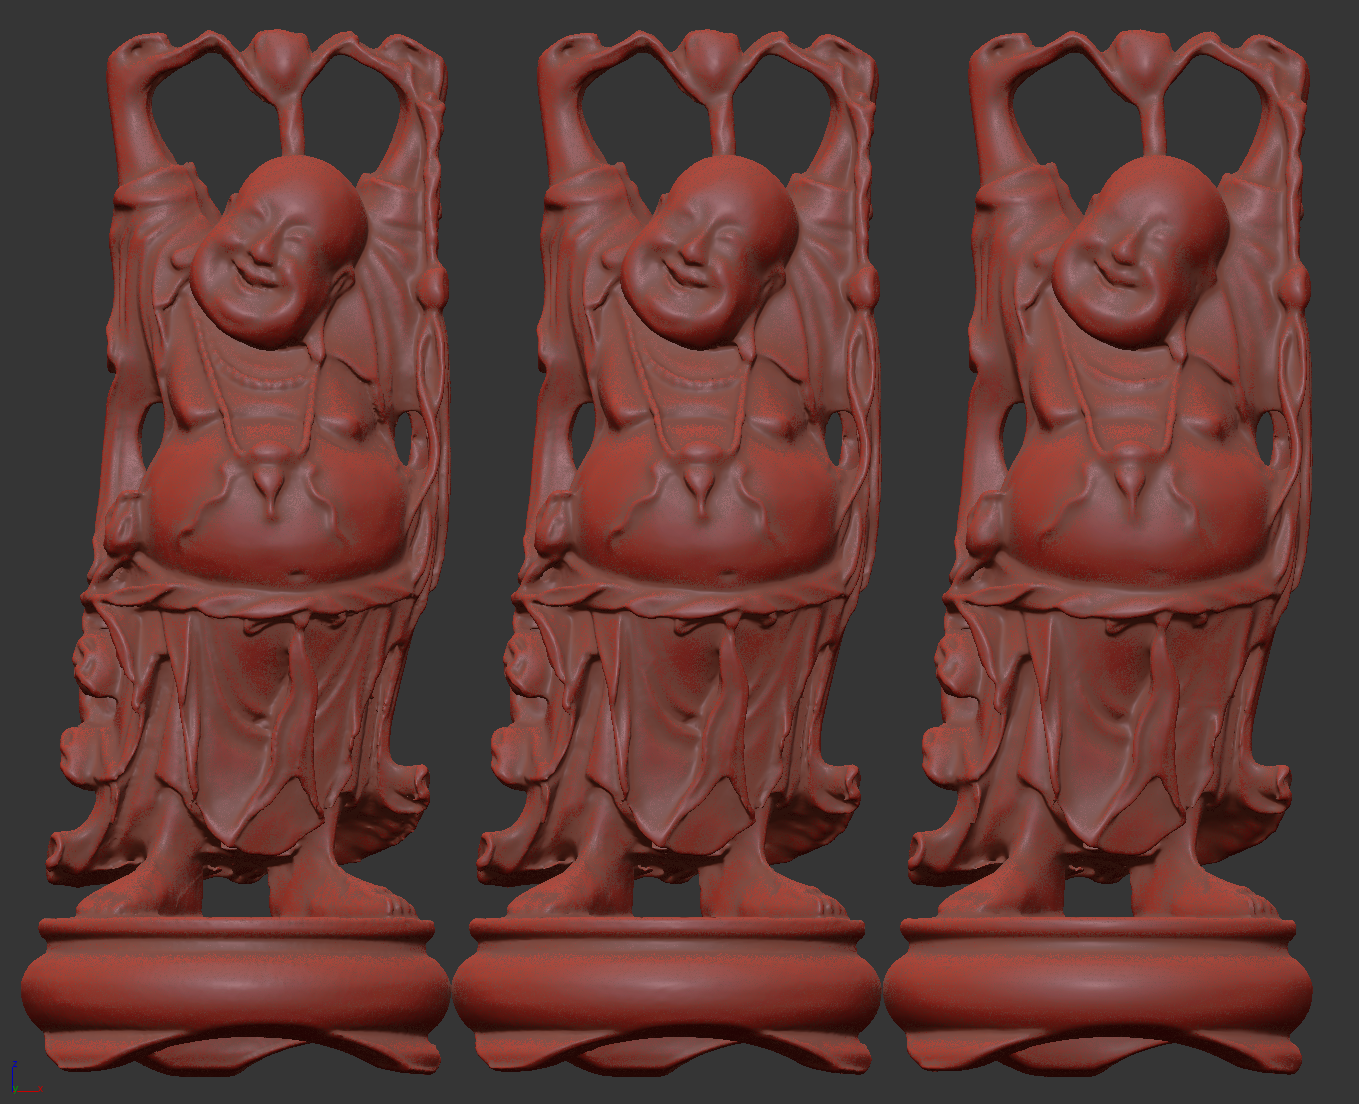

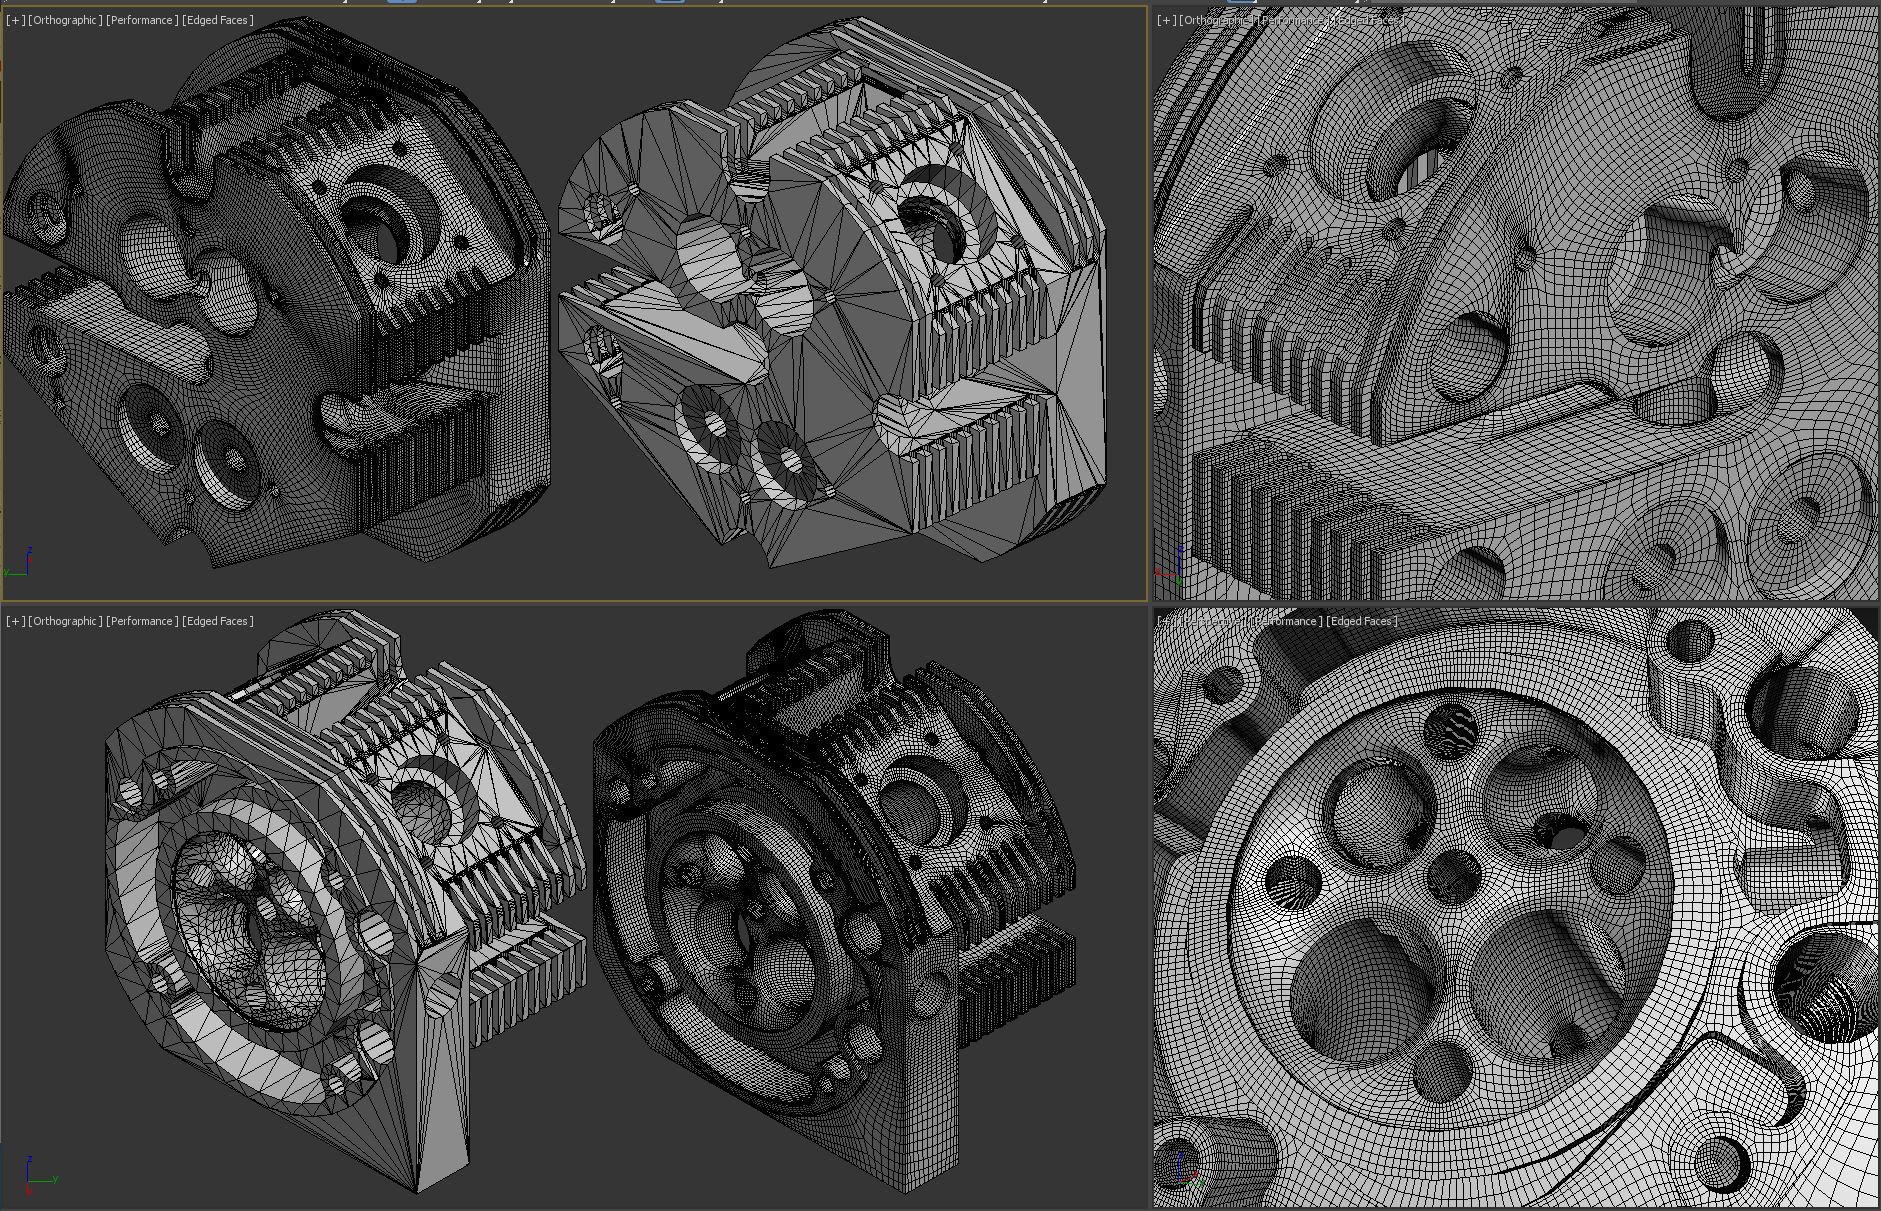
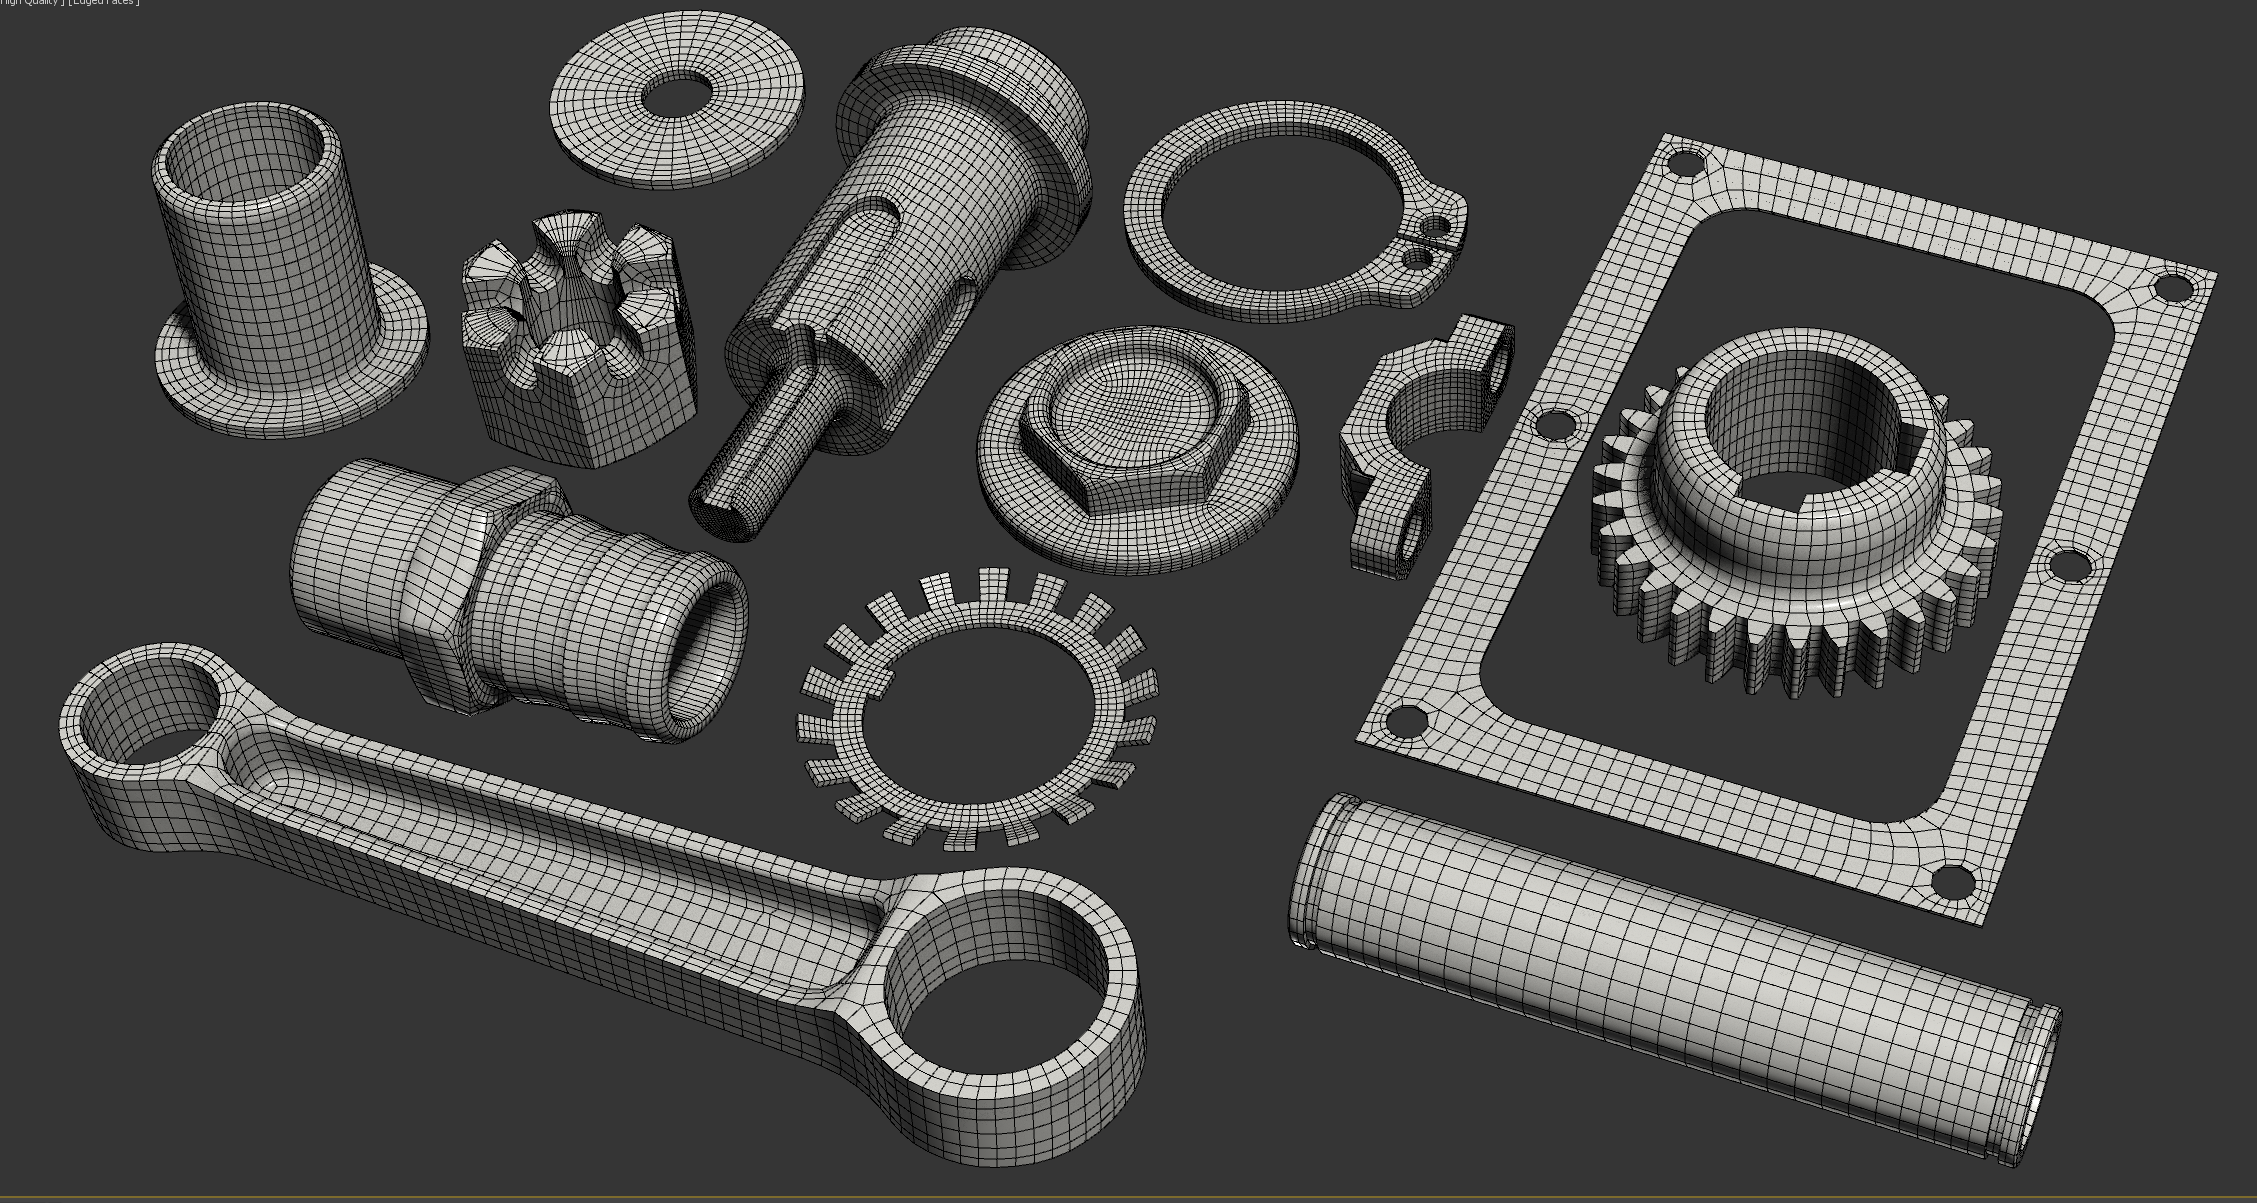


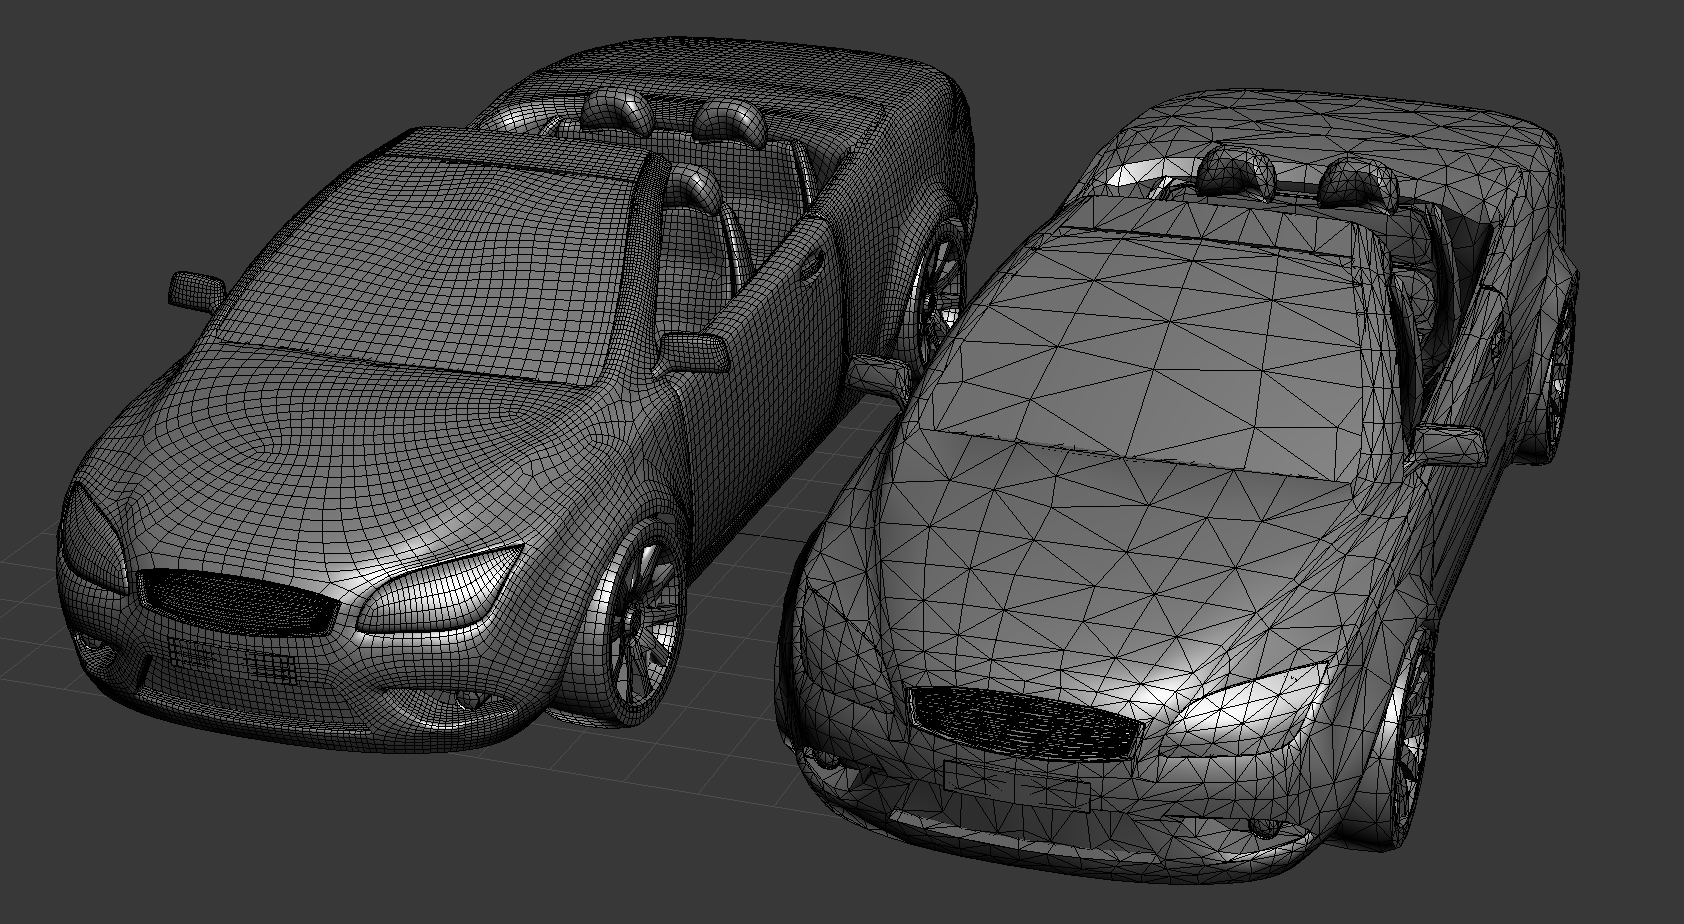

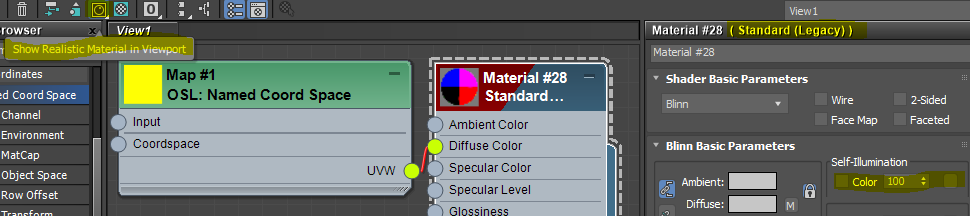
 3dsMax OSL has


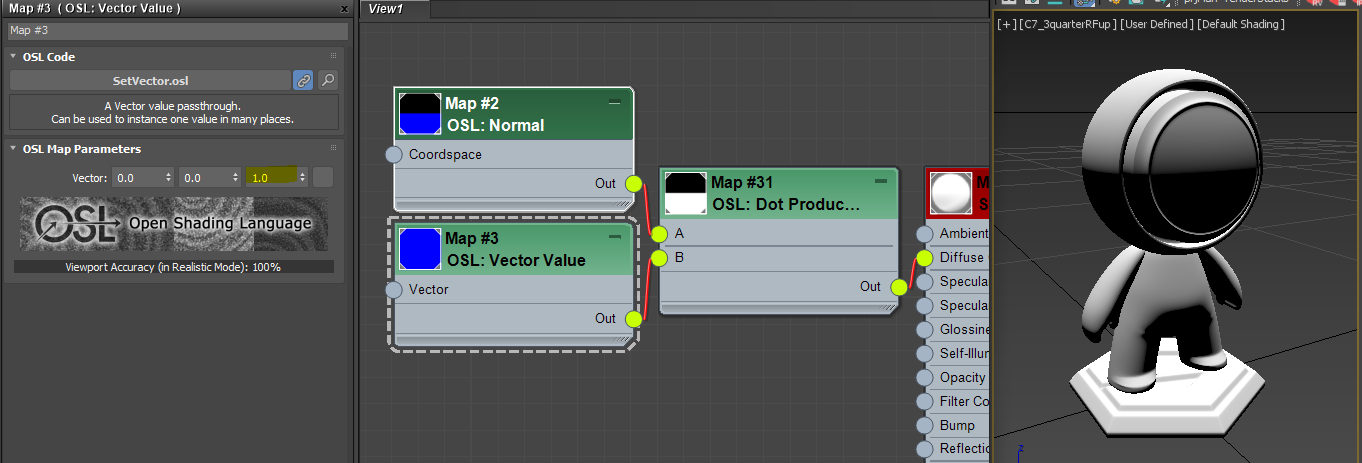
 How about X = 1.0 and Y, X =0.0?
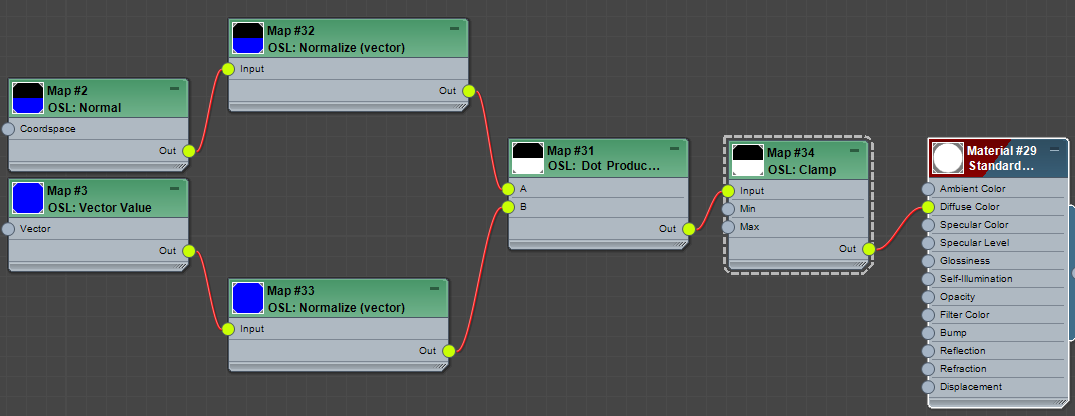
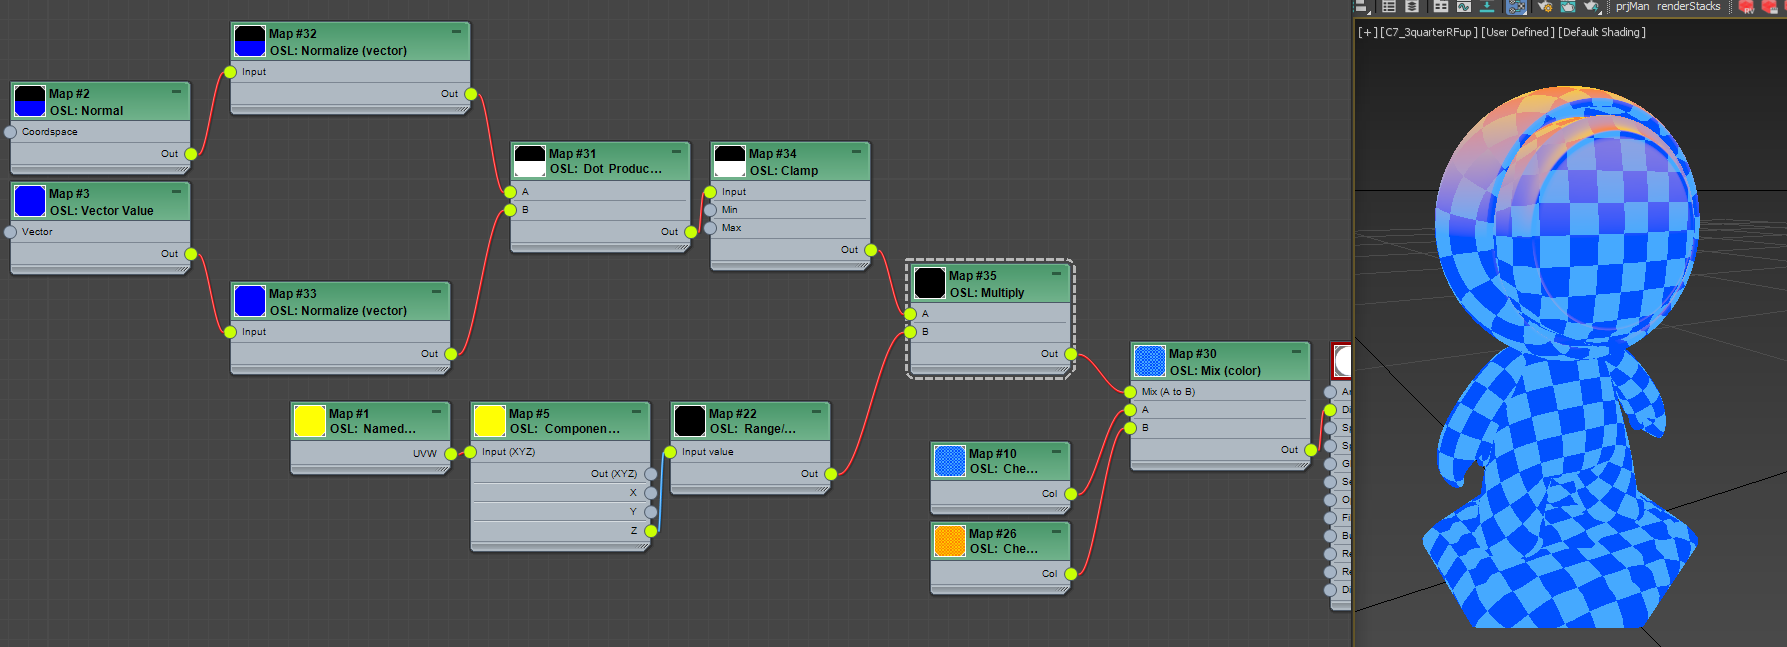

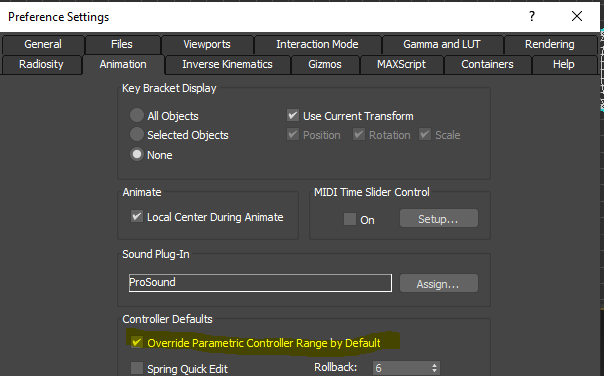

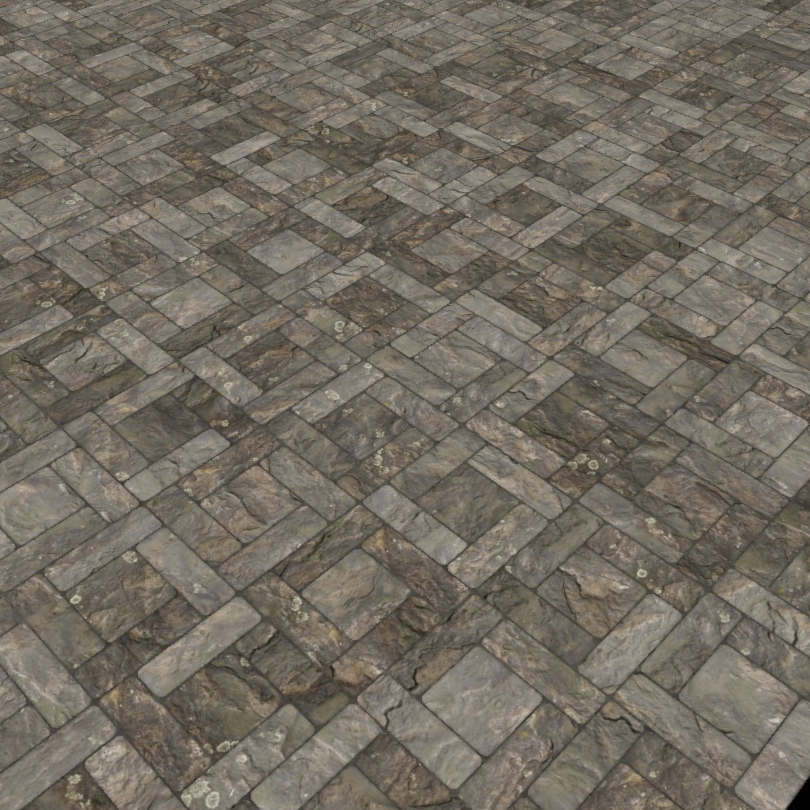
 Open SlateME.
 Make 2 OSL > Math Float > Random by Index.

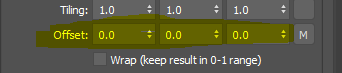


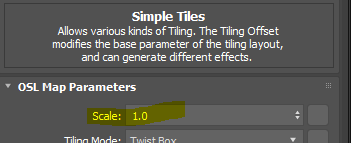
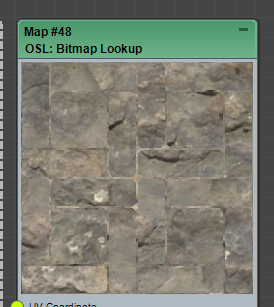
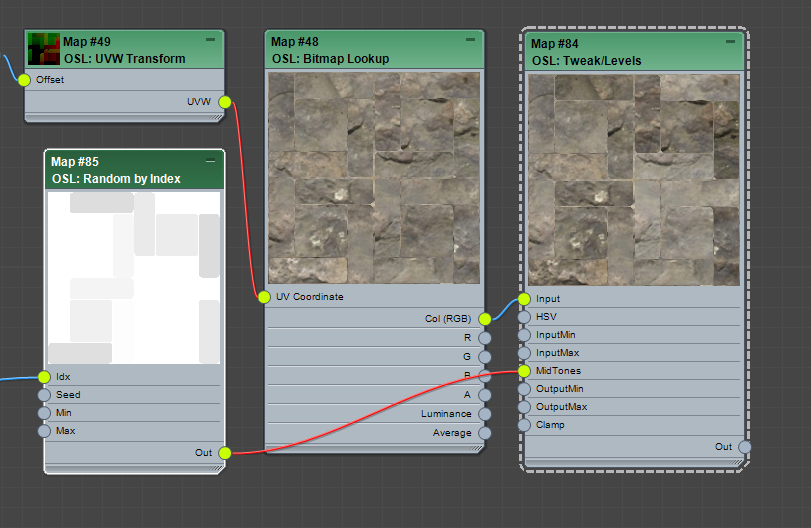


 As you can see, you can randomize any parameters you want. You just need to know when to stop. Should we stop now then? No, not yet. So far, we have used only one map file and looks like getting a good result. But, what if we can use multiple map files and randomly use per file?


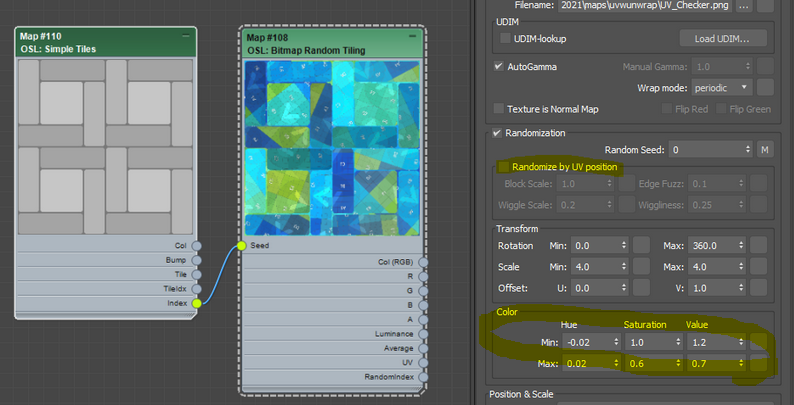

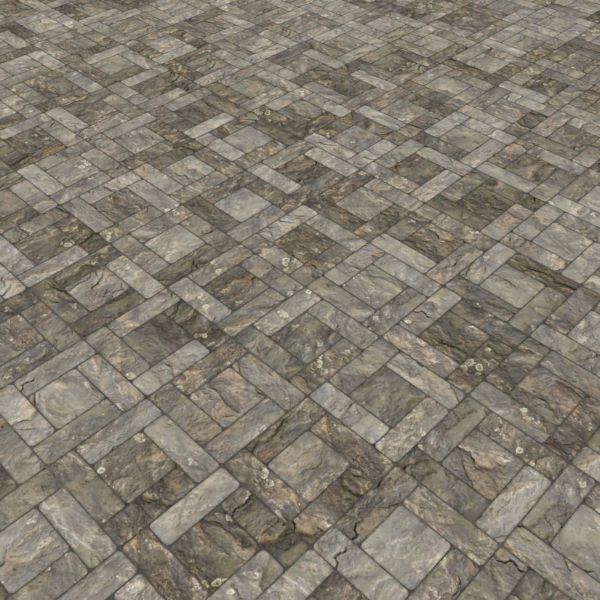


 Some may think “why not Edit Normal modifier?” because it turns out that Edit Normals can not completely remove normal interface. So far the only way to completely wipe out explicit normal is applying


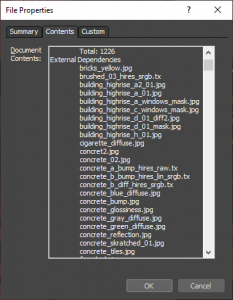 As you know, 3dsMax searches a few folder to find your asset or map files. I personally do not set any of these search folder. Either having assets in a correct folder or not. But, I know some users rely on this behaviors and even having 100s(!) of search folders.