Menu Close

Category: csTools

3dsMax 2021.1 Custom Default Parameter – and the manager!

3dsMax 2024.1 added a way to set the custom default with right click menu. Therefore, you wouldn’t need to use this script anymore for most cases.

Updated to 1.11! 11/29/2021

3dsMax 2021.1 has been released today. There are many fixes and nice improvement.
One of a new feature is the custom default parameter using Maxscript by DefaultParamInterface. Click here for details. This new feature allows you to have custom default for most areas of 3dsMax as long as it is a class.

The simplest  example would be the height segment of Cylinder. The current default is 5. Id you change it, whatever that value becomes the default for the session. Now you can set your own default  height segment using Maxscript DefaultParamInterface. It is not limited to object and modifiers since it is supported for all classes. You can also use this to set your own renderer default include 3rd party plugins.

The custom defaults will be saved in C:\Users\[username]\Autodesk\3ds Max 2021\User Settings\DefaultParameters.ini. Next time when you update to 3dsMax 2022. You just need to copy that file to the corresponding 3dsMax 2022 folder.

BUT, you would wonder… “why do I have to use Maxscript?”. I think setting the custom default using UI will come in the future. There was some prototype for UI in beta. But, it was removed from release because it doesn’t cover some cases.

So, that’s why I made this Custom Default Param Manager script. This script give you a UI to search a class and parameters and allow you to set default value.

Download 1.11

Download, unzip and drag and drop the script into the viewport. It will be nder csTools > CustomDefaultParamManager. Or simply type X > CustomDefaultParamManager.

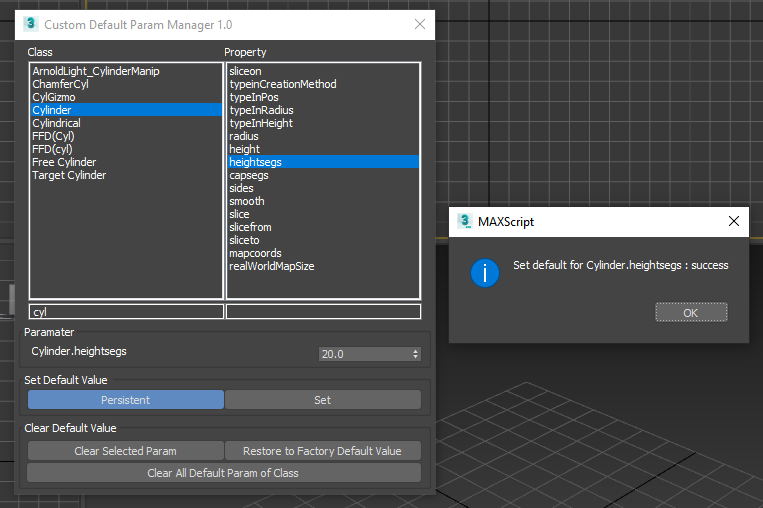
This is the UI.

On the left, you can choose a class. On the right, you can choose a parameter name. Then, you will see the spinner of checkbox to input the new default.
Then, just press Set button.
Persistent checkbutton is on by default. To make the default for the next session, you need to check this. So, don’t turn off.
The last 3 buttons are to remove the custom default. You can clear custom default for selected parameter or restores to the factory default. You can also remove everything you set.

Have you heard about renderStacks? The smarter way to render? Let’s click here and check it out!
 

simpleMapBaker

3dsMax 2021 has been release. One of the new feature is the brand new BakingToTexture tool. This tool is written from scratch and the replacement of legacy Render to Texture tool. This is the first iteration of this tool and still in active development.

Along with this tool, now 3dsMax provide the full support of MikkT tangent space from baking to rendering , viewport and SDK.

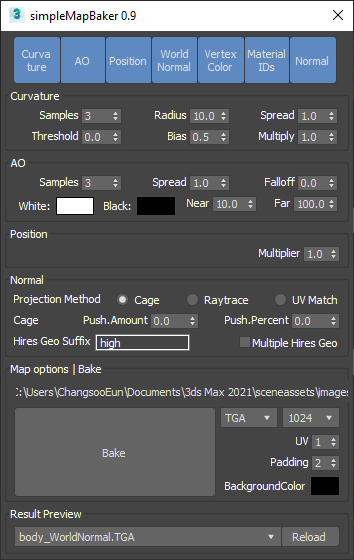
simpleMapBaker is a simplified front-end of new BakingToTexture. It allow users to bake certain utility map with one click. Also it was used to test the maxscript exposure of BakingToTexture tool.

Download simpleMapBaker

You can bake the following maps.

  • Curvature
  • AO
  • Position
  • World Normal
  • Vertex Normal
  • Material IDs
  • Normal

simpleMapBaker utilize the new override map feature to render most maps at once. Also it uses Arnold’s Curvature and AO shader. Therefore, it will save render preset of the current render.Therefore, it will switch to Arnold for all maps other than Normal map. For normal map, it will switch to Scanline renderer(This is temporary workaround until Arnold normal baking is ready). After baking, the renderer will be reverted to back.

Select objects, and just turn on the map buttons to render and press the big Bake button.

You can set up parameters for some maps and output parameters that BakingToTexture supports.

After bake, it will show all baked maps in the dropdownlist at the bottom. If you select a map there, it will use viewport override for preview baked map.

For normal map, it is using the new MikkT tangent space.

If you want to preview the previously baked maps, select object and press Reload button. It will search the maps and show preview if it finds the map.

Installation
  1. Download simpleMapBaker zip file
  2. Unzip
  3. drag and drop .ms into a viewport
  4. csTools > simpleMapBaker

thanks!

renderStacks can also make your work a lot simpler. Click here and check it out!


csMergeBy – powered by 3dsMax 2019 Custom Scene File Data Stream

One of the hidden gem of the new 3dsMax 2019 feature is the Custom Scene File Data Streams. This allows uses attach custom strings to your max and access from outside of 3dsmax. It is not only eliminate the need of companion external file for such data but also opens up accesing of .max file related data to any program or language.

For more details, check the help.

To show the power of this feature, I made a sample implementation of this feature. csMergeBy script. It allows users to merge object from other .max file by Layer, SelectionSet, ObjectID and Material name.

Download CsMergeBy 1.0

There are 2 files in the zip file. The first one is csMergeBySave.ms which registers post save callback to save the scene data as xml and write to Custom Scene File Data Stream. You need to drop this into your startup script folder or one of plugins folder to run this script automatically everytime when you launch 3dsMax.
For exmaple, C:\Users\[username]\AppData\Local\Autodesk\3dsMax\2018 – 64bit\ENU\scripts\startup

This script would increase file saving a littlt bit. When I tested it, it took 0.1 sec for for 1,000 objects. BUT, I also have an extreme case of 29,769 objects which add 4.5 sec for saving. Considering the file saving itself would take some time, It was not noticable. But, I still want to give you heads up for the possible saving time increase.

The second file is csMergeBy.ms. This is actually a macro script. Just drag and drop this file into iewport. It will make csTools > csMergeBy action. This is the merge dialog.

How to use is simple.

  1. Select a max file which you want to merge from using the top button

2. Choose “Merge By” method from dropdownlist. You can use…
Layer – with hierarchy
Layer – no hierarchy
SelectionSet
ObjectID
Material name

3. Choose items in the left list. You can CTRL+click to select multiple items. CTRL+click also deselect item.

As you choose item in the left list. Preview object list will be updated.
By default, all objects in the preview will be selected. But, you can only select the objects you want.

If you have a lot of objects(1000+), it might take a while to update the object list. Then you cah turn off Preview object names chekbox to not to show the object list. Then all objects in the selected items will be merged.

4. Then press Merge.

5. All megered object will be in “JustMerged” selection set for your convinience.

3dsMax 2019 – OSL shader pack 1

You don’t need to download this shaders anymore. 3dsMax 2020 has a better version of all these shaders built-in.

While I was beta testing 3dsMax 2019, I made a few OSL maps. Nothing spectacular. Most of them are just “artist-friendly” pre-made setups to save some nodes.

Download OSL shader pack 1 or at http://UncleBobsShaders.com. Make sure to visit Uncle Bobs Shader Emporium for cool OSL shaders!

UVW > MatCapUV

This is a renderable version of my superClayMode script. Plug into the UVW slot of Bitmap Lookup.

Value > Color by Colorspace

You can conver to a vector value of other color space to RGB.

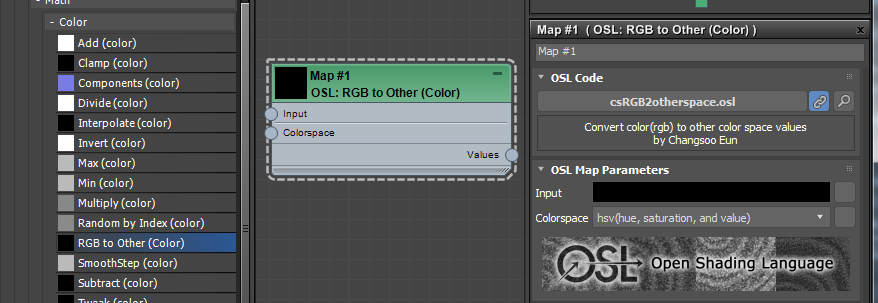
Math\Color > RGB to Other(Color)

You can convert a color from RGB to other color space. Output value is vector. after you process it, you can convert back to RGB with Color By Colorspace

Switchers > Random Index by Number/Color

It generates random integer index by number or color input. When you need to randomize something by Object ID, Materaal ID, Node Name and Node Handle, this map will be very handy. Of course you can also do the same thing by assembing a few other maps. I just made as one map for your convinience.

Math\Float > Sine wave function of frames

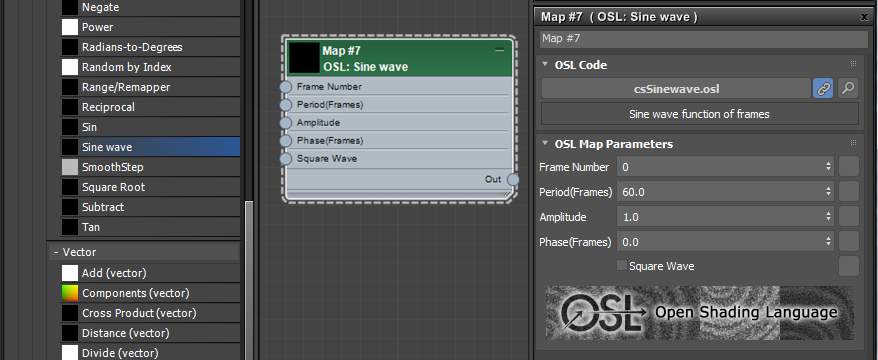
You can generate sine wave of time. It supports amplitude, period, phase value and square wave option. Check my sample animation. This map is very handy when you need to make some cyclic map animation.

!!! You DON”T need to connect Frame Number input. It already has float expression controller assigned. !!!

Scene > Normal

You can get normal value of pixel in various spaces.

Falloff

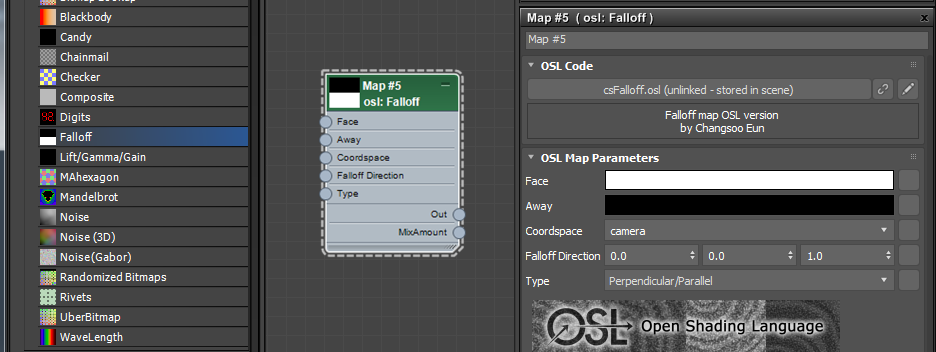
Falloff map OSL version. It supports Perpendicular/Parallel and Towards/Away.

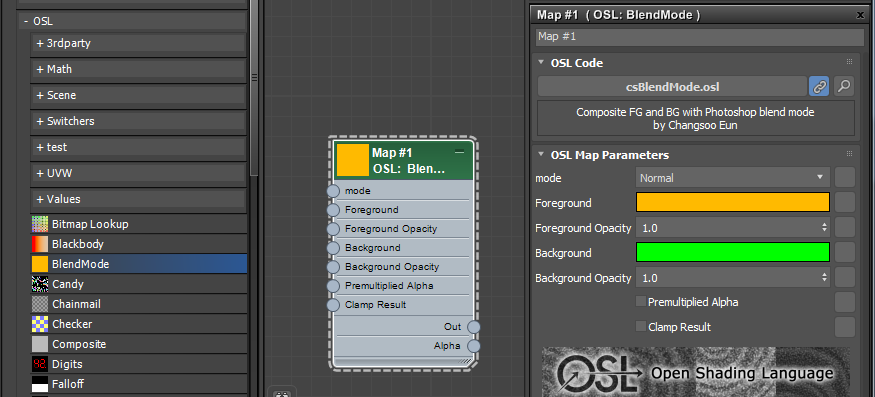
BlendModel

Legacy Composite map OSL version. It supports all bklending mode in legacy Composite map. I was trying to support all Photoshop mode. But, I gave up on Vivid Light and Linear Light.

Here is a QC image that shows this map and legacy Composite map are producing the same result.

How to Install

1. Make “OSL” subfolder in any plugin folder
2. Unzip and copy *.osl files into the folder

A sample max file

Here is the shader tree for the animation. I used the distance from local center and random sin wave as the light intensity. No keyframes al all. The max file is included in the shader pack .zip file.

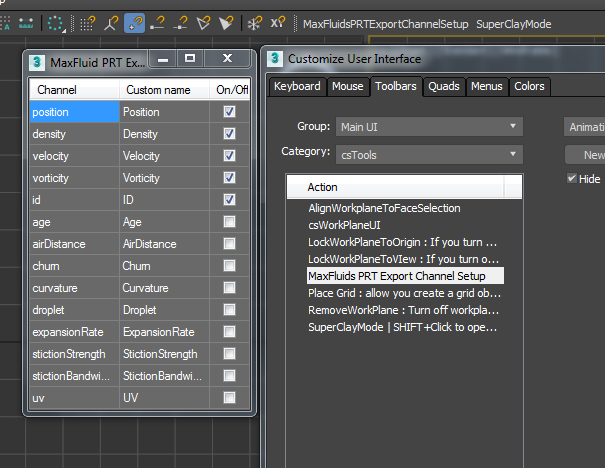
MaxFluids PRT Export Channel Setup

Download MaxFluidsPRTExportChannelSetup

3dsMax 2018.4 has been released today.
https://area.autodesk.com/blogs/the-3ds-max-blog/meet-3ds-max-2018-4/

One of the feature is the full BiFrost channel support for PRT export.
You can export all BiFrost channels even with custom channel names.

As of now, export channel setup is only exposed to Maxscript.
So, I made a UI for that.

You can turn on/off channels and rename channels.

Installation is simple.
Download the zip file and drag and drop to your viewport.
You can find the script in csTools > MaxFluidsPRTExportChannelSetup.
It is a macroscript so you can make button, menu or shortcut.
It will also show up in Global Search(X)

As always, it is free!

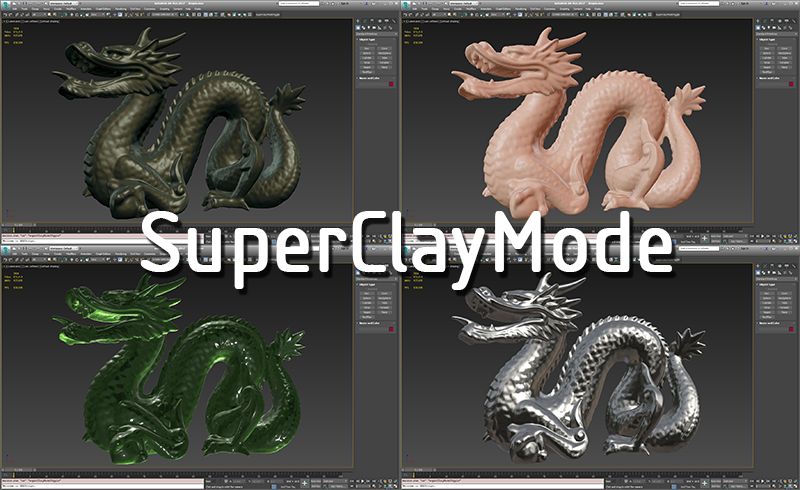
SuperClayMode v1.1

superclaymode


Download : SuperClayMode


Some background information about the new viewport override

3dsMax 2017 introduced the new viewport material override. As you cans see from viewport menu, there are three override modes.

viewportmaterialoverride

UV Checker

This mode uses self illuminated Standard material with UV Checker map.
This material is defined by uvchecker_override_material.ms script.
This files is in [maxroot]\scripts\Startup\ folder.
Usually C:\Autodesk\3ds Max 2017\scripts\Startup\uvchecker_override_material.ms
In that file, you can see the script is using [maxroot]\maps\uvwunwrap\UV_Checker.png.
Therefore, if you want to change the texture of the default UV Checker, you can 1)edit startup script or 2)replace the default bitmat file.

Fast Shader

This a specially designed build-in shader for faster viewport display. “Performance” mode preset is using this shader overide.

Rendering Setting

This is a mode for custom override shader.
You can use any material for viewport override by using this maxscript.

nitrousgraphicsmanager.OverrideRenderSettingMtl = yourMaterial

SuperClayMode is a script which mimics built-in clay mode with custom matcap texture by utilzing this Rendering Setting mode.

This script makes a ShaderFX shader with matcap uv on the fly and assign the material as override material and turn on Rendering Setting mode. It is designed as a toggle mode. Therefore, you should make button or assign shortcut for this script.

If you want to know more about matcap. Check the following links.

http://wiki.unity3d.com/index.php/MatCap

https://pixologic.com/zbrush/downloadcenter/library/

This script doesn’t contain any matcap material. You can easily search google for texture.

How to use
  1. Unzip the downloaded file
  2. Just drag and drop to viewport.
  3. Go to Customize User Interface. You will see SuperClayMode in csTools category.
  4. Make button or assign to shortcut.
  5. Run script while pressing SHIFT. It should open matcap file selection dialog.
  6. Choose a matcap texture.
  7. Toggle the button/shortcut.

When you assign matcap texture, it stores the file path in plufcfg. You don’t need to assign texture every session.

csWorkPlane 1.52

This is a collection of macro script relate to construction plane. It started as an implementation of Modo’s work plane. It includes the following four scripts.

Download csWorkPlane 1.52


1.52 UpdatecsWorkPlaneUI

First of all, Special thanks to Fausto De Martini for all great feedback.

LockWorkPlaneToView

It is similar to LockWorkPlaneToOrigin except this aligns construction plane to view.

Place Grid

autoAutogrid renamed as Place Grid

csWorkPlaneUI

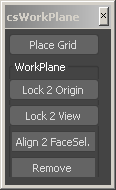
a small floating dialog for csWorkPlane funtions. It is dockable. To undock, just rightclick any button.


PlaceGrid(autoAutogrid)

It allow you create a grid object. After the grid is made, the grid will be automatically activated, and all transform coordinates will be set to Grid.

The core functionality of this script has been in 3ds Max for long time. AutoGrid, Grid object, Grid coordinate. I just make more streamlined workflow.

If you want to go back to the default coordinate, Run this script again while pressing SHIFT.

LockWorkPlaneToOrigin

If you turn on this mode, the plane which face to camera will automatically become the construction plane.

If you want to go back to the default coordinate, Run this script again while pressing SHIFT.

AlignWorkplaneToFaceSelection

1) Select an object

2) Select face(s)

3)Run this script.

This script will make a grid object at the center of face and activate it. The ZAxis will be aligned to face normal.”

RemoveWorkPlane

Turn off workplane by deleting the workplane from the scene. It is same as SHIFT+LockWorkPlaneToOrigin


How to install

1) Unzip!

2) Just drag and drop csWorkPlane_1_52.ms into viewport.

3) Make button or shortcut.  This script will show up in “csTools” category.


MCG:CollapseSW + MXS

Download MCG:CollapseSW

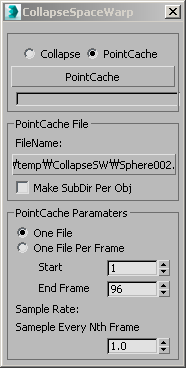
CollapseSW_UIThis MCG and Msxscript combo will allow you to collapse/pointcache object with spacewarp(s) while preserving pivot and hierarchy.

The main calculation engine is CollapseSW MCG object. This MCG object converts vertex position from world space to local space.

Accompanying Maxscript calculate a new mesh using this MCG object and either replace original object with the collapse object or generate point cache and apply to the original object.

This MCG shows a few benefits of MCG.

1) The node based nature of MCG and the large amount of built in functions and Auto UI generation allow fast development. It took less than 5 minute for me to make this MCG object.

2) All MCG parameters are automatically exposed to Maxscript.


CollapseSW macroscript


To provide a complete workflow, I made CollapseSW macroscript. It is easier to make script than trying to explain in English for me.

The parameters are self-explanatory.

1) Select objects to collapse/pointcache. you can select multiple objects.

2) Choose what to do with Collapse/PointCache.

3) If you want to collapse, you don’t need to set anything. If you want to point cache, you need to set parameters for point cache and assign out file name.

4) If you select multiple objects and point cache, this script will only use the path portion and use object name as point cache name. If you check Make SubDir Per Obj, it will create a sub folder for each object automatically. If you choose to use One File Per Frame, you probably want to check this.

* Currently MCG mesh building is a little slow for high polycount mesh. It might take a while to point cache.


How to Install


CollapseSW.zip includes two files.

CollapseSW.mcg is the MCG package.Install this package through Scripting menu > Install MCG package..

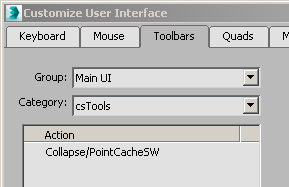
csTools-CollapseSW.mcr is macroscript. Just drag and drop to a viewport. Then you will see Collapse/PoinrCache SW in csTools category.

CollapseSW_CustomizeUI


csLayerExplorerExtension v1.0

Finally 3ds max 2015 introduced nested layer and Scene Explorer based new Layer Explorer.

I think it is one of the the most important update for years. Of course being the first version. it has some rough edges. I hope this script smooth out the rough edges a little bit.

Some of scripts are for old layer manager functionality. Some of scripts are for nested layers. Some of scripts are for frequent user request items.

  • Delete Selected Layer and All Children
  • Delete Unused Layer
  • Hide/Unhide Child Nodes
  • Select Nodes on Selected Layer
  • Unhide Nodes on Selected Layer”
  • Unfreeze Nodes on Selected Layer
  • Hide/Unhide All Layers
  • Freeze/Unfreeze All Layers
  • Hide Visible Icon[+Shift to Show]
  • Turn off SyncSelection [+Shift to turn on]
  • Unhide Selection
  • Unhide Nodes on Current Layer

How to install

Installation is simple. Download csLEextension.zip file. Unzip and drag-and-drop csLEextension.ms file into any viewport.

You will have 12 macro script in “Layer Explorer Extension” category.
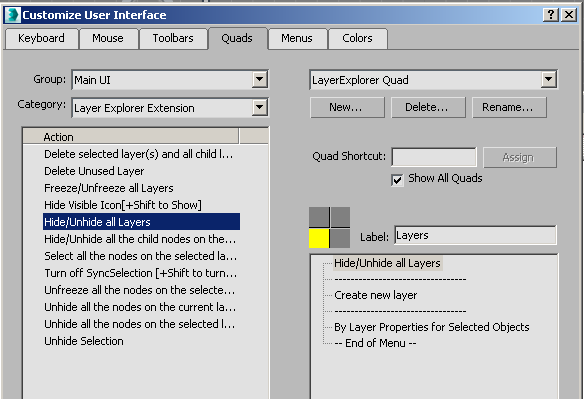
Go Customize User interface > Quads tab > Layer Explorer Quad.
Add the macro script to the quad menu.

cui

Some of script must be in Layer Explorer Quad since it need to know what currently selected layers are.

Scripts

This is format for details.
ScriptName
Name in CUI window
Name in quad menu.


csLEextDeleteSelectedLayerTree
“Delete selected layer(s) and all child layer(s)/node(s).”
“Delete Selected Layer and All Children”

You can not delete a layer if the layer is active or has a node. 3ds max also does not delete the children layers. It only delete the layer you selected.

This script will delete all the selected layer(s) and their children layer(s)/object(s).

Since what this script does is very dangerous. It will confirm you action before it delete layer. It also confirm one more time if there is children objects.

csLEextDeleteUnusedLayer
“Delete Unused Layer”

This script will delete all empty layer while preserving nested layer hierarchy.
Therefore, it would not delete the layer if it has any children objects even though the layer itself is empty.

csLEextHideUnhideChildren
“Hide/Unhide all the child nodes on the selected layer”
“Hide/Unhide Child Nodes”

This is same as using “Select Child Nodes” quad command and hide/unhide those selection.
The advantage of this script is 1)one-click less and 2)can be faster since it does not need to show selection in the viewport.

If there is ANY unhidden object Among children, this command hide all children.
If ALL children are hidden, this command unhide all children.
This is the same behaviour as “HideUnhideAllLayers” and “FreezeUnfreezeAllLayers” which come from old Layer Manager.

csLEextSelectAllNodesOnSelected
“Select all the nodes on the selected layer”
“Select Nodes on Selected Layer”

csLEextUnhideAllNodesOnSelected
“Unhide all the nodes on the selected layer”
“Unhide Nodes on Selected Layer”

Shortcut for csLEextSelectAllNodesOnSelected > Unhide.

csLEextUnfreezeAllNodesOnSelected
“Unfreeze all the nodes on the selected layer”
“Unfreeze Nodes on Selected Layer

Shortcut for csLEextSelectAllNodesOnSelected > Unfreeze.

csLEextHideUnhideAllLayers
“Hide/Unhide all Layers”
“Hide/Unhide All Layers”

Same as the same name command in old Layer Manager.

csLEextFreezeUnfreezeAllLayers
“Freeze/Unfreeze all Layers”
“Freeze/Unfreeze All Layers”

Same as the same name command in old Layer Manager.

csLEextToggleVisibleIcon
“Hide Visible Icon[+Shift to Show]”

In Layer Explorer, there are two way to see object’s hidden/unhidden status.
One is Visible Icon next to name.
Another is “Visible” column.
You can turn off Visible Icon with this script if you just want to use Visible column.
Shift+Click will show icon.

csLEextToggleSyncSelection
“Turn off SyncSelection [+Shift to turn on]”

This is same as old “SyncSelection” command” which is not available in 2015.
If you turn off “SyncSelection”, the selection in Layer Explorer would not select object in the scene/viewport.
Shift+Click will turn on SyncSelection.

csLEextUnhideSelection
“Unhide Selection”
“Unhide Selection”

Long waited, unhide selection!
This script would work everywhere in 3ds max.

csLEextUnhideAllNodesOnCurrent
“Unhide all the nodes on the current layer”
“Unhide Nodes on Current Layer”

This script unhide all the nodes on the current/activated layer”


I hope this scrips are helpful.

Thanks.

animBoost v0.8

What is it

animBoost is a set of maxscript that boost viewport performance for animated mesh.

What it does

Recently I found out that 3ds max still evaluates an object’s modifier stack even though the object is hidden. I always assume that’s not the case. For a non-animated object, this is not a problem, since 3ds max internally caches the final result of modifiers stack. But, if a hidden object is deforming over time, 3ds max wastes a lot of resources for this invisible object. For example, a typical character rig would have a low res proxy for faster playback. But, it becomes useless, since skinned hi-res mesh will be calculated anyway.

animBoost is an workaround for this problem. animBoost keeps monitoring scene and selectively turns on/off modifier when object is unhidden/hidden.

animBoost supports 3ds max 2009+

How to install

Download animBoost zip file. You will see two folders(Scripts/UI) after unzip the file. You need to copy those two folders into your 3ds max’s Scripts/UI folder.

Each 3ds max installation may have different folder location. To find your scripts and ui folder.
Copy and paste the following two line into your Maxscript Listener and press Numpad Enter. It will tell you where your script and ui folder is.

getdir #scripts
getdir #ui

*** installation for 3ds max 2013 ****

Since 3ds max 2013, 3ds max folder structure has been changed. Now “usermacros” folder is not in the “ui” folder anymore.

Threrfore, after you unzip the package, you need to go in “ui” folder and copy “usermacros” folder to user “usermacros” folder. To find your “usermacros” folder location. You can use the following maxscript command.

getdir #usermacros

How to use

Launch 3ds max. “Go to Customize User Interface”. Select “animBoost” category. You wil have 3 new actions. Make buttons or assign shourcut.

“turn on animBoost” will show up as “animBoost_On” button. “turn off animBoost” will show up as “animBoost_Off” button. “animBoost manual mode” will show up as “animBoost_Manual” button.readme

Now all you need to do is click “animBoost_On” button. Now animBoost is monitoring your scene and invisibly turns on/off modifiers when you hide/unhide objects.

WARNING!

If you have a lot of modifier heavy objects, THERE WILL BE DELAY when you hide/unhide objects.

If you have any problems with this script, you can always click “animBoost_Off”. Then animBoost will be removed from memory.

animBoost also support a “manual mode”. Instead of using “animBoost_On”, if you use “animBoost_Manual” button. You can run animBoost routine manually. If your system is really slow or you dont like the delay, you may use this.

v0.8 Update

bugfix – If you turn on/off with Layer, eveything is OK. But, when you hide/unhide each nodes, animBoost forgot to turn on Mesher/SuperMesher/XMesh. This has been fixed.

v0.7 Update

Support SuperMesher

Support Frost

Support Mesher

A few things to remember

– animBoost uses “Off in Viewport” to turn off modifier. Anytime when you hide/unhide an object, animBoost will reset “Off in Viewport” of ALL modifiers in the scene. If you want to turn off a modifier all the time, use “Off”. animBoost will skip any modifier that set to “Off”.

– animBoost will stay in memory until the current session ends(in other word, until you close 3ds max.). Evey time when you launch a new instance of 3ds max you need to run “animBoost_On” to use animBoost.

– After using animBoost, if you need to give the file to someone, make sure turn off animBoost before you save the file so all hidden modifiers can be turned in the file.

– If you use Thinking Particles, animBoost does not detect the source object that used for Thinking Particle Geom Instance. Therefore, if you hide the source object, animBoost will turn off the modifiers on the source objects.

any comment, bug report, English proof read to cganimator@cganimator.com

animBoost is a replyware. If you use it, you are obligated to send/reply comment, bug report or English proof read. 🙂

Changsoo Eun(c) 2011.