Menu Close

Category: MCG

MCG: Trajectory Constraint Rotation Controller

Download MCG: Trajectory Constraint Rotation Controller

TrajectoryConstraintUITrajectory Constraint causes an object’s orientation to follow the trajectory(velocity vector) of a target object. For example. when you animate a car, the rotation of car would be defined my the direction of car movement.

Many of you probably know how to rig this with Script Controller and Look At Constraint. I just took the idea and implemented as MCG.

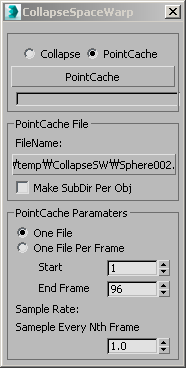
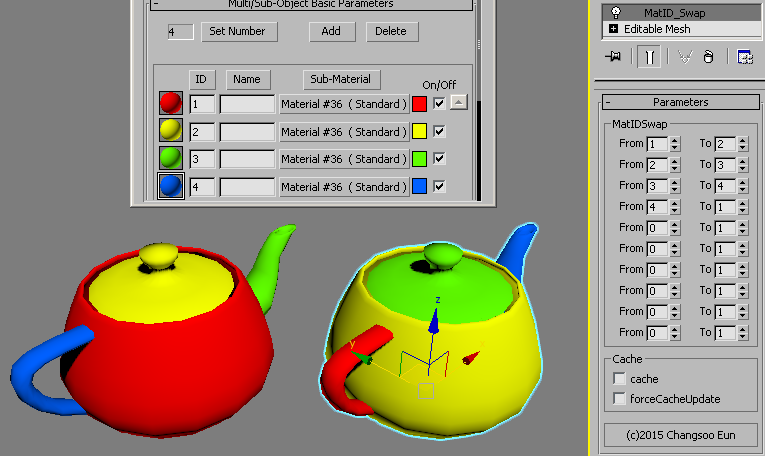
How to use this constraint is simple. Just assign as an rotation controller and pick Motion Target object.

When you assign Motion Target, this MCG will ask you if you want also constraint position to the Motion Target. You will probably need to say yes unless somehow you only need to have orientation.

This MCG also shows a good example of a benefit/advantage of MCG. This MCG is actually just a modified version of the new MCG_LookAt Constraint. I just replaced multi target list with a pick button and added a simple velocity calculation from Motion Target nodes. I did not need to reinvent all the parameter for upload. MCG allows you to easily modify/enhance someone’s MCG for your need. This is a big benefit.

One thing you need to know is that when you assign Motion Target node MCG will do the following things.
1) Assign Motion Target node as upnode
2) Turn off World from Upnode Settings
3) Set Upload Control as Axis Alignment.
4) Source Axis and Axis Aligned to Upnode as Z

What is does is letting you define up axis with the Z axis of Motion Target node.
Usually users uses just World Z as up axis. But, this can cause problem(flipping) when your object is moving vertically very close to World Z axis. To prevent flipping, you need to manage up ax, and I think this option is the best for that.

But, if you need to use other setting, then you can always change later.

MCG:CollapseSW + MXS

Download MCG:CollapseSW

CollapseSW_UIThis MCG and Msxscript combo will allow you to collapse/pointcache object with spacewarp(s) while preserving pivot and hierarchy.

The main calculation engine is CollapseSW MCG object. This MCG object converts vertex position from world space to local space.

Accompanying Maxscript calculate a new mesh using this MCG object and either replace original object with the collapse object or generate point cache and apply to the original object.

This MCG shows a few benefits of MCG.

1) The node based nature of MCG and the large amount of built in functions and Auto UI generation allow fast development. It took less than 5 minute for me to make this MCG object.

2) All MCG parameters are automatically exposed to Maxscript.


CollapseSW macroscript


To provide a complete workflow, I made CollapseSW macroscript. It is easier to make script than trying to explain in English for me.

The parameters are self-explanatory.

1) Select objects to collapse/pointcache. you can select multiple objects.

2) Choose what to do with Collapse/PointCache.

3) If you want to collapse, you don’t need to set anything. If you want to point cache, you need to set parameters for point cache and assign out file name.

4) If you select multiple objects and point cache, this script will only use the path portion and use object name as point cache name. If you check Make SubDir Per Obj, it will create a sub folder for each object automatically. If you choose to use One File Per Frame, you probably want to check this.

* Currently MCG mesh building is a little slow for high polycount mesh. It might take a while to point cache.


How to Install


CollapseSW.zip includes two files.

CollapseSW.mcg is the MCG package.Install this package through Scripting menu > Install MCG package..

csTools-CollapseSW.mcr is macroscript. Just drag and drop to a viewport. Then you will see Collapse/PoinrCache SW in csTools category.

CollapseSW_CustomizeUI


MCG: BlendedBoxMapping modifier

Download MCG:BlendedBoxMapping 1.1

Update: 03-14-2016

Fixed crash caused by EXT2. Thanks for Vu Nguyen.

BlendedBoxMappingUI

TBlendedBoxMappinghis is a modifier that makes Neil Blevins’ Blended Box Mapping technique simpler.

It assigns 3 different planar UV onto object using the bounding box of assigned objects. Use Select boxmap gizmo mesh button to select a gizmo object.

Currently you can only use an object which can be converted to mesh.

To prevent an accidental render of gizmo object, this modifier will turn off the object’s renderable property and apply Lattice modifier for your convenience.

If no object is assigned as gizmo, this modifier will use the object’s own bounding box as gizmo.

Since this modifier projects 3 planar UV from each axis, it will generate 3 UV channel. You can set the channel ID for each axis in UV group.

I also added the Use userdefined size checkbox so you can keep the texture scale across multiple objects.

If you check this option, a cubic bounding box with the  size of the below Size spinner will be created and used as gizmo.

Randomize Gizmo option allow you randomize the local bounding box gizmo center and/or rotation.

Amount(%) is a percentage of gizmo X size or 180 degrees. Currently this option uses the distance between the first vertex and local origin as a seed to generate ransom numbers. Therefore, if two objects are exactly same, they will get the same result unfortunately.

This modifier has an option to generate blending mask as vertex color.

If you turn on Generate blend mask VC checkbox, X/Y/X bleding mask will be generate as R/G/B vertex color.

If a vertex normal is parallel to projection axis, it will get 1.0. If a vertex normal is perpendicular to projection axis, it will get 0.0.

You can also limit the blending area with min/max value.
Then the blending will happen between min/max instead of 0.0/1.0.

The last button is Generate TemplateMtl button. If you click the button, a Composite map with 3 bitmap and 3 vertex color map will be created at active material editor slot.

BlendedBoxMappingMtl

MCG: MatID_Swap & MatID_Offset

Download MCG: MatID_SwapDownload MCG: MatID_Offset


MatID_Swap

This modifier let you change the current Material with a new MaterialID.
You can swap upto 10 sets of IDs at once.
the following image shows that the MaterialID on the teapot has been changed from..
1 -> 2
2 -> 3
3 -> 4
4 -> 1
If you set From to 0, the ID set would not be used.

MatIDSwap
This modifier also support the cache of updated MaterialID assignment.
If you turn on cache, this modifier will cache calculated MaterialID assignment once and reuse it until you force to update the cache.
Therefore, when you change the value, DO NOT turn on this option.
To refresh the cache, turn off cache and turn ON and OFF forceCacheUpdate.


MatID_Offset

This modifier let you offset MaterialID numbers.
If you had MaterialID 1, 2, 3, 7 and set Offset amount as 4, you will have 5, 6, 7, 11.

If you want to start MaterialID at a specific number, you can turn on Use Absolute StartID checkbox and set the Start ID spinner.
Then this modifier will automatically calculate offset number and apply them.

For the above case, you can turn on Use Absolute StartID checkbox and set StartID 5.

MatIDOffset


MCG: ExtractDeltas

Download MCG: ExtractDeltas

This is a MCG modifier which extract the difference(deltas) between two meshes and let you apply the deltas to a different mesh.
You can use this modifier to make a corrective morph target. Check out this video for how to utilize this modifier.

This  modifier need two meshes to calculate deltas, “Original geometry” and “Corrective shape”.
This modifier will go through each vertex of two meshes and extract the difference(Corrective Shape- Original Geometry).
Then, the modifier will offset the vertex position with the calculated deltas.
Therefore, all three meshes must have the same number of vertex and topology.

MCG_extractDeltas_UI

You can also adjust the amount of deltas using Weigh value.
This modifier also has an option to cache the calculated deltas for better performance.

If you turn on cacheDelta, this modifier will cache calculated deltas once and reuse it until you force toupdate cache.
If your Original Geometry and Corrective Share is animated, DO NOT turn on this option.
To refresh the cache, turn off cacheDelta and turn ON and OFF forceCacheUpdate.