Finally 3ds max 2015 introduced nested layer and Scene Explorer based new Layer Explorer.
I think it is one of the the most important update for years. Of course being the first version. it has some rough edges. I hope this script smooth out the rough edges a little bit.
Some of scripts are for old layer manager functionality. Some of scripts are for nested layers. Some of scripts are for frequent user request items.
- Delete Selected Layer and All Children
- Delete Unused Layer
- Hide/Unhide Child Nodes
- Select Nodes on Selected Layer
- Unhide Nodes on Selected Layer”
- Unfreeze Nodes on Selected Layer
- Hide/Unhide All Layers
- Freeze/Unfreeze All Layers
- Hide Visible Icon[+Shift to Show]
- Turn off SyncSelection [+Shift to turn on]
- Unhide Selection
- Unhide Nodes on Current Layer
How to install
Installation is simple. Download csLEextension.zip file. Unzip and drag-and-drop csLEextension.ms file into any viewport.
You will have 12 macro script in “Layer Explorer Extension” category.
Go Customize User interface > Quads tab > Layer Explorer Quad.
Add the macro script to the quad menu.
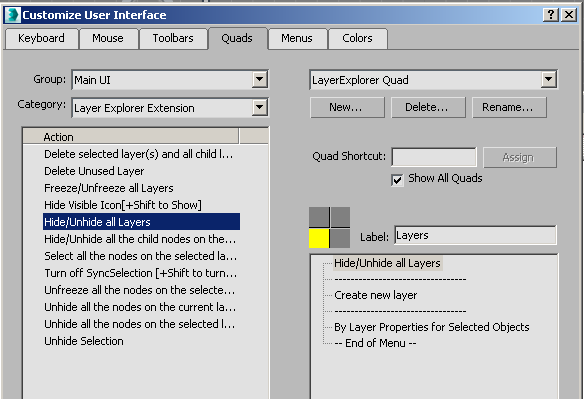
Some of script must be in Layer Explorer Quad since it need to know what currently selected layers are.
Scripts
This is format for details.
ScriptName
Name in CUI window
Name in quad menu.
csLEextDeleteSelectedLayerTree
“Delete selected layer(s) and all child layer(s)/node(s).”
“Delete Selected Layer and All Children”
You can not delete a layer if the layer is active or has a node. 3ds max also does not delete the children layers. It only delete the layer you selected.
This script will delete all the selected layer(s) and their children layer(s)/object(s).
Since what this script does is very dangerous. It will confirm you action before it delete layer. It also confirm one more time if there is children objects.
csLEextDeleteUnusedLayer
“Delete Unused Layer”
“Delete Unused Layer”
This script will delete all empty layer while preserving nested layer hierarchy.
Therefore, it would not delete the layer if it has any children objects even though the layer itself is empty.
csLEextHideUnhideChildren
“Hide/Unhide all the child nodes on the selected layer”
“Hide/Unhide Child Nodes”
This is same as using “Select Child Nodes” quad command and hide/unhide those selection.
The advantage of this script is 1)one-click less and 2)can be faster since it does not need to show selection in the viewport.
If there is ANY unhidden object Among children, this command hide all children.
If ALL children are hidden, this command unhide all children.
This is the same behaviour as “HideUnhideAllLayers” and “FreezeUnfreezeAllLayers” which come from old Layer Manager.
csLEextSelectAllNodesOnSelected
“Select all the nodes on the selected layer”
“Select Nodes on Selected Layer”
csLEextUnhideAllNodesOnSelected
“Unhide all the nodes on the selected layer”
“Unhide Nodes on Selected Layer”
Shortcut for csLEextSelectAllNodesOnSelected > Unhide.
csLEextUnfreezeAllNodesOnSelected
“Unfreeze all the nodes on the selected layer”
“Unfreeze Nodes on Selected Layer
Shortcut for csLEextSelectAllNodesOnSelected > Unfreeze.
csLEextHideUnhideAllLayers
“Hide/Unhide all Layers”
“Hide/Unhide All Layers”
Same as the same name command in old Layer Manager.
csLEextFreezeUnfreezeAllLayers
“Freeze/Unfreeze all Layers”
“Freeze/Unfreeze All Layers”
Same as the same name command in old Layer Manager.
csLEextToggleVisibleIcon
“Hide Visible Icon[+Shift to Show]”
“Hide Visible Icon[+Shift to Show]”
In Layer Explorer, there are two way to see object’s hidden/unhidden status.
One is Visible Icon next to name.
Another is “Visible” column.
You can turn off Visible Icon with this script if you just want to use Visible column.
Shift+Click will show icon.
csLEextToggleSyncSelection
“Turn off SyncSelection [+Shift to turn on]”
“Turn off SyncSelection [+Shift to turn on]”
This is same as old “SyncSelection” command” which is not available in 2015.
If you turn off “SyncSelection”, the selection in Layer Explorer would not select object in the scene/viewport.
Shift+Click will turn on SyncSelection.
csLEextUnhideSelection
“Unhide Selection”
“Unhide Selection”
Long waited, unhide selection!
This script would work everywhere in 3ds max.
csLEextUnhideAllNodesOnCurrent
“Unhide all the nodes on the current layer”
“Unhide Nodes on Current Layer”
This script unhide all the nodes on the current/activated layer”
I hope this scrips are helpful.
Thanks.