Menu Close

MCG: BlendedBoxMapping modifier

Download MCG:BlendedBoxMapping 1.1

Update: 03-14-2016

Fixed crash caused by EXT2. Thanks for Vu Nguyen.

BlendedBoxMappingUI

TBlendedBoxMappinghis is a modifier that makes Neil Blevins’ Blended Box Mapping technique simpler.

It assigns 3 different planar UV onto object using the bounding box of assigned objects. Use Select boxmap gizmo mesh button to select a gizmo object.

Currently you can only use an object which can be converted to mesh.

To prevent an accidental render of gizmo object, this modifier will turn off the object’s renderable property and apply Lattice modifier for your convenience.

If no object is assigned as gizmo, this modifier will use the object’s own bounding box as gizmo.

Since this modifier projects 3 planar UV from each axis, it will generate 3 UV channel. You can set the channel ID for each axis in UV group.

I also added the Use userdefined size checkbox so you can keep the texture scale across multiple objects.

If you check this option, a cubic bounding box with the  size of the below Size spinner will be created and used as gizmo.

Randomize Gizmo option allow you randomize the local bounding box gizmo center and/or rotation.

Amount(%) is a percentage of gizmo X size or 180 degrees. Currently this option uses the distance between the first vertex and local origin as a seed to generate ransom numbers. Therefore, if two objects are exactly same, they will get the same result unfortunately.

This modifier has an option to generate blending mask as vertex color.

If you turn on Generate blend mask VC checkbox, X/Y/X bleding mask will be generate as R/G/B vertex color.

If a vertex normal is parallel to projection axis, it will get 1.0. If a vertex normal is perpendicular to projection axis, it will get 0.0.

You can also limit the blending area with min/max value.
Then the blending will happen between min/max instead of 0.0/1.0.

The last button is Generate TemplateMtl button. If you click the button, a Composite map with 3 bitmap and 3 vertex color map will be created at active material editor slot.

BlendedBoxMappingMtl

MCG: MatID_Swap & MatID_Offset

Download MCG: MatID_SwapDownload MCG: MatID_Offset


MatID_Swap

This modifier let you change the current Material with a new MaterialID.
You can swap upto 10 sets of IDs at once.
the following image shows that the MaterialID on the teapot has been changed from..
1 -> 2
2 -> 3
3 -> 4
4 -> 1
If you set From to 0, the ID set would not be used.

MatIDSwap
This modifier also support the cache of updated MaterialID assignment.
If you turn on cache, this modifier will cache calculated MaterialID assignment once and reuse it until you force to update the cache.
Therefore, when you change the value, DO NOT turn on this option.
To refresh the cache, turn off cache and turn ON and OFF forceCacheUpdate.


MatID_Offset

This modifier let you offset MaterialID numbers.
If you had MaterialID 1, 2, 3, 7 and set Offset amount as 4, you will have 5, 6, 7, 11.

If you want to start MaterialID at a specific number, you can turn on Use Absolute StartID checkbox and set the Start ID spinner.
Then this modifier will automatically calculate offset number and apply them.

For the above case, you can turn on Use Absolute StartID checkbox and set StartID 5.

MatIDOffset


MCG: ExtractDeltas

Download MCG: ExtractDeltas

This is a MCG modifier which extract the difference(deltas) between two meshes and let you apply the deltas to a different mesh.
You can use this modifier to make a corrective morph target. Check out this video for how to utilize this modifier.

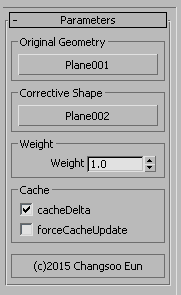
This  modifier need two meshes to calculate deltas, “Original geometry” and “Corrective shape”.
This modifier will go through each vertex of two meshes and extract the difference(Corrective Shape- Original Geometry).
Then, the modifier will offset the vertex position with the calculated deltas.
Therefore, all three meshes must have the same number of vertex and topology.

MCG_extractDeltas_UI

You can also adjust the amount of deltas using Weigh value.
This modifier also has an option to cache the calculated deltas for better performance.

If you turn on cacheDelta, this modifier will cache calculated deltas once and reuse it until you force toupdate cache.
If your Original Geometry and Corrective Share is animated, DO NOT turn on this option.
To refresh the cache, turn off cacheDelta and turn ON and OFF forceCacheUpdate.

csLayerExplorerExtension v1.0

Finally 3ds max 2015 introduced nested layer and Scene Explorer based new Layer Explorer.

I think it is one of the the most important update for years. Of course being the first version. it has some rough edges. I hope this script smooth out the rough edges a little bit.

Some of scripts are for old layer manager functionality. Some of scripts are for nested layers. Some of scripts are for frequent user request items.

  • Delete Selected Layer and All Children
  • Delete Unused Layer
  • Hide/Unhide Child Nodes
  • Select Nodes on Selected Layer
  • Unhide Nodes on Selected Layer”
  • Unfreeze Nodes on Selected Layer
  • Hide/Unhide All Layers
  • Freeze/Unfreeze All Layers
  • Hide Visible Icon[+Shift to Show]
  • Turn off SyncSelection [+Shift to turn on]
  • Unhide Selection
  • Unhide Nodes on Current Layer

How to install

Installation is simple. Download csLEextension.zip file. Unzip and drag-and-drop csLEextension.ms file into any viewport.

You will have 12 macro script in “Layer Explorer Extension” category.
Go Customize User interface > Quads tab > Layer Explorer Quad.
Add the macro script to the quad menu.
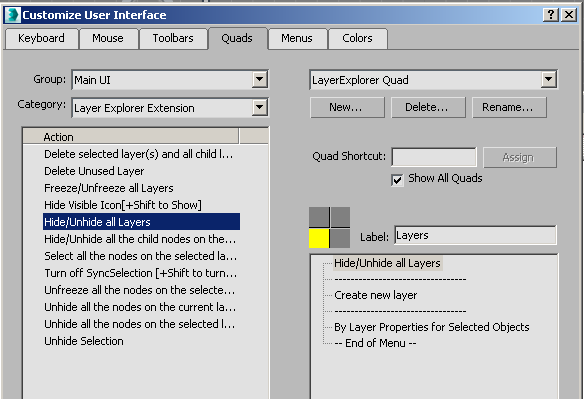
cui

Some of script must be in Layer Explorer Quad since it need to know what currently selected layers are.

Scripts

This is format for details.
ScriptName
Name in CUI window
Name in quad menu.


csLEextDeleteSelectedLayerTree
“Delete selected layer(s) and all child layer(s)/node(s).”
“Delete Selected Layer and All Children”

You can not delete a layer if the layer is active or has a node. 3ds max also does not delete the children layers. It only delete the layer you selected.

This script will delete all the selected layer(s) and their children layer(s)/object(s).

Since what this script does is very dangerous. It will confirm you action before it delete layer. It also confirm one more time if there is children objects.

csLEextDeleteUnusedLayer
“Delete Unused Layer”

This script will delete all empty layer while preserving nested layer hierarchy.
Therefore, it would not delete the layer if it has any children objects even though the layer itself is empty.

csLEextHideUnhideChildren
“Hide/Unhide all the child nodes on the selected layer”
“Hide/Unhide Child Nodes”

This is same as using “Select Child Nodes” quad command and hide/unhide those selection.
The advantage of this script is 1)one-click less and 2)can be faster since it does not need to show selection in the viewport.

If there is ANY unhidden object Among children, this command hide all children.
If ALL children are hidden, this command unhide all children.
This is the same behaviour as “HideUnhideAllLayers” and “FreezeUnfreezeAllLayers” which come from old Layer Manager.

csLEextSelectAllNodesOnSelected
“Select all the nodes on the selected layer”
“Select Nodes on Selected Layer”

csLEextUnhideAllNodesOnSelected
“Unhide all the nodes on the selected layer”
“Unhide Nodes on Selected Layer”

Shortcut for csLEextSelectAllNodesOnSelected > Unhide.

csLEextUnfreezeAllNodesOnSelected
“Unfreeze all the nodes on the selected layer”
“Unfreeze Nodes on Selected Layer

Shortcut for csLEextSelectAllNodesOnSelected > Unfreeze.

csLEextHideUnhideAllLayers
“Hide/Unhide all Layers”
“Hide/Unhide All Layers”

Same as the same name command in old Layer Manager.

csLEextFreezeUnfreezeAllLayers
“Freeze/Unfreeze all Layers”
“Freeze/Unfreeze All Layers”

Same as the same name command in old Layer Manager.

csLEextToggleVisibleIcon
“Hide Visible Icon[+Shift to Show]”

In Layer Explorer, there are two way to see object’s hidden/unhidden status.
One is Visible Icon next to name.
Another is “Visible” column.
You can turn off Visible Icon with this script if you just want to use Visible column.
Shift+Click will show icon.

csLEextToggleSyncSelection
“Turn off SyncSelection [+Shift to turn on]”

This is same as old “SyncSelection” command” which is not available in 2015.
If you turn off “SyncSelection”, the selection in Layer Explorer would not select object in the scene/viewport.
Shift+Click will turn on SyncSelection.

csLEextUnhideSelection
“Unhide Selection”
“Unhide Selection”

Long waited, unhide selection!
This script would work everywhere in 3ds max.

csLEextUnhideAllNodesOnCurrent
“Unhide all the nodes on the current layer”
“Unhide Nodes on Current Layer”

This script unhide all the nodes on the current/activated layer”


I hope this scrips are helpful.

Thanks.
animBoost v0.8

What is it

animBoost is a set of maxscript that boost viewport performance for animated mesh.

What it does

Recently I found out that 3ds max still evaluates an object’s modifier stack even though the object is hidden. I always assume that’s not the case. For a non-animated object, this is not a problem, since 3ds max internally caches the final result of modifiers stack. But, if a hidden object is deforming over time, 3ds max wastes a lot of resources for this invisible object. For example, a typical character rig would have a low res proxy for faster playback. But, it becomes useless, since skinned hi-res mesh will be calculated anyway.

animBoost is an workaround for this problem. animBoost keeps monitoring scene and selectively turns on/off modifier when object is unhidden/hidden.

animBoost supports 3ds max 2009+

How to install

Download animBoost zip file. You will see two folders(Scripts/UI) after unzip the file. You need to copy those two folders into your 3ds max’s Scripts/UI folder.

Each 3ds max installation may have different folder location. To find your scripts and ui folder.
Copy and paste the following two line into your Maxscript Listener and press Numpad Enter. It will tell you where your script and ui folder is.

getdir #scripts
getdir #ui

*** installation for 3ds max 2013 ****

Since 3ds max 2013, 3ds max folder structure has been changed. Now “usermacros” folder is not in the “ui” folder anymore.

Threrfore, after you unzip the package, you need to go in “ui” folder and copy “usermacros” folder to user “usermacros” folder. To find your “usermacros” folder location. You can use the following maxscript command.

getdir #usermacros

How to use

Launch 3ds max. “Go to Customize User Interface”. Select “animBoost” category. You wil have 3 new actions. Make buttons or assign shourcut.

“turn on animBoost” will show up as “animBoost_On” button. “turn off animBoost” will show up as “animBoost_Off” button. “animBoost manual mode” will show up as “animBoost_Manual” button.readme

Now all you need to do is click “animBoost_On” button. Now animBoost is monitoring your scene and invisibly turns on/off modifiers when you hide/unhide objects.

WARNING!

If you have a lot of modifier heavy objects, THERE WILL BE DELAY when you hide/unhide objects.

If you have any problems with this script, you can always click “animBoost_Off”. Then animBoost will be removed from memory.

animBoost also support a “manual mode”. Instead of using “animBoost_On”, if you use “animBoost_Manual” button. You can run animBoost routine manually. If your system is really slow or you dont like the delay, you may use this.

v0.8 Update

bugfix – If you turn on/off with Layer, eveything is OK. But, when you hide/unhide each nodes, animBoost forgot to turn on Mesher/SuperMesher/XMesh. This has been fixed.

v0.7 Update

Support SuperMesher

Support Frost

Support Mesher

A few things to remember

– animBoost uses “Off in Viewport” to turn off modifier. Anytime when you hide/unhide an object, animBoost will reset “Off in Viewport” of ALL modifiers in the scene. If you want to turn off a modifier all the time, use “Off”. animBoost will skip any modifier that set to “Off”.

– animBoost will stay in memory until the current session ends(in other word, until you close 3ds max.). Evey time when you launch a new instance of 3ds max you need to run “animBoost_On” to use animBoost.

– After using animBoost, if you need to give the file to someone, make sure turn off animBoost before you save the file so all hidden modifiers can be turned in the file.

– If you use Thinking Particles, animBoost does not detect the source object that used for Thinking Particle Geom Instance. Therefore, if you hide the source object, animBoost will turn off the modifiers on the source objects.

any comment, bug report, English proof read to cganimator@cganimator.com

animBoost is a replyware. If you use it, you are obligated to send/reply comment, bug report or English proof read. 🙂

Changsoo Eun(c) 2011.