Menu Close

Author: changsooeun

3dsMax 2023.1 Highlights

3dsMax 2023.1 – Performance

Improving/optimizing performance #3dsMax has been one of the big focus for a while. #3dsMax 2023.1 has another round of big performance boost. Especially these updates are for animators.

3dsMax 2023.1 – Spline Extrude

3dsMax is known for the best spline tool on the market. Yet it has gotten even better!

3dsMax 2023.1 – Progress bar update

File IO operations will show progress and progress will displayed in task bar icon.

#3dsMax 2023.1 – Isolate selection updates

Zoom Extents On Isolate (ZEOI) is now persistent from session to session (in 3ds Max.ini). Default value of ZEOI is set to off, means do not zoom extents on isolation.

#3dsMax 2023.1 – New Triangulation algorithm

New Triangulation algorithm prevents inverted or collapsed triangles, generates more regular fewer long, thin triangles and handles non-planar faces better. Chamfer and SmartExtrude utilize this new algorithm. It will eventually be deployed more broadly.

#3dsMax 2023 1 – Vertex Paint modifier Capture

A new button is available called “Capture” which copies all of the existing vertex colors that exist under the current Vertex Paint modifier into this level. This will allow you to blur and work with the existing data easier.

#3dsMax 2023 1 – Background Playback & Merge Performance

Improved playback speed with animated background if the source image is in sRGB or gamma 2.2. It is 2x-3x faster.
Improved performance of Merge dialog when dealing with large number of nodes.

MCG : map2vc

It has been a while I made an MCG. This simple MCG allow to set vertex color(or any uv) using any 3dsMax 2d map.

Download

How to use.

  1. Pick a 3dsMax map. You can use a map tree. But, it has to be all 2d maps with Explicit Map Channel.
  2. Set Source ID same as the uv index which the map is using.
  3. Set Target ID to bake map into.
    As label says that channel 0 is vettex color channel in max.

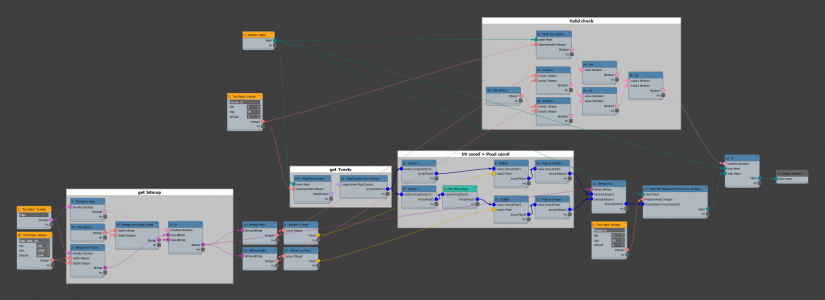
If you wander what the graph looks like, this is the graph. The core portion is smaller. But, error checking made graph a little bit bigger.

3dsMax 2023 Retopology 1.2

3dsMax 2023 includes the updated Retopology modifier. Retopology modifier is an automatic retopology solution that was introduced in 2021.3. It is based on a Autodesk’s proprietary tech called Reform.

If you are new to this modifier here are some links you can read.
Retopology Gallery     Tutorial Video Collection     Quick Start 1     Quick Start 2

Preprocess/Remesh

One of the main update is “Preprocess Mesh” checkbox(On by default). If this option is on, Retopology modifier will preprocess/remesh to make a evenly triangulated mesh first before retopolizing the mesh.

Reform really love this preprocessed mesh which makes the retopology process really really faster. Especially, when you go from very high poly count to low count target. The  above bunny has almost 70k triangles. When I retopo to 5k without preprocessing. It took 34 seconds. With preprocess, it took only 4.7 second.

Second, because the preprocess smooth out small details(or noises), it produce a better edge flow as you can see from the following image. Of course, if you want to keep all the details as much as possible, you might want to turn off preprocess.

Another important benefits of the preprocess is that it actually allow to retopo a highly detailed mesh to a very low target. Reform tend to try to keep all the details as much as possible. Because of this, Reform sometimes just fail or give you a result that has a lot more poly than you wanted. Preprocess solves this issue.

Here are some examples of retopo with preprocess on. I have Ryzen 2700X. Both models were sliced half and reassembled with Symmetry modifier.

Left – 2.4 million poly        Center – 20ok poly / 77 seconds         Right – 24k poly / 20 seconds

730k poly        39602 poly / 25s       10282 polys / 9s       2978 polys / 7s        1003 polys / 6s

Data Propagation/Preservation

3dsMax mesh has more data than just vertex and faces such as UV, normal, smoothing group and material id. Now Retopology modifier keeps any of this data which you set as “Auto Edge” while preprocessing and processing. For example, if you turn on Auto Edge > UV Channel, it will create edges along the uv seams and re-project uv data to the new mesh.

I picked a Megascan asset and retopoed from high res model to 5000 poly target which is same as their LOD0 mesh. The left one is Retopoloigy modifier result. It took 26s with the default setting.

UV after/before retopo

But, Let’s talk a little but more about Auto Edge especially for uv seams as Auto Edge.

I have scanned model. The green line is th euv seams. Do you see all those tiny uv elements? If I turn on Auto Edge with UV Seams, Retopology modifier will try really hard to keep all of them, which means retopo will likely fail unless you set the target really really big. So, please check your UV if your retopo process fails with Auto Edge/UV seam.


To solve this issue, you will likely create a new uv with less elements and bake maps to the new uv. This is the result after I created new seam abd used BTT to transfer the texture to new uv. It took 104 seconds to retopo to 25000. I’ll have a new post dedicated to this process in the future.


Here is some images of retopolized Megascan assets. Most of them was just one click.

Output Mesh type

Now you can choose to output either Retopology mesh or Remeshed Mesh(Preprocessed mesh) to the stack.

As you can see, remeshed mesh has extremely simulation friendly topology. As of now, you can’t just get remeshed mesh. But, remesh process usually a few seconds. You can just press ESC when retopology process starts to get only remeshed mesh.

That’s it for today!

3dsMax 2023 Pipeline Integration v2

The pipeline integration which was introduced in 2022.3 has a small but very very important update in 3dsMax 2023,

%ADSK_3DSMAX_MAJOR_VERSION%  and %ADSK_3DSMAX_MINOR_VERSION%

  • %ADSK_3DSMAX_MAJOR_VERSION% – represents the major version of the 3ds Max (3dsmax.exe) process. For example “2023” for 3ds Max 2023
  •  %ADSK_3DSMAX_MINOR_VERSION% – represents the minor version of the 3ds Max (3dsmax.exe) process. For example “1” for 3ds Max 2023 Update1

In a not shell, you can set all pipeline integration folders per 3dsMax version and even for each PUs.

For example, this is my ADSK_3DSMAX_PLUGINS_ADDON_DIR setup.

When 3dsMax launches, it loads plugins from D:\PROJECT\_maxDefault\plugin_2023

One more example?

Setting ADSK_3DSMAX_STARTUPSCRIPT_ADDON_DIR as
\\server\3dsMax\%ADSK_3DSMAX_MAJOR_VERSION%.%ADSK_3DSMAX_MINOR_VERSION%\scripts\startup

will make your startup script path to be
\\server\3dsMax\2023.0\scripts\startup

When 3ds Max 2023 Update 2 is is installed, the path becomes
\\server\3dsMax\2023.2\scripts\startup

With this new edition, the following article need to be updated. You don’t have to use batch file or script anymore.

How to manage tools part 2 – Plugins (featuring new 3dsMax 2022.3 pipeline integration)

ADSK_3DSMAX_USERTOOLS_DIR

ADSK_3DSMAX_USERTOOLS_DIR allow you to set user settings folder,
The default location is C:\Users\[username]\Autodesk\3ds Max 2023\User Tools\

Why it is important? Because this is the folder where MCG goes.
This is the default MCG installation location.
C:\Users\[username]\Autodesk\3ds Max 2023\User Tools\Max Creation Graph\Packages

So, now I can set ADSK_3DSMAX_USERTOOLS_DIR as D:\PROJECT\_maxDefault\MCG and put all my mcg package file in D:\PROJECT\_maxDefault\MCG\Max Creation Graph\Packages.

After I set this up one time, I will not need to set MCG folder forever and ever. Update? re-install? new version? PR? I don’t need to do anything to get my MCG back.

And more…

ADSK_3DSMAX_AUTOBACKUP_DIR – Defines the path used by Autobackup to save files.

ADSK_3DSMAX_ROOT – An environment variable defined by the 3ds Max process that contains the directory from which the current 3dsmax.exe program is running, regardless of where 3ds Max is installed. Only defined when auto-tokenization is enabled.

ADSK_3DSMAX_ENVVAR_TOKEN_SUPPORT – Enables auto-tokenization of 3ds Max installation files, similar to the -envartoken command line switch.

3dsMax 2023 Highlights

3dsMax 2023 – Snap Working Pivot
Quick way to place and align working pivot. Just place the mouse near where you want to have a pivot and press CTRL+ ~ to see the magic happens! https://help.autodesk.com/view/3DSMAX/2023/ENU/?guid=GUID-5516D160-4031-4CF6-A655-A9D70752F890

3dsMax 2023 – Retopology 1.2
Pre-processing == faster and better retopo result.  Data propagation == Now it preserves UV and more! Preprocessed mesh(Remeshed mesh) is super sim friendly. https://help.autodesk.com/view/3DSMAX/2023/ENU/?guid=GUID-65A60AD3-CDB1-48F2-A103-C7168FD56EFC

3dsMax 2023 – glTF Material and Exporter
Not just an exporter. A dedicated glTF Material and accurate viewport representation. https://help.autodesk.com/view/3DSMAX/2023/ENU/?guid=GUID-EFBB037D-C4EB-42D2-9CE1-30FCAD483C31

3dsMax 2023 – Autobackup Improvement
Your voice has been heard. A lot of work has been done to make autobackup experience smoother. New Autobackup Toolbar – Enable/Disable button, Autobackup Time Interval progress indicator, Reset Timer. Minimize user activity interruption – Timer only progresses when the scene is changed. Timer will pause when users are interacting with max. Compress on Autobackup, Prepend Scene Name , Better handling of simultaneous Max sessions. https://help.autodesk.com/view/3DSMAX/2023/ENU/?guid=GUID-0378F364-72C4-4C8D-9E05-B918656E1761

3dsMax 2023 – Compress Save Performance
Continuing file save performance improvement of 3dsMax 2022.Save with compression performance has been greatly improved(500% to 2500% in my test) with New zstandard compression engine. Now saving with compression on will only take 10-15% longer than with off in my test case. Before this improvement, turning on compression on used to be 400-600% slower than off. In many cases, now saving with compression on in 3dsMax 2023 is even faster than compression off in an older version.

3dsMax 2023 – Pipeline integration v2
Now you can control pipeline integration env var per 3dsMax version! Also now autoback and MCG folder can be set by env var.%ADSK_3DSMAX_MAJOR_VERSION%, %ADSK_3DSMAX_MINOR_VERSION%, ADSK_3DSMAX_ENVVAR_TOKEN_SUPPORT,ADSK_3DSMAX_AUTOBACKUP_DIR,ADSK_3DSMAX_ROOT, ADSK_3DSMAX_USERTOOLS_DIR

3dsMax 2023 – Occlude selection mode improvement
Further optimizations have been made to the Occlude Selected functionality. The selection performance and accuracy has been greatly improved.

3dsMax 2023 – Physical Material Autodesk Standard Surface Compliant mode
Thin Film and Sheen support.  https://help.autodesk.com/view/3DSMAX/2023/ENU/?guid=GUID-A9CF77A3-48EF-4103-9DCB-22AD856D0BD0

3dsMax 2023 – FBX Maya Interop
Improved FBX so now it supports the physical material and you can send to/from Maya without much loss of data.

3dsMax 2023 – Render/Viewport Instancing API
This new API provides a consistent way for third party developers to provide instancing data for a Renderer and viewport.

3dsMax 2023 – Volume Display API
This new API simplifies displaying a volume in the viewport when a plugin provides the voxels data, positions and display options. MaxToA Volume object in MAXtoA 5.2.0 is using this API.

3dsMax tips #7 – Use startup script instead of maxstart.max file

I know a lot of 3dsMax users uses maxstart.max to set their default working environment. While that is certainly a convenient method. I haven’t used that for more than 10 years. Here is why.

  • It replaces everything. It is a load/save. I can’t pick and choose what to set. For example, all the renderer settings are saved and loaded. If the renderer developer changes some default value for their new feature. Your maxstart.max from the older version will override all that settings.
  • It is hard to know what you actually have set. There is no trace whatsoever what you have changed. If someone accidently changed settings and overwrote the file, there is no way to know until someone has an issue. This is actually the most important reason for me to switch to startup script.
  • Obviously there are settings that aren’t stored in a max file.
  • It is rare and probably ok now. But, back in the day, there was a bug that maxstart.max was loaded AFTER I already loaded a max file.

This is a sample startup template that you can use as a starter point. This include the #script and #userscripts folder setup that I posted in another post. Now I just throw this script in my “ADSK_3DSMAX_STARTUPSCRIPTS_ADDON_DIR” folder and good to go forever!

setdir #scripts @"D:\PROJECT\_maxDefault\scripts\"
setdir #userscripts @"D:\PROJECT\_maxDefault\scripts\"

-- system unit
DisplayType = #Generic
units.SystemType = #Inches
units.SystemScale = 1

-- animation
frameRate = 24
animationRange = interval 1 72
maxOps.autoKeyDefaultKeyOn = true
maxOps.autoKeyDefaultKeyTime = 1

-- gamma
IDisplayGamma.colorCorrectionMode = #gamma
IDisplayGamma.affectMEdit = true
IDisplayGamma.affectColorPickers = true
displayGamma = 2.2
fileInGamma = 2.2
fileOutGamma  = 2.2

-- renderer
if vray == undefined then (
    renderers.current = Arnold()
)
else(
    renderers.current = VRay()
)

-- autoback
autosave.Enable = true
autosave.NumberOfFiles  = 20
autosave.Interval = 10.0

-- UI
-- hide viewcube
ViewCubeOps.Visibility = false
-- hide Sign In
qtmax = python.import "qtmax"
(((qtmax.GetQMaxMainWindow()).menuBar()).children() as array)[2].close()

-- Viewport
-- Set all viewport background as solid
actionMan.executeAction 0 "618"

callbacks.removeScripts id:#startup4reset
callbacks.addScript #systemPostReset filename:(getSourceFileName()) id:#startup4reset
callbacks.removeScripts id:#startup4new
callbacks.addScript #systemPostNew filename:(getSourceFileName()) id:#startup4new

– To prevent “Do you want to savr?” dialog after fresh start
setSaveRequired false
    
format "startup script is loaded\n"

Try renderStacks. It will change your Max life!

How to manage tools part 2 – Plugins (featuring new 3dsMax 2022.3 pipeline integration)

This is the second part of how to manage tools series, Plugins. I’m sure most 3dsMax users know about the plugin,ini file. When 3dsMax starts, it looks for the following 2 plugin,ini files.

  1. C:\Program Files\Autodesk\3ds Max 2022\en-US\plugin.ini
  2. C:\Users\[username]\AppData\Local\Autodesk\3dsMax\2022 – 64bit\ENU\Plugin.UserSettings.ini

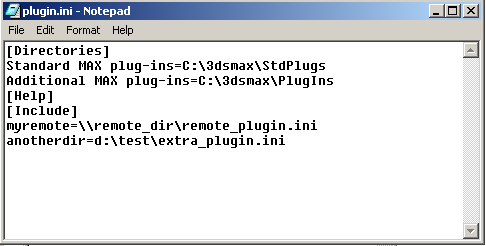
This is a usual ini file with sections and keys and values like this.

[Directories]
Additional MAX plug-ins=C:\Program Files\Autodesk\3ds Max 2022\PlugIns\
[Help]

You can edit one of the above files with a text editor to add your own plugins folder or use Customize menu > Customize Users and System Paths dialog > 3rd Party Plug-Ins tab.

Usually a commercial plugin would have an installer to take care this for users. Then, users would make a plugins folder and throw all free plugin there and add the path to plugin.ini. Or, some still just throw everything in C:\Program Files\Autodesk\3ds Max 2022\Plugins folder. If your studio has TDs or IT department, they probably already have their own way to do it. Also you can specify a plugin,ini to use via command line option -p while launching 3dsMax

But, there are also 2 not-so-well-known ways of managing plugins to know.

  1. [Include] section in plugin.ini
    This allows to nest plugin ini like this image.
    https://help.autodesk.com/cloudhelp/2022/ENU/3DSMax-Customizing/images/GUID-0E41A3C7-B6B5-4CA3-9A36-6208D8F2799C.png
    This is great for central management and exactly the same principle as my “seed startup script”. You just deploy a caller and do the real job in another file. This is what I have been using.
  2. Autodesk Application Plug-in Package
    This is the new official way to distribute any plugins and a great way to de-couple plugin files from 3dsMax installations. VRay already has moved to this method and hopefully more commercial plugins adapt to this format. But, you can also utilize this for your own plugin management. It is a little bit involved. So, it might not be great for individual users or small studios. But, if you have TDs or IT department, it is worth checking.

ADSK_3DSMAX_PLUGINS_ADDON_DIR

The new pipeline integration also supports custom plugin and application package folder. You can use these two following env vars to control plugin loading location. Again this means I don’t need the seed .ini anymore!

  • ADSK_3DSMAX_PLUGINS_ADDON_DIR
  • ADSK_APPLICATION_PLUGINS

But, one thing you need to understand is that the current pipeline integration in 3dsMax 2022.3 is mainly aimed for using a batch file or Python script. Because of that, it doesn’t have a way to specify the 3dsMax version. That means all 3dsMax versions will pick up the exact same folder when you have multiple versions installed. This can cause problems if any folder you set has version specific data likek plugins folder. As you know, often plugins are not compatible between versions, if you set “ADSK_3DSMAX_PLUGINS_ADDON_DIR” as system env var, all the 3dsMax versions will try to to pick up plugins from the same folder. That wouldn’t work.

With 3dsMax 2023 updates, the above issue has been addressed. Please check the new post here.

Therefore, you need to set env var only for a session instead of the whole system. You can do this by using a batch file or Python script to run 3dsMax. If you have a Python launcher, you probably wouldn’t need a tutorial from me. Here is a sample batch file for “artists”. A good thing about this sample is that it doesn’t leave the command shell after 3dsMax started.

SET ADSK_3DSMAX_PLUGINS_ADDON_DIR=D:\PROJECT\_maxDefault\plugin_free_2022
c:
cd "C:\Program Files\Autodesk\3ds Max 2022\"
start "" "C:\Program Files\Autodesk\3ds Max 2022\3dsmax.exe"

“SET” command is the command to set env var in a batch file.

As you can see, this allows you to define the combination of plugins dynamically while launching 3dsMax easily. Imagine you need different versions of VRay, ThinkingParticles per project. Before the pipeline integration, you would need to build a plugin.ini per project and load. Now, you can just add directories directly in the launcher script.

This is it for plugins! But, the potential of the pipeline integration doesn’t end here. WIth new env var controls and token support in various ini. You can actually install each PUs side by side now like 3dsMax 2022.1, 2022.2, 2022,3. You can even install 3dsMax in a network folder and load from there. Sure, you need to figure out how exactly execute this for your studio. But, the technical foundation is there. So, try it!

Do you want to improve your pipeline? renderStacks could be the start.


How to manage tools part 1 – Scripts (featuring new 3dsMax 2022.3 pipeline integration)

We, 3dsMax users, love 3rd party scripts and plugins. But, we don’t necessarily like the process of installing and managing those. Sometimes this is one of the reasons why we don’t even upgrade 3dsMax. In this post, I’ll show you how to decouple the installation of 3rd party scripts from 3dsMax for easier management. I will also show how the new pipeline integration feature in 3dsMax 2022.3 will make this task simpler. We will use the famous Soulburn script as an example.

First, we need to know how scripts are loaded when 3dsMax launches. Fortunately there is already very good documentation here. In a nutshell, 3dsMax executes startup scripts and macros scripts from certain locations while being launched. Users need to install scripts in those locations so they can be loaded properly.

Startup scripts

There are a few reasons why users would want to execute scripts automatically when 3dsMax starts. For example, If you use any scripted plugins such as the famous Paul’s PEN_Attribute_Holder, you probably want it to be loaded and ready to use just like C++ plugins. Another important use of startup script is setting working environments, defaults and system directories which we will utilize in this post. I also have a separate post about this subject here. Please check it out.

As you see in the above document, 3dsMax reads the startup script from the various places. But, the most commonly used folders are these two folders.

  • system startup scripts folder – C:\Program Files\Autodesk\3ds Max 2022\scripts\Startup
  • user startup scripts folder – C:\Users\[username]\AppData\Local\Autodesk\3dsMax\2022 – 64bit\ENU\scripts\startup

One of the important rules of 3dsMax tool management is you never touch the 3dsMax root folder. If you need to add/modify anything, you should add/modify files in the appdata folder which is usually called the “ENU” folder. C:\Users\[username]\AppData\Local\Autodesk\3dsMax\2022 – 64bit\ENU\

But, as you can see, using a user data folder brings a lot of challenges, especially for a team. So, I have been managing startup scripts using a seed startup script, [3dsMax root]/scripts/startup.ms. This script basically calls the real script like this.

FileIn @ "D:\PROJECT\_maxDefault\startup\mystartup.ms"

By using this seed script, I can update the startup script centrally without re-depolying again to all workstations. this is one of two files I allow an exception personally.

BUT! I don’t need this seed script anymore because of the new pipeline integration feature. This feature allows users to set various paths used by 3dsMax with Environment variables which means you can set paths from the outside of 3dsMax before it launches. Even though 3dsMax provides a great amount of control over every aspect of 3dsMax with Maxscript. The fundamental limitation of the script based approach is that everything happens after 3dsMax launched. The new pipeline integration removes this limitation. Also it allows you to control folders that never have been allowed to control before such as the appdata folder itself.

So, how can we use this feature? There are 2 ways to set environment variables in Windows.

  • The first one is setting in System Properties or using a group policy. As you can already see, IT dept. would love this central management.
  • The second way is using a batch file or Python to set env var only for the session. If your studio is using a launcher, they are already using this way.

For startup script, we can use the first method since scripts are usually compatible between 3dsMax versions and you can put a condition if there are any version specific things in it.

After I added “ADSK_3DSMAX_STARTUPSCRIPTS_ADDON_DIR” env var, my 3dsMax runs any scripts in this folder. I don’t need to add anything to 3dsMax root folder. I don’t need to worry about re-coying again this file after wiping out ENU folder to solve my 3dsMax issues. I don’t even need to do anything for any future version of 3dsMax. It is truly set it and forget it!

Setting custom system directories with startup script

Even though the new pipeline integration allows you to add “scripts” folders with “ADSK_3DSMAX_SCRIPTS_ADDON_DIR”. This folder actually doesn’t matter much because we never execute all scripts in these folders automatically. Also setting env var doesn’t actually change 3dsMax system directories, and most scripts are usually called other scripts or macroscript(We will discuss it later) using #scripts or #userScripts system directories to allow more flexible installation instead of hard-coded path. For example, this is a macroscript from the Soulburn script.

MacroScript blendedBoxMapMaker category:"SoulburnScripts" tooltip:"blendedBoxMapMaker" Icon:#("SoulburnScripts_blendedBoxMapMaker",1)
(
Include "$scripts/SoulburnScripts/scripts/blendedBoxMapMaker.ms"
on execute do blendedBoxMapMakerDefaults()
on Altexecute type do blendedBoxMapMakerUI()
)

As you can see, this action will try to find “/SoulburnScripts/scripts/blendedBoxMapMaker.ms” file under #scripts folder($scripts is a symbolic pathname for #scripts).

By default #scripts is set to C:\Program Files\Autodesk\3ds Max 2022\scripts and  #userScripts is set to C:\Users\ChangsooEun\AppData\Local\Autodesk\3dsMax\2022 – 64bit\ENU\scripts. 3rd party scripts are suppose to use #userScripts. This means that we have to install the Soulburn script files under C:\Program Files\Autodesk\3ds Max 2022\scripts unless we change the location.

The good news is that we can change any system directories using the “setdir” Maxscript command! This is the first two lines of my startup script. This allows me to install any 3rd party script under D:\PROJECT\_maxDefault\scripts\ instead of 3dsMax root or my user folder.

setdir #scripts @"D:\PROJECT\_maxDefault\scripts\"
setdir #userscripts @"D:\PROJECT\_maxDefault\scripts\"

TIP! As you can see from the 3dsMax system directories document, you can also set any project folders using “setdir” command. By default, they are set as a relative path to the current project folder. But, you can change those using “setdir“ command. For example, you can change autoback folder to “D:\3dsMax_Autoback” instead of in your Document folder.

setdir #autoback @"D:\3dsMax_Autoback"

Macroscripts

Macroscript is a script that defines “ActionItems” in 3dsMax. ActionItem is “that represents the action that can be assigned to Toolbars, Menus, QuadMenus and Keyboard Shortcuts using the Customize User Interface dialog”. Basically if you want to make an UI like a button or shortcut, you need a macroscript for the script. It also allows the script to show up in Global Search(X menu).

3dsMax executes the macroscripts in #userMacros and #macroScripts system directories by default when it starts. Now you may think we could change these folder to own custom folder like #scripts and #userscripts. BUT! We can’t do that for macroscript because 3dsMax and many 3rd parties actually use these folders. BTW, there is the new Autodesk Application Plug-in Package format which 3rd parties can completely separate their files from 3dsMax factory installation. If your favorite plugin doesn’t support this. Ask them!

Another problem of #userMacros folder is that it is used when user create macroscript by drag and drop. For example, if I type print “Hello, World” and drag and drop this line to a toolbar. 3dsMax makes “DragAndDrop-Macro1.mcr” under #userscripts folder. If you share this folder across many users, you will get macroscript from all your teammates.

Therefore, it is better to load the commonly shared macroscripts from an added folder using “ADSK_3DSMAX_MACROS_ADDON_DIR” env var.

If you are using 3dsMax without the pipeline integration, you have a few ways to do this.

  • Copy all .mcr files to #userMacros folder.
  • Just run all .mcr files with the “FileIn” function.
  • You can copy to the 3dsMax root folder. But, I wouldn’t recommend it.

Honestly none of the above options are good. This just shows how beneficial the new pipeline integration is.

Icons

This is the last piece of puzzle for 3rd party script management. Sometimes 3rd party scripts include icon files. We can use both startup script or env var for this. It doesn’t matter much. I choose to use “ADSK_3DSMAX_ICONS_ADDON_DIR”  env var.

If you are using older version of 3dsMax, I will just set #usericons folder in a startup script.

Let’s put together all the pieces for Soulburn script

I have set 3 environment variables.

  • ADSK_3DSMAX_STARTUPSCRIPTS_ADDON_DIR = D:\PROJECT\_maxDefault\startup
  • ADSK_3DSMAX_MACROS_ADDON_DIR = D:\PROJECT\_maxDefault\usermacros
  • ADSK_3DSMAX_ICONS_ADDON_DIR = D:\PROJECT\_maxDefault\usericons

I have set 2 system directories in a startup script in D:\PROJECT\_maxDefault\startup

folder(ADSK_3DSMAX_STARTUPSCRIPTS_ADDON_DIR).

  • setdir #scripts @”D:\PROJECT\_maxDefault\scripts\”
  • setdir #userscripts @”D:\PROJECT\_maxDefault\scripts\”

If you download the SoulburnScriptsPack_3dsMax_v112_R2013toR2022.zip file, it has 3 folders.

  • Copy all files in “MacroScripts” folder to D:\PROJECT\_maxDefault\usermacros (ADSK_3DSMAX_MACROS_ADDON_DIR)
  • Copy “SoulburnScripts” folder in “scripts” folder to D:\PROJECT\_maxDefault\scripts\ (#scripts)
  • Copy all files in “\UI_ln\IconsDark” or “\UI_ln\Icons” folder to D:\PROJECT\_maxDefault\usericons (ADSK_3DSMAX_ICONS_ADDON_DIR).
    You can’t use “Icons” or “IconsDark” folder in #usericons folder. .bmp icons are only supported for backward compatibility since 3dsMax 2017. If you want to have a different set of icons per theme, you need to use the new .png icon naming convention and “iconname:” argument. The details are here.

Now I have the Soulburn script in my 3dsMax 2021, 2022 and will have them in the whatever future version of 3dsMax without any more steps. I can nuke the ENU folder anytime without worrying about re-installing these scripts.

This also works with any 3rd party scripts.

  • If they are .mcr files, put in the ADSK_3DSMAX_MACROS_ADDON_DIR folder.
  • If they are .ms files, put in the #scripts folder.
  • If they have icons, put in the ADSK_3DSMAX_ICONS_ADDON_DIR folder.

To help your understanding, I’ll give one more example, another famous script, DebrisMaker2.

In this case, the downloaded file is .mzp file. This is a self-installation zip file. You can actually unzip with any zip uncompressor such as 7-zip.

If you unzip, it has 3 folders under “DebrisMaker2.0” folder. Guess where would you need to copy the files?

  • MacroScripts -> D:\PROJECT\_maxDefault\usermacros
  • Scripts -> D:\PROJECT\_maxDefault\scripts\
  • UI_ln\Icons -> D:\PROJECT\_maxDefault\usericons

Again, now you will have DebrisMaker2 in any 3dsMax 2021 and above!

Before I finish this post. Someone might wonders why I said “3dsMax 2021 and above”. Isn’t it a new feature of 3dsMax 2022.3? Yes, right. It is officially added to 3dsMax 2022.3 with more complete support. But, 3dsMax 2021.3 actually have had some env var support for Autodesk internal use. At least, the 3 env var we have utilized work for 2021.3, too. I let you know because setting env var as system env var will affect 2021.3. I don’t want you to be confused or surprised.

If you want to use the pipeline integration for only certain version of 3dsMax, you have to use batch file of Python script which I will cover in the next post.

Happy rendering with renderStacks 2!

3dsMax 2022.3 Highlights

3dsMax 2022.3 has been released with new/improved features and fixes. Here are some highlights. Please check Unofficial 3dsMax What’s New for all 3dsMax updates in detail!

Advanced Wood OSL shader

As an OSL shader, UVW can be modified with external shaders, and a random seed can be driven to have per-object variations.It is also fully supported in a ‘High Quality’ viewport and will render exactly the same on any OSL capable renderer.

Per-Viewport Filtering

You can hide/unhide objects by category or by class per each viewport. Each viewport’s settings can be set independently from one another, giving you the flexibility to display what you need in a given viewport. Per-Viewport Filtering does not affect the scene or renderer. User can copy/paste filter setting between viewport. Shift+K to toggle on and off the viewport filter Full MXS exposure with ViewportFilter interface. Per view settings/preference dialog is modeless and dockable now.

Pipeline Integration

You can control most 3dsMax path with environment variables. This reduce the need of extra file deployment. It also allow you have more flexible setup like different plugin configuration for same version easily.Support for Environment Variable Tokens in Paths found in Configuration Files.

Occlude mode – marquee(box)/paint selection support

High-polling rate mouse fix

Save Performance Improvement 2

We got the second round of file save performance improvement.,This is the sheet I made during beta testing. As you can see, 2022.3 saving is 20-40% faster on top of 2022.2. The % number in the table is how much it is improved. So, 100% means 2 times faster. 200% means 3 times faster.You can see some of big files are saving more than 4 times faster than 3dsMax 2016.

Autodesk Official Site https://makeanything.autodesk.com/3dsmax?fbclid=IwAR1Nlc-oTE0dm4n9yYYGgHZnF3V-BPC92Hcrdf_aCkBVT_GwAeVqKIy-z2k
3dsMax 2022 What’s New https://help.autodesk.com/view/3DSMAX/2022/ENU/?guid=GUID-E2B9038C-3041-44CC-A957-AB2E5EEC631E
3dsMax 2022
Release Notes https://help.autodesk.com/view/3DSMAX/2022/ENU/?guid=3dsMax_ReleaseNotes_3dsmax_2022_3_releasenotes_html
Maxscript What’s New https://help.autodesk.com/view/MAXDEV/2022/ENU/?guid=What-s-New-in-MAXScript-in-3ds

Make your rendering life awesome with renderStacks 2!